

In today's digital age, the importance of protecting exposed web services cannot be overstated. While many applications offer their own authentication mechanisms, they are not immune to hacking attacks. The custom authentication may be bypassed or may be vulnerable to exploits. On the other hand, some apps may not even support authentication at all, leaving them vulnerable to unauthorized access and data breaches.
This is where Authentik, as an Identity Provider (IdP), steps in. Authentik provides an additional layer of security by acting as an authentication wall and access control mechanism for web services. It offers compatibility with various authentication protocols such as OpenID Connect, SAML, LDAP, and even Social Logins with platforms like Github, Facebook, Discord, Microsoft Azure AD and many more.
In this blog post, we will delve into how Authentik can be a powerful tool in fortifying your web services. We will setup an Authentik Docker container and configure it to use an already existing Traefik reverse proxy. Additionally or optionally, we will also configure Authentik to use Microsoft Azure AD (Entra) as social login for user onboarding and authentication.
forward-auth protection and not setting up Single-Sign-On (SSO).Spawning Authentik
To get started with Authentik, we will guide you through the process of setting up an Authentik Docker container via Docker Compose. Docker containers offer a streamlined way to deploy and manage applications, making it easier to integrate Authentik into your existing infrastructure.
Note that we assume an already existing Traefik reverse proxy. If you do not have one yet, may check out the examples at https://github.com/Haxxnet/Compose-Examples/tree/main/examples/traefik. Otherwise, if you already run a different reverse proxy, please consult the official Authentik documentation regarding your setup. You may be able to reuse some information of this blog post though nonetheless.
Docker Compose
To spawn an Authentik Docker service, you can use the below docker-compose.yml file (also availabe here). You can either define secrets directly in the compose file below or use a separate .env file. A separate one is the recommended approach.
The .env file must contain the following variables at least:
# define the version to use
AUTHENTIK_VERSION=2026.5

# database credentials
PG_USER=authentik
PG_DB=authentik

# generate via pwgen -s 40 1
PG_PASS=7jFjT4pUyf0YOlQ84LrO6JdLVWpzKEGiEMtdVwBE

# generate via pwgen -s 50 1
AUTHENTIK_SECRET_KEY=YZRzXecsKQVEJ3Lr5uoKRGXZkETsYjUDT1qtQ28JjzWzDYvcoG
.env
The compose file looks the following:
services:
postgresql:
image: docker.io/library/postgres:16-alpine
container_name: authentik-psql
restart: unless-stopped
healthcheck:
test: ["CMD-SHELL", "pg_isready -d $${POSTGRES_DB} -U $${POSTGRES_USER}"]
start_period: 20s
interval: 30s
retries: 5
timeout: 5s
volumes:
- ${DOCKER_VOLUME_STORAGE:-/mnt/docker-volumes}/authentik/psql:/var/lib/postgresql/data
environment:
POSTGRES_PASSWORD: ${PG_PASS:-authentik}
POSTGRES_USER: ${PG_USER:-authentik}
POSTGRES_DB: ${PG_DB:-authentik}
env_file:
- .env
networks:
- authentik-internal
redis:
image: docker.io/library/redis:alpine
container_name: authentik-redis
command: --save 60 1 --loglevel warning
restart: unless-stopped
healthcheck:
test: ["CMD-SHELL", "redis-cli ping | grep PONG"]
start_period: 20s
interval: 30s
retries: 5
timeout: 3s
volumes:
- ${DOCKER_VOLUME_STORAGE:-/mnt/docker-volumes}/authentik/redis:/data
networks:
- authentik-internal
authentik-proxy:
image: ghcr.io/goauthentik/server:${AUTHENTIK_VERSION:-2026.5}
container_name: authentik
restart: unless-stopped
command: server
environment:
AUTHENTIK_REDIS__HOST: redis
AUTHENTIK_POSTGRESQL__HOST: postgresql
AUTHENTIK_POSTGRESQL__USER: ${PG_USER:-authentik}
AUTHENTIK_POSTGRESQL__NAME: ${PG_DB:-authentik}
AUTHENTIK_POSTGRESQL__PASSWORD: ${PG_PASS:-authentik}
AUTHENTIK_SECRET_KEY: ${AUTHENTIK_SECRET_KEY:-authentiksupersecretkey}
volumes:
- ${DOCKER_VOLUME_STORAGE:-/mnt/docker-volumes}/authentik/media:/media
- ${DOCKER_VOLUME_STORAGE:-/mnt/docker-volumes}/authentik/custom-templates:/templates
expose:
- 9000
- 9443
env_file:
- .env
depends_on:
- postgresql
- redis
networks:
- proxy
- authentik-internal
labels:
- traefik.enable=true
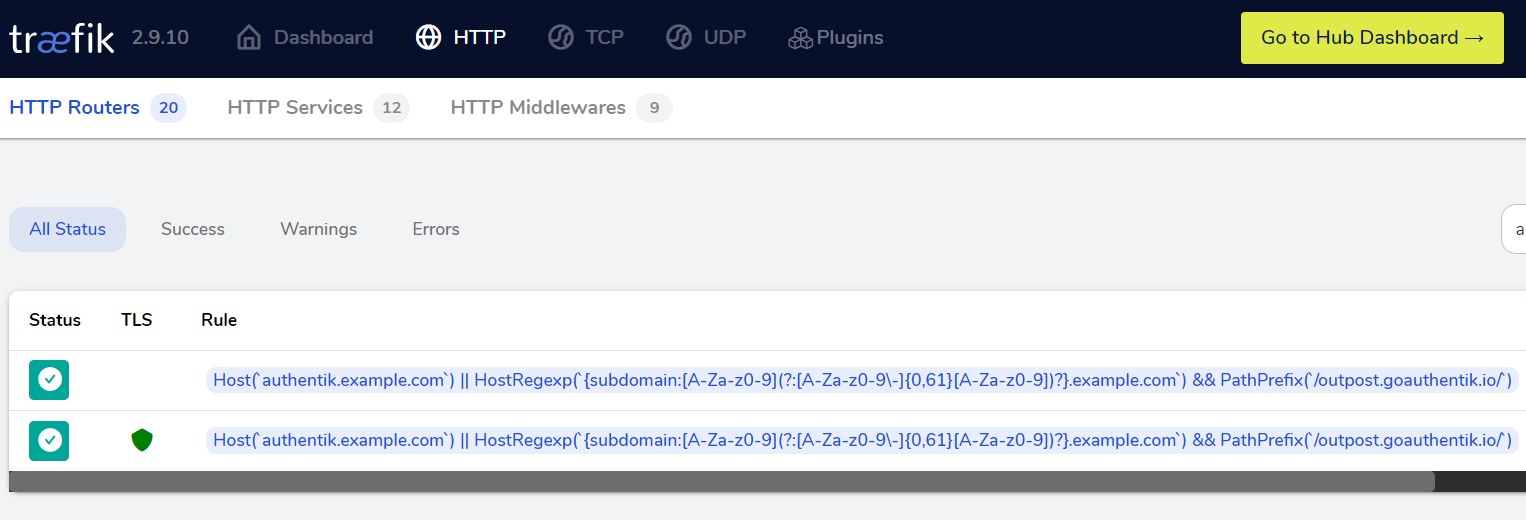
- traefik.http.routers.authentik.rule=Host(`authentik.example.com`) || HostRegexp(`{subdomain:[A-Za-z0-9](?:[A-Za-z0-9\-]{0,61}[A-Za-z0-9])?}.example.com`) && PathPrefix(`/outpost.goauthentik.io/`)
- traefik.http.services.authentik.loadbalancer.server.port=9000
- traefik.docker.network=proxy
- traefik.http.middlewares.authentik.forwardauth.address=http://authentik-proxy:9000/outpost.goauthentik.io/auth/traefik
- traefik.http.middlewares.authentik.forwardauth.trustForwardHeader=true
- traefik.http.middlewares.authentik.forwardauth.authResponseHeaders=X-authentik-username,X-authentik-groups,X-authentik-email,X-authentik-name,X-authentik-uid,X-authentik-jwt,X-authentik-meta-jwks,X-authentik-meta-outpost,X-authentik-meta-provider,X-authentik-meta-app,X-authentik-meta-version
worker:
image: ghcr.io/goauthentik/server:${AUTHENTIK_VERSION:-2026.5}
container_name: authentik-worker
restart: unless-stopped
command: worker
user: root
environment:
AUTHENTIK_REDIS__HOST: redis
AUTHENTIK_POSTGRESQL__HOST: postgresql
AUTHENTIK_POSTGRESQL__USER: ${PG_USER:-authentik}
AUTHENTIK_POSTGRESQL__NAME: ${PG_DB:-authentik}
AUTHENTIK_POSTGRESQL__PASSWORD: ${PG_PASS:-authentik}
AUTHENTIK_SECRET_KEY: ${AUTHENTIK_SECRET_KEY:-authentiksupersecretkey}
volumes:
- ${DOCKER_VOLUME_STORAGE:-/mnt/docker-volumes}/authentik/certs:/certs
- ${DOCKER_VOLUME_STORAGE:-/mnt/docker-volumes}/authentik/media:/media
- ${DOCKER_VOLUME_STORAGE:-/mnt/docker-volumes}/authentik/custom-templates:/templates
env_file:
- .env
depends_on:
- postgresql
- redis
networks:
- proxy
- authentik-internal
networks:
proxy:
external: true
authentik-internal:
internal: truedocker-compose.yml
Docker Networks
As the above compose file uses two Docker networks, you likely have to create those first before spawning up the compose stack. Also ensure to join your Traefik reverse proxy into the proxy network.
Traefik as reverse proxy will solely communicate with the Authentik server service. Additionally, the worker service needs an external Docker network like
proxy if a Social Login auth like Azure/Entra will be configured.Follow these steps to create the networks:
# create revelant docker networks
docker network create proxy

# join traefik container to the proxy network
# alternatively, directly define it in traefik's compose file for persistence
docker network connect proxy traefik
creating the relevant docker networks
Afterwards, it should be a matter of:
docker compose upspawning the Authentik Docker stack
Authentik Middleware
Now that we have Authentik up and running, we can adjust our proxy services to use Authentik as middleware for authentication.
If you are firm with Traefik, you will already know that most configuration settings for proxy services are defined via Traefik labels. For example, directly in your relevant Docker Compose file.
For this blog post, we will use Traefik's whoami container as an example:
services:

  whoami:
    image: traefik/whoami
    networks:
      - proxy
    labels:
      - traefik.enable=true
      - traefik.http.routers.whoami.rule=Host(`whoami.example.com`)
      - traefik.http.services.whoami.loadbalancer.server.port=80
      - traefik.docker.network=proxy
      - traefik.http.routers.whoami.middlewares=authentik@docker

networks:
  proxy:
    external: true
docker-compose.yml
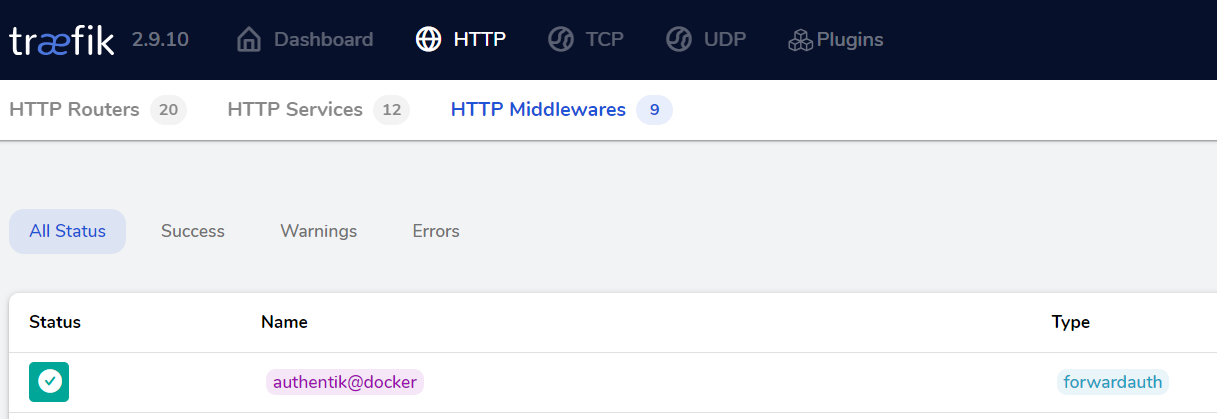
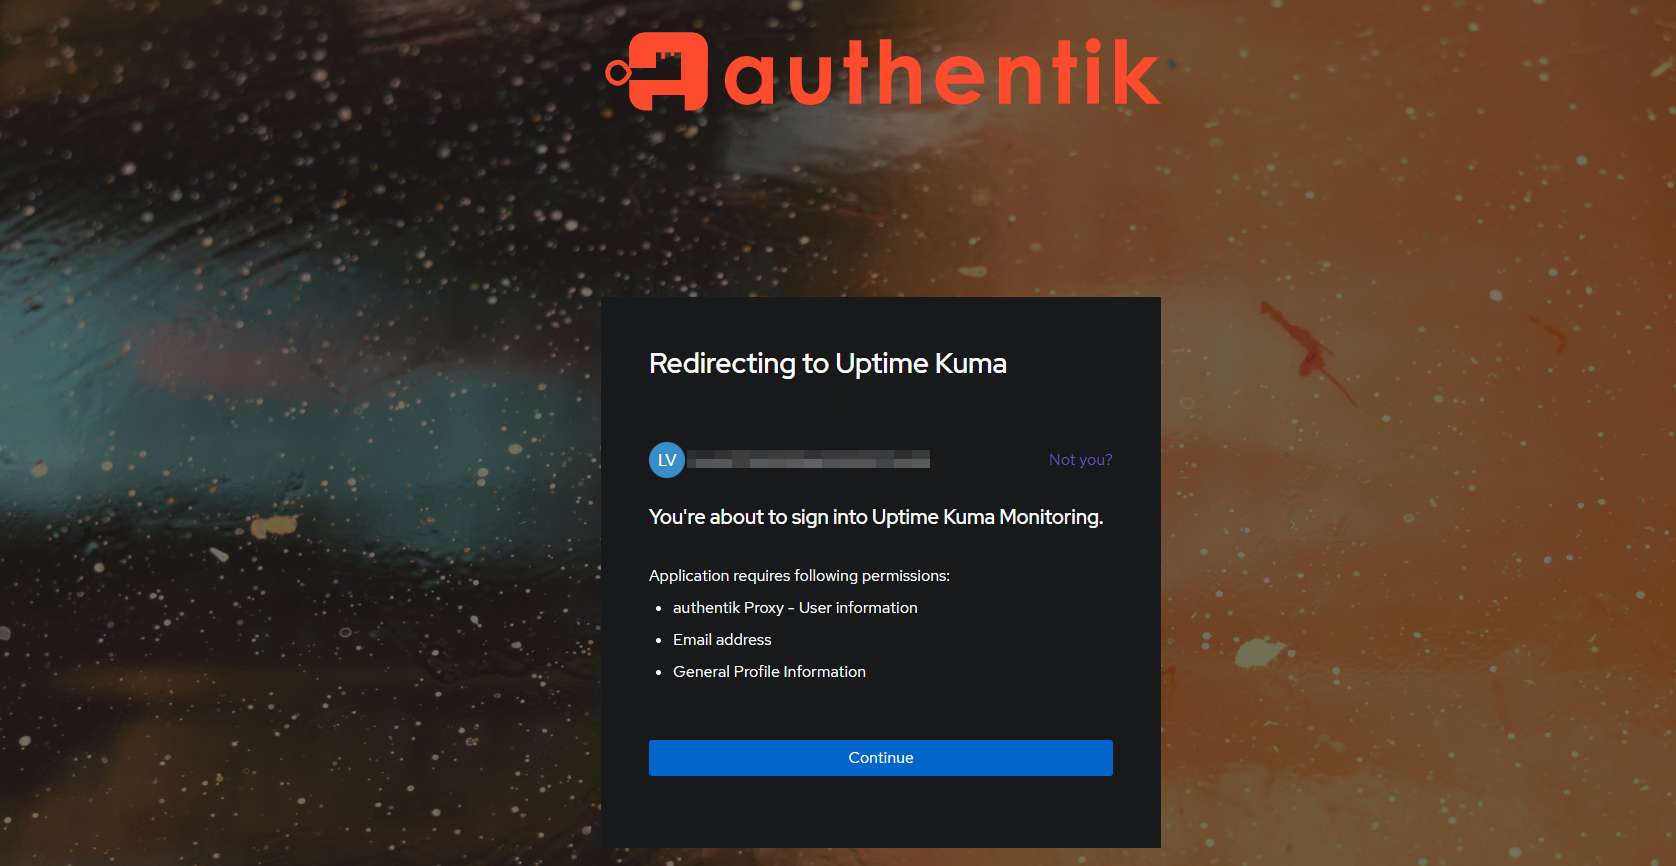
As can be seen in the above compose example, the only thing we have to define in our proxy service, in order to use Authentik, is the authentik@docker middleware via Traefik labels. That's it, your application will then be proxied over Authentik, which handles authentication as well as access control.
If your service supports it, you may be able to configure Authentik as SSO provider (e.g. OAuth2/OIDC). Portainer for example supports this. May read this blog post.
However, as we have not yet configured Authentik, authentication will fail and not yet work. We have to create a user account, define an authentication provider as well as an application for the whoami container in Authentik first.
Let's go ahead.
Configuring Authentik
After spawning up the Authentik container, your Traefik reverse proxy should automatically detect the new container via the Docker provider. Therefore, the Authentik web application should be available at your defined hostname in the Traefik labels.
Creating a local admin user
Browsing the Authentik HTTP URL directly won't work yet. You have to browse an initialization URL and configure an admin user first.
Go ahead and browse: https://authentik.yourdomain.com/if/flow/initial-setup/
Follow the instructions and create your admin user. Afterwards, login with the created account credentials. You will be presented with the Authentik admin dashboard, asking you to create a new application.
Setting up Providers
In order to use Authentik, we have to setup providers as well as applications. For each of your proxy services, you have to setup an individual provider and of course the individual application, which uses the provider.
For this blog post, we will keep using the above whoami container as an example.
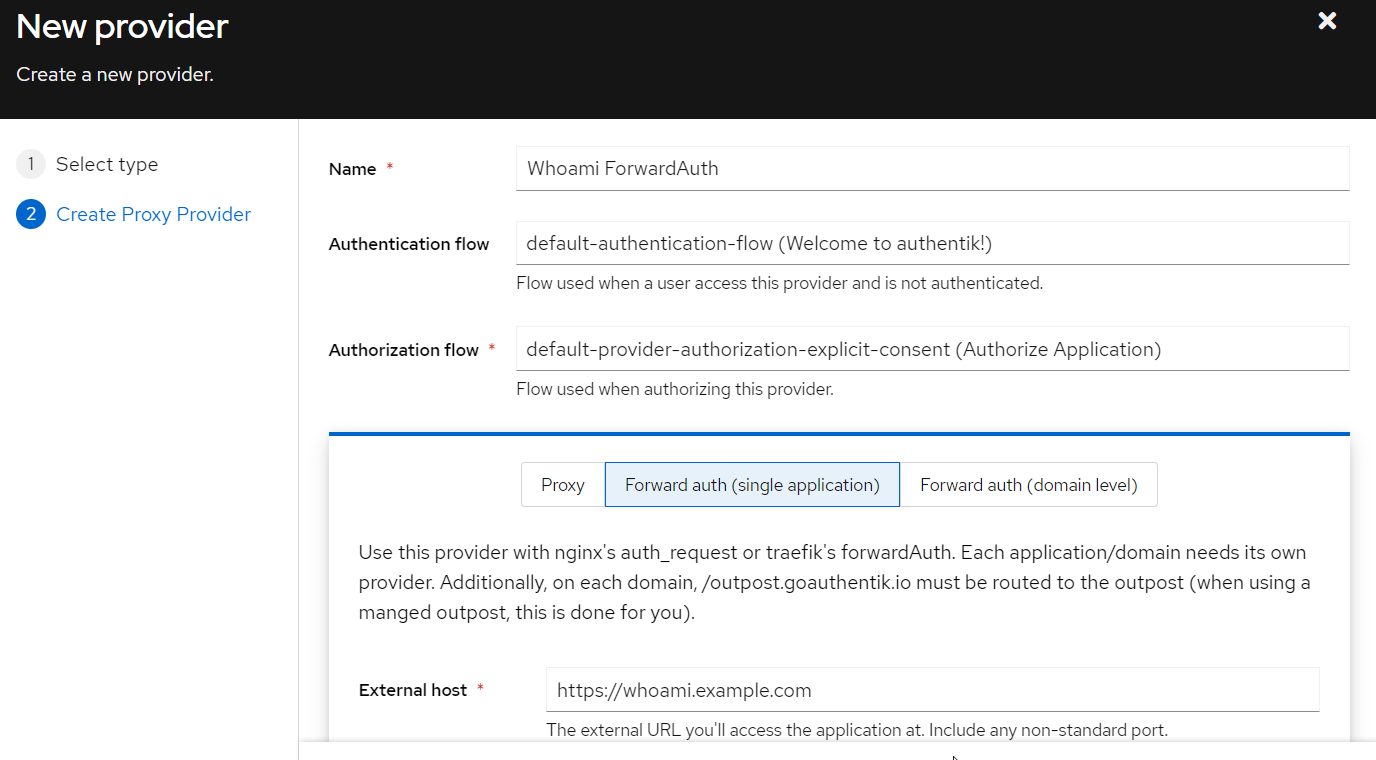
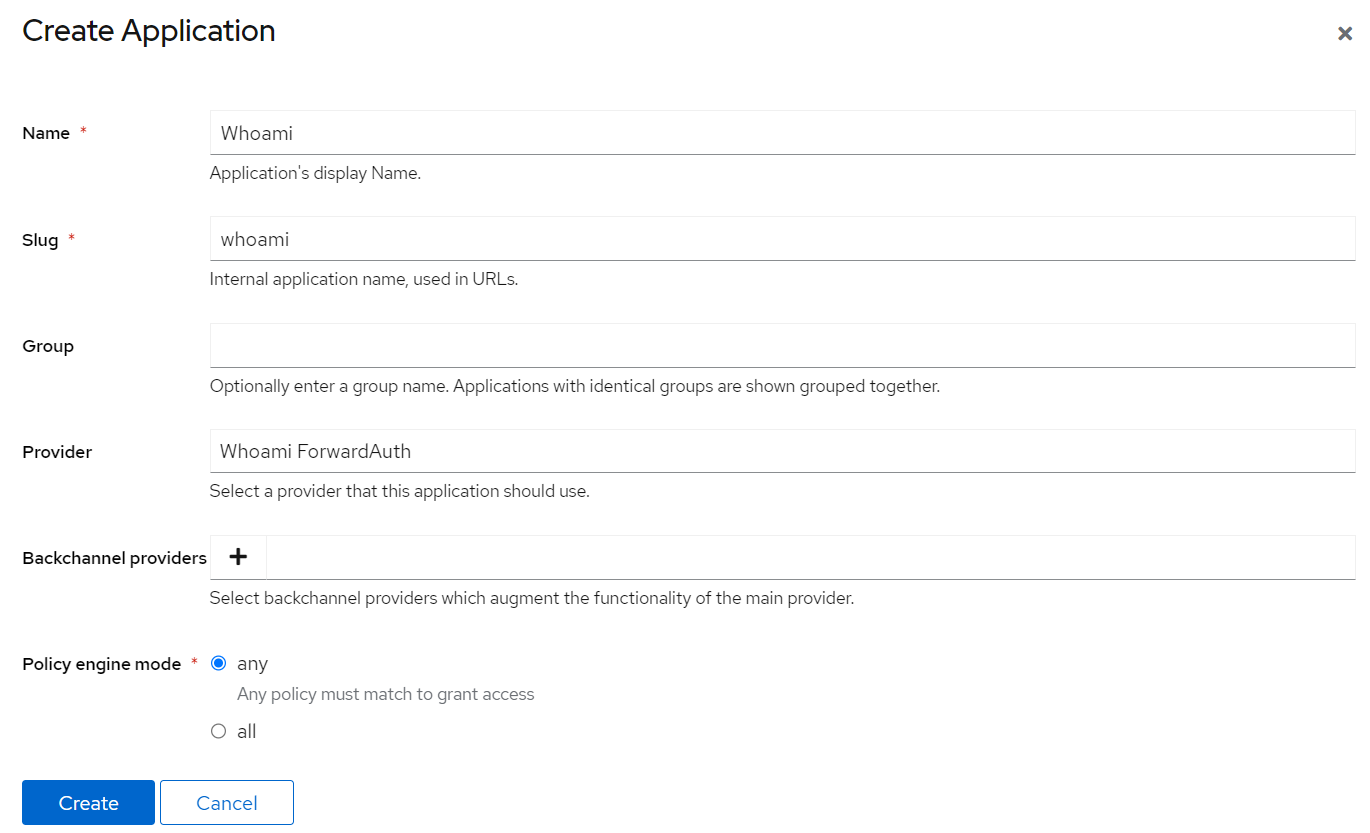
- Log into Authentik as admin and visit the
admin interface - Browse to
Applications > Providers - Create a new provider via the button
Create - Select
Proxy Providerand hitNext - Define a name e.g.
Whoami ForwardAuth - Choose an Authentication and Authorization flow. I recommend the
explicitones for the beginning. Explicit ones will show an additional web page after authentication to users, stating to which service they will be redirected. The other option will just redirect the user to the service without an additional info page. - Choose
Forward auth (single endpoint) - Define the subdomain of your proxy service. Here, it would be
https://whoami.example.com - Finish the provider setup by clicking
Finish
Setting up Applications
After creating our first provider, we now have to create our application. Remember, this is a 1:1 relationship. For each proxy service, we need one provider and one application.
For this blog post, we will keep using the above whoami container as an example.
- Log into Authentik as admin and visit the
admin interface - Browse to
Applications > Applications - Create a new provider via the button
Create - Define a name e.g.
Whoami - Select the previously created provider
Whoami ForwardAuth - Optionally upload an icon and change some settings under
UI Settings - Finish the application setup by clicking
Finish
Setting up Outposts
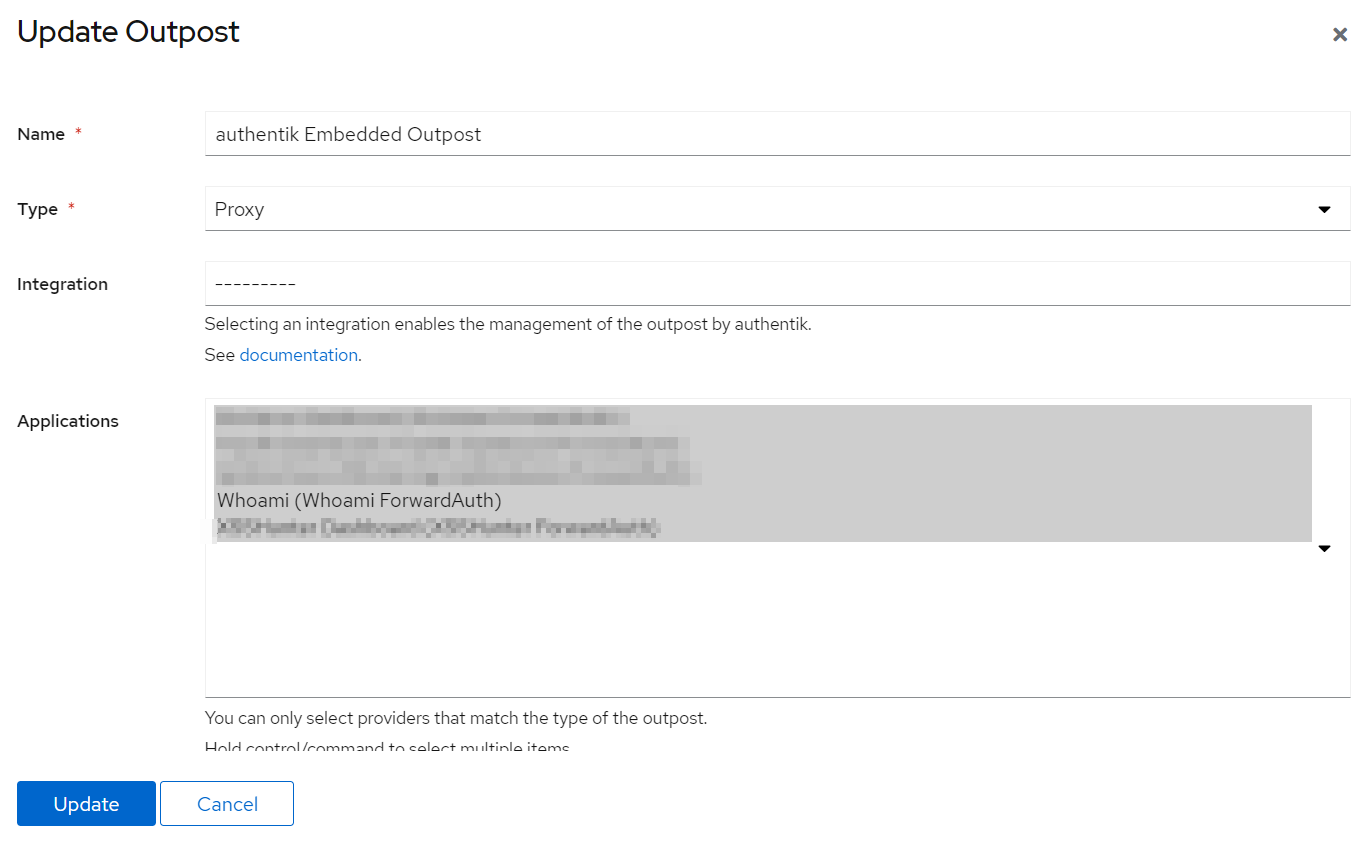
After setting up a forward-auth provider as well as an application, we have to onboard our application in the Authentik outposts.
- Log into Authentik as admin and visit the
admin interface - Browse to
Applications > Outpots - Select the default outpost and the action
edit - At
Applicationsselect all previously created applications. You can multi-select by holding SHIFT on your keyboard. The UI has changed in newer versions of Authentik and is now more intuitive to use. - At
Configuration, ensure that the keyauthentik_hostis provisioned to your FQDN URL of your Authentik instance. - Finish the outpots setup by clicking
Update

authentik_host FQDN URLSetting up Azure AD
One of the standout features of Authentik is its ability to integrate with external providers like Github, Facebook, Discord, Azure AD and many more as so-called Social Logins. For this blog post, we will focus on Azure AD.
 Contributors to Wikimedia projects
Directoy > Users.A social login integration like Azure AD enables you to onboard your Azure AD users into Authentik automatically. As soon as a successful authentication occurs (Authentik <> OAuth Azure AD), the user will be created locally in Authentik with the user information obtained from Microsoft Azure. You are freed from creating your employees manually, yeah!
Create Azure App
In order to setup Azure AD as social login, follow these steps:
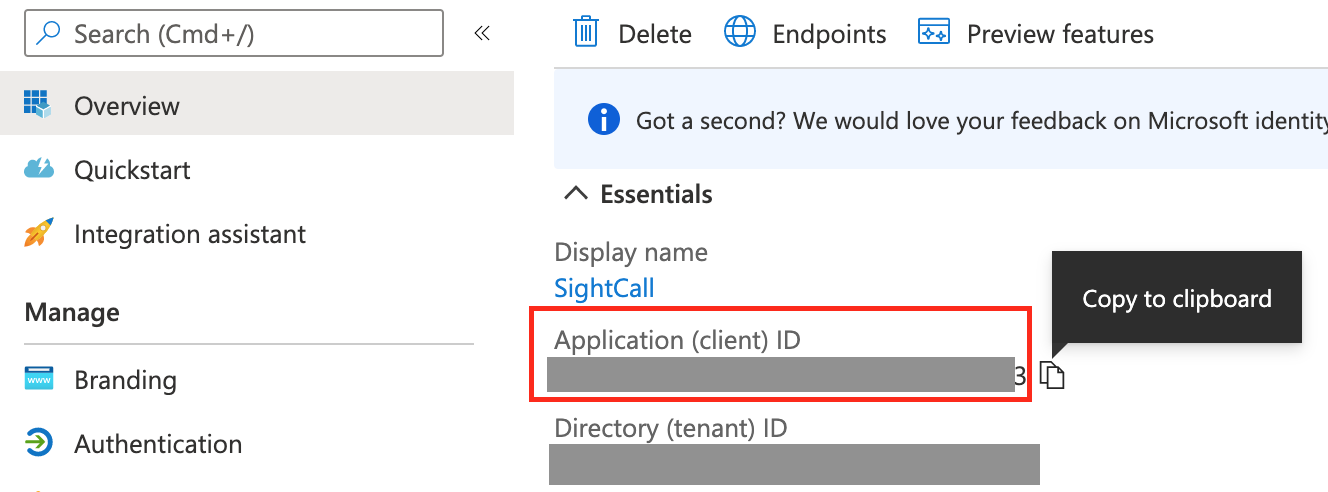
- Log into the Azure portal (now called Entra) and create a new application
- Follow the instructions provided by Authentik
- Especially keep note of the
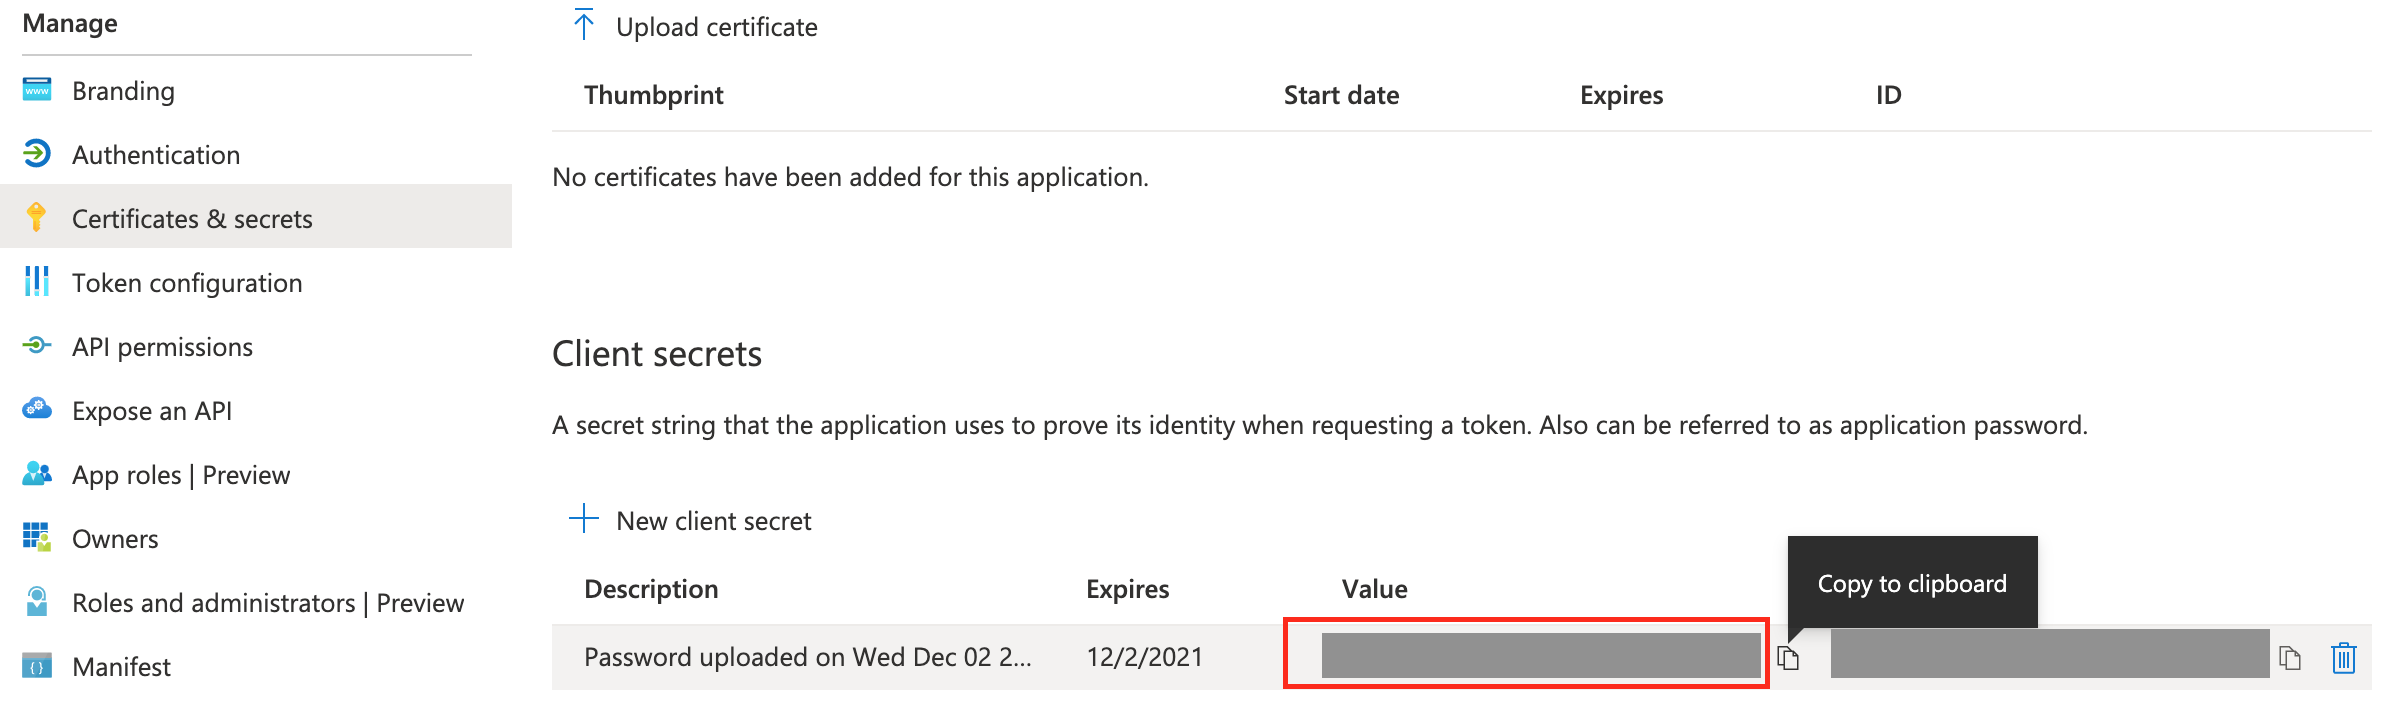
Client IDandTenant ID. These will be later used within Authentik to create the social login integration. - Also head to
Certificates and Secretsand create a newClient Secret. Keep note of theSecret Value. It will later be used within Authentik to create the social login integration. - As redirect URL, you must define the FQDN of your Authentik service like
https://authentik.example.com/source/oauth/callback/azure-ad. The slugazure-adis important, as it must be reflected within Authentik later on. - At
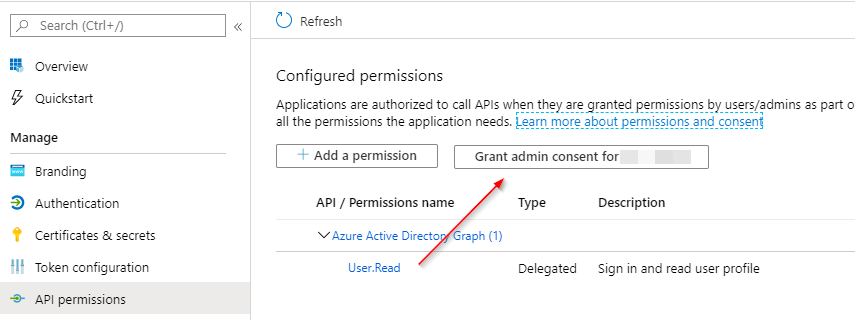
API Permissions, hitGrant admin consent for xxx. Otherwise, you will obtain permission errors during login.
Then head over to Authentik.
Create Social Login
Adhere to the following steps:
- Log into Authentik as admin and visit the
admin interface - Browse to
Directory > Federation and Social login - Create a new social login via the button
Create - Choose
Azure AD Oauth Source - Define
Azure ADin the fieldName - Ensure the field
Slugwas propagated toazure-adcorrectly. Otherwise, change it manually toazure-ad. This is the important slug mentioned previously when setting things up in the Azure Portal. - Define the IDs and secrets created previously in the Azure portal.
Consumer Keyis theClient ID.Consumer Secretis theSecret Value. - At the fields
Authorization URLandAccess token URL, replace the valuecommonin both URLs with yourTenant ID. Just replace the single wordcommonwith your ID string. - Finish the setup by clicking
Finish
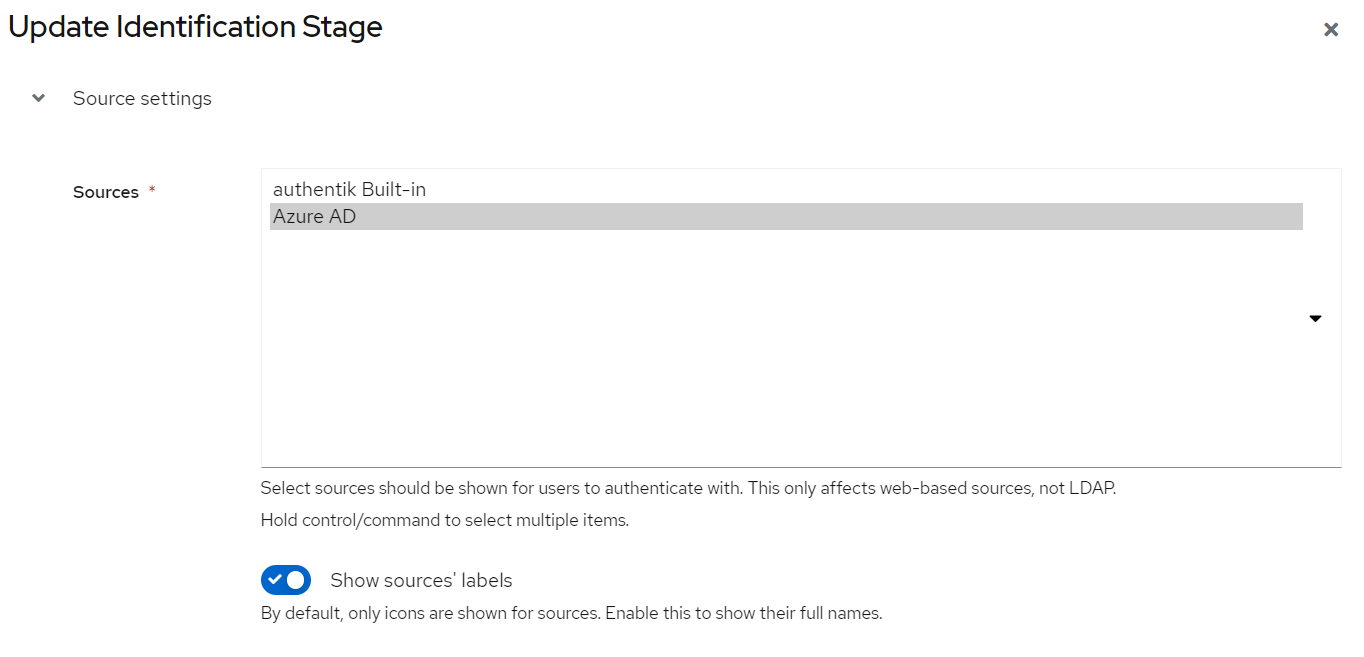
After setting up our Azure AD source as social login, we have to adjust Authentik. As default, the new source won't be available at the Authentik login screen. We first have to configure the new source as an option during authentication.
- Log into Authentik as admin and visit the
admin interface - Browse to
Flows and Stages > Flows - Select
default-authentication-flow - Select
Stage-Bindings - Select
default-authentication-identificationandEdit - Drop down
Sourcesand select our new sourceAzure-AD. You can multi-select by holding SHIFT on your keyboard. - Finish the flow setup by clicking
Update
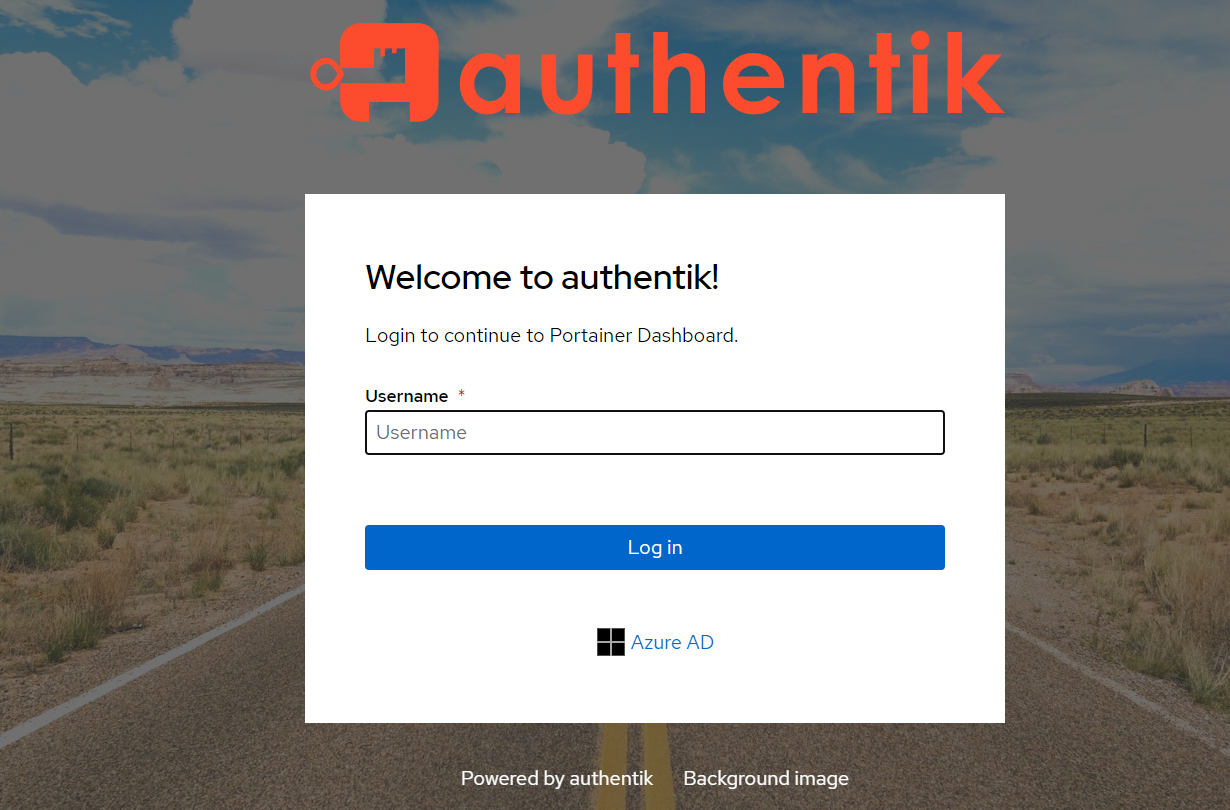
Your Azure AD tenant users can now authenticate by selecting the Azure AD Microsoft icon below the login button. An Oauth flow will occur and the user account will be created in Authentik and the user being logged in.
Note that local authentication is still provided by Authentik. For example, if you want to login with your admin user created during the init phase.
Be aware that both authentication methods work natively (local auth and social login). Therefore, think about setting up a local password policy.
Otherwise, you can also change this behaviour. Keep on reading.
Disable Local Auth
If you want to provide authentication via Azure or any other social login only, you have to disable Authentik's default local authentication.
Follow these steps to disable local authentication and support social logins only:
- Log into Authentik as admin and visit the
admin interface - Browse to
Flows and Stages > Flows - Select
default-authentication-flow - Select
Stage-Bindings - Select
default-authentication-identificationandEdit - Drop down
Sourcesand select your social login source solely. Removeauthentik Built-infrom the selection. - Go to
Stage-specific settingsand unselect the fieldsUsernameandEmailat theUser fieldssection. Use SHIFT and/or CRTL to unselect all entries. - Finish the flow setup by clicking
Update
Atferwards, there won't be an Authentik login screen anymore. You'll be directly redirected to MS Azure or your configured social login source.
Disable Password Change
Finally, if Azure was configured as sole authentication option, you may want to remove the useless password change option. As local auth won't be supported anymore, changing a user's password won't have any effect.
I recommend doing it after disabling Authentik's local authentication method though. This ensures that user's cannot change their password in the UI, as this won't have any technical effect for the Azure SSO login.
The local user's password in Authentik is irrelevant for Azure OAuth.
To disable password change, follow these steps:
- Log into Authentik as admin and visit the
admin interface - Browse to
Flows and Stages > Flows - Select
default-authentication-flow - Select
Stage-Bindings - Select
default-authentication-passwordandEdit - Choose empty
------atConfiguration flowto disable password changes - Finish the flow setup by clicking
Update
This removes the Change password button from the user settings area of Authentik.
Granting or Denying Access
With Authentik and Azure AD as social login in place, you can start configuring fine-grained control over who can access your web services. You can grant or deny access based on individual users or even groups.
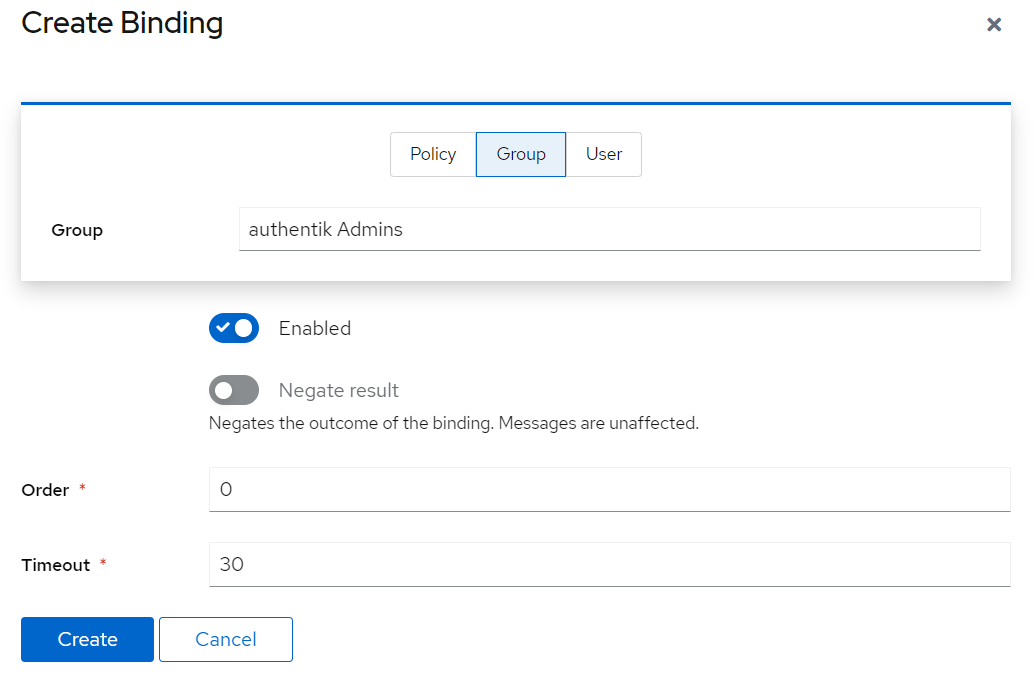
Such fine-grained access controls are configured in Authentik as admin at Applications > Applications. If you remember correctly, we have already created such application for our example whoami container. Let's open this one again and inspect the tab Policy / Group / User Bindings.
Within this tab, we can create a new policy. Simply hit Bind existing policy and choose from either User or Group. Select your individual users or a group. Or both via multiple bindings.
If you want to grant access to a specific group only, head over to
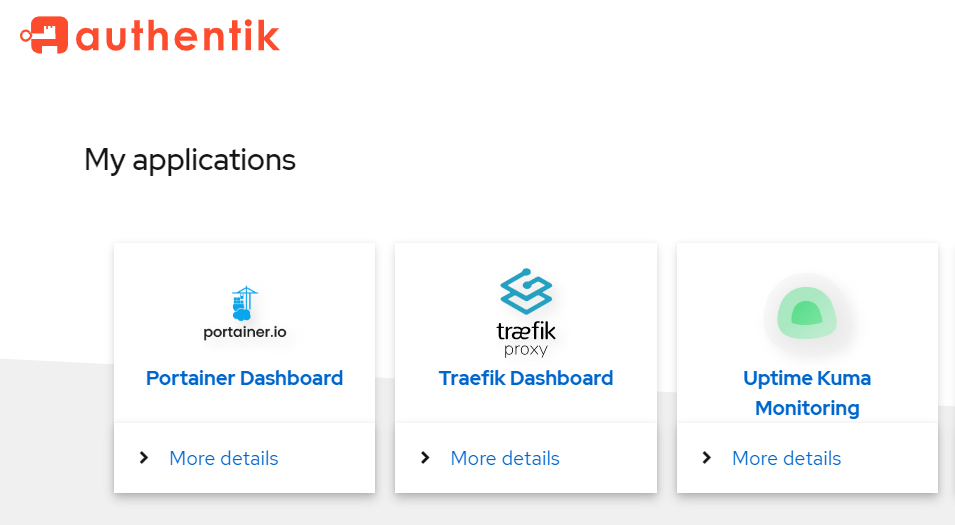
Directory > Groups and create/modify/adjust to your liking. You can also assign a default group for newly created users or disable automatic user creation completely (read here).Authenticated users will always have access to the Authentik user interface. This interface will list all applications the current user has permission for to access. It basically acts as a user dashboard with a list of accessible applications.
Local Password Policy
In case you are not using Azure AD solely but local authentication too, you may want to introduce a local password policy. Authentik users are per default allowed to change their password after successfully logging into Authentik. This is done via the user's settings area at Change password.
Per default, Authentik does not come with a password policy for local users. So your users may choose a weak password that is easy to remember but also easy to guess as an attacker.
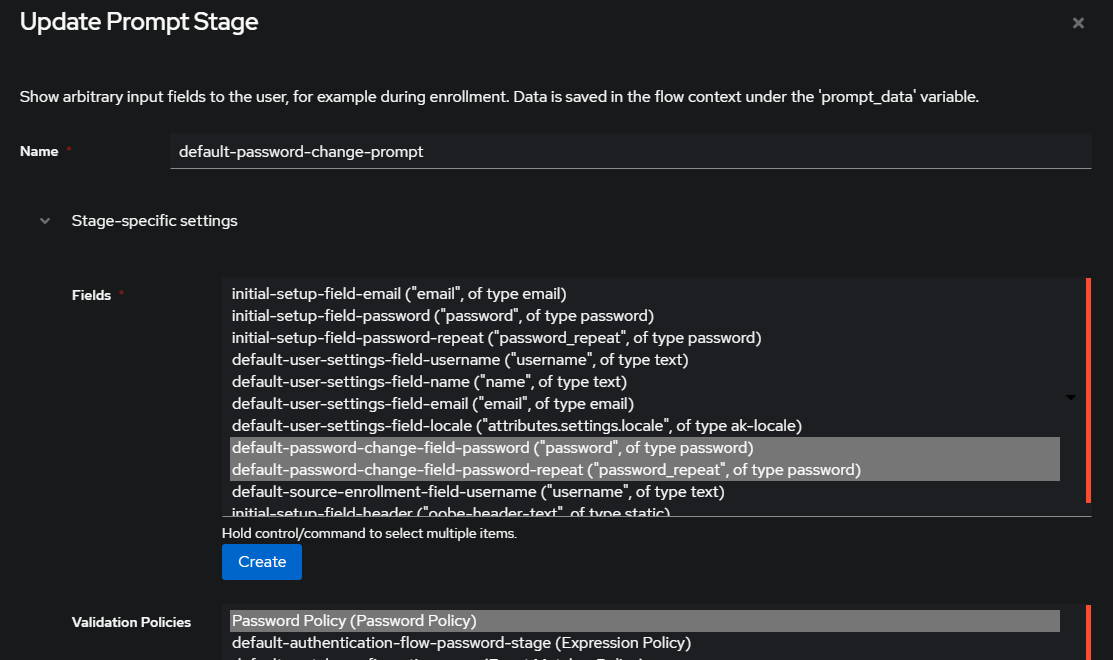
default-password-change-password-policy at Flows and Stages > Stages to your needs instead of creating and applying a new policy manually as outlined below.Therefore, if you want to introduce a password policy into Authentik, follow these steps:
- Log into Authentik as admin and visit the
admin interface - Browse to
Customisation > Policies - Hit the button
Createand choosePassword Policy - Define a name (e.g.
Password Policy) and your preferred policy requirements - Click the button
Finish - Afterwards, browse to
Flows and Stages > Stages - Select
default-password-change-promptand the actionEdit - At
Validation Policiesselect your previously created password policy (e.g.Password Policy)
Restrict User Self-Service
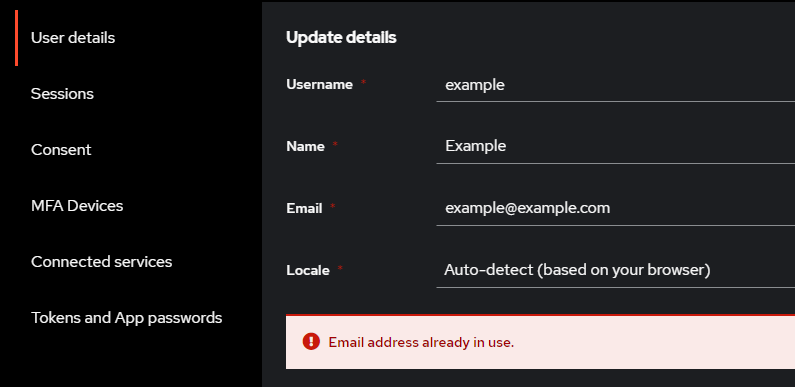
Typically, users are either onboarded manually by an Authentik administrator or via an enrollment stage (e.g. social login). Afterwards, the user can modify his personal account details like username, name and e-mail address within Authentik using the self-service area.
The username field must be unique per default, which restricts impersonification attacks. However, the e-mail address must not be unique and can be used multiple times over multiple user accounts (read here). Same holds true for the name of a user account.
As the e-mail field and others are often used in SSO flows to identify the user, changing them may allow for privilege escalation attacks or cause authentication issues. Therefore, it may makes sense to restrict users from editing these fields.
To implement this, Authentik provides us with a feature to create and apply custom policies. One can implement the following checks:
- Ensure that a new e-mail address defined by a user is unique and not in use by another Authentik user
- Ensure that only authorized user accounts are allowed to edit account fields using the self-service area. This is done on user or group level using custom attributes that reflect permissions.
Ensure Unique E-Mail Addresses
Follow these steps:
- Log into Authentik as admin
- Browse the
Customization > Policiesarea at/if/admin/#/policy/policies - Create a new policy by clicking
Create - Choose
Expression Policy - Define a fitting name for your policy like
default-user-settings-unique-email - Define the below regex
from authentik.core.models import User

email = request.context["prompt_data"]["email"]

if User.objects.filter(email=email).exists():
  ak_message("Email address already in use.")
  return False
return True
Custom policy in Authentik to ensure unique emails
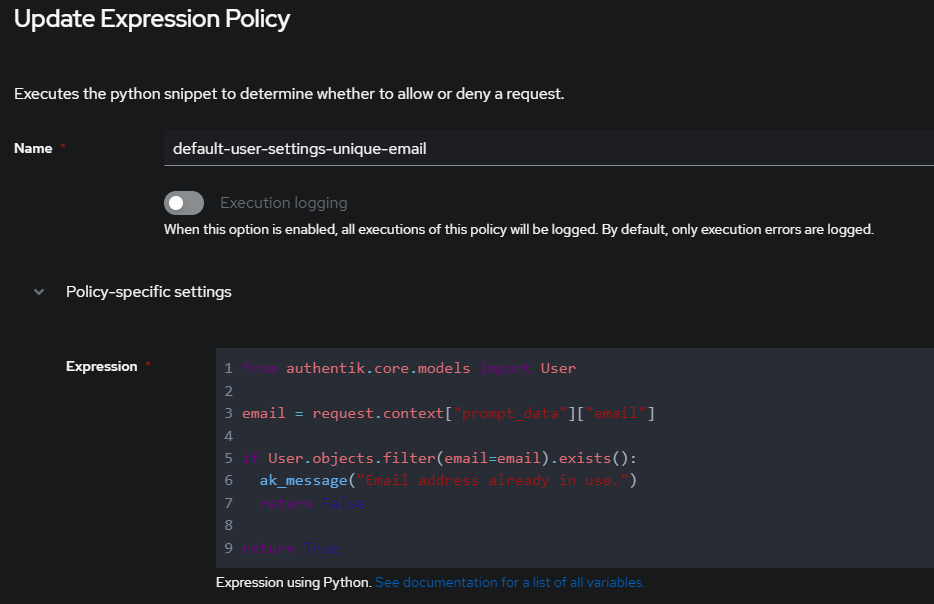
This policy will check whether the newly set e-mail address by a user is unique and not yet in use by another account on Authentik.
Finally, we have to bind this policy to a stage:
- Log into Authentik as admin
- Visit the
Flows and Stages > Stagesarea at/if/admin/#/flow/stages - Edit the prompt stage
default-user-settings - Apply the previously created policy
default-user-settings-unique-email - Optional: May repeat step 1-4 for other prompt stages like
default-source-enrollment-prompttoo

If a user now tries to change the e-mail address field to an existing e-mail address, he/she will receive the following error message:
Restrict Self-Service via Permissions
Follow these steps:
- Log into Authentik as admin
- Browse the
Customization > Policiesarea at/if/admin/#/policy/policies - Create a new policy by clicking
Create - Choose
Expression Policy - Define a fitting name for your policy like
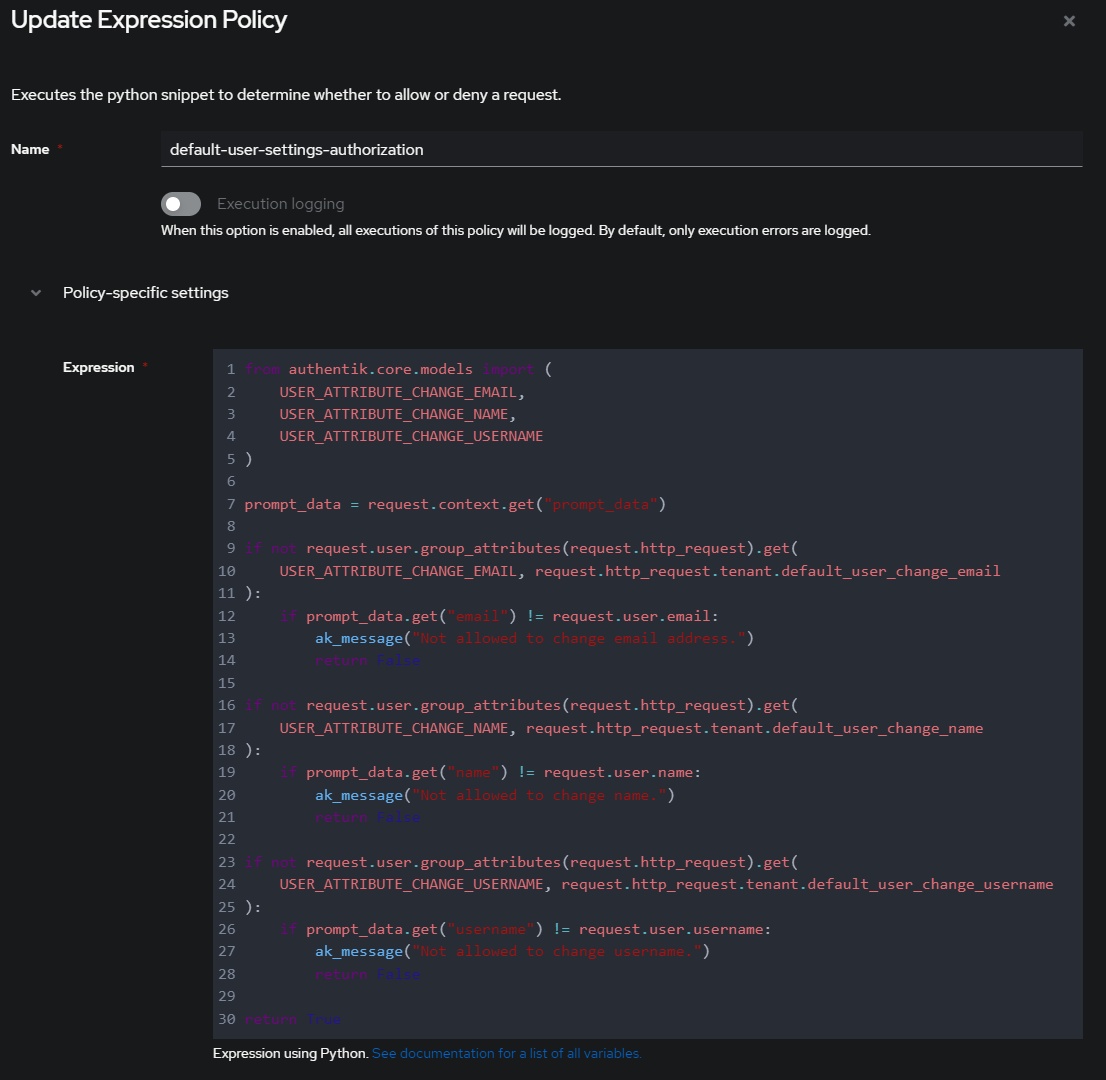
default-user-settings-authorization - Define the below regex
from authentik.core.models import (
    USER_ATTRIBUTE_CHANGE_EMAIL,
    USER_ATTRIBUTE_CHANGE_NAME,
    USER_ATTRIBUTE_CHANGE_USERNAME
)

prompt_data = request.context.get("prompt_data")

if not request.user.group_attributes(request.http_request).get(
    USER_ATTRIBUTE_CHANGE_EMAIL, request.http_request.tenant.default_user_change_email
):
    if prompt_data.get("email") != request.user.email:
        ak_message("Not allowed to change email address.")
        return False

if not request.user.group_attributes(request.http_request).get(
    USER_ATTRIBUTE_CHANGE_NAME, request.http_request.tenant.default_user_change_name
):
    if prompt_data.get("name") != request.user.name:
        ak_message("Not allowed to change name.")
        return False

if not request.user.group_attributes(request.http_request).get(
    USER_ATTRIBUTE_CHANGE_USERNAME, request.http_request.tenant.default_user_change_username
):
    if prompt_data.get("username") != request.user.username:
        ak_message("Not allowed to change username.")
        return False

return True
Custom policy in Authentik to restrict self-service
Finally, we have to bind this policy to a stage:
- Log into Authentik as admin
- Visit the
Flows and Stages > Stagesarea at/if/admin/#/flow/stages - Edit the prompt stage
default-user-settings - Apply the previously created policy
default-user-settings-authorizuation
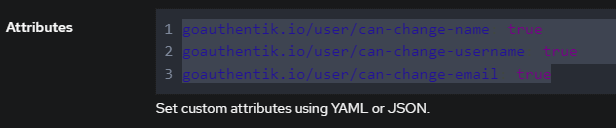
If a user now tries to change the e-mail address, name or username fields, the policy will validate whether the user account possesses the following permissions:
- goauthentik.io/user/can-change-name
- goauthentik.io/user/can-change-username
- goauthentik.io/user/can-change-email
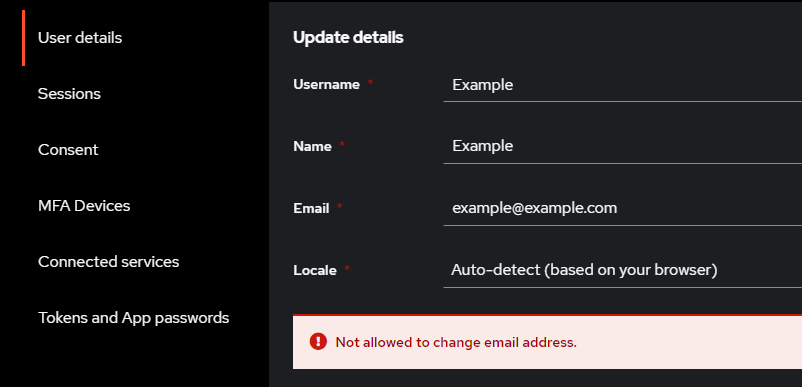
If the user is not authorized, he/she will receive the following error message:
If you have users that should be allowed to change such fields, add the corresponding permission at the user's attribute field or on group level as admin.
- Log into Authentik as admin
- Browse
Directory > Usersand select your user account. Alternatively, select an existing group to apply the attribute permissions on group level. - Hit
Editand add the attributes as outline and shown below
goauthentik.io/user/can-change-name: true
goauthentik.io/user/can-change-username: true
goauthentik.io/user/can-change-email: true
Permissions to paste into the Attributes section of a user/group to allow self-service fields to be edited
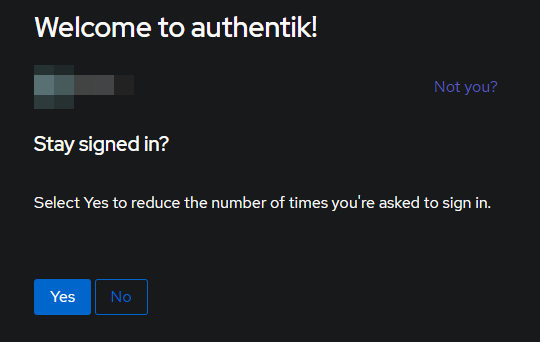
Enable Stay Signed-In
You can also enable a stay signed-in feature to increase the lifespan of sessions. This is helpful, if you want to reduce the amount of time you have to re-authenticate at Authentik.
As default, Authentik's user sessions will be terminated as soon as the browser closes. This is fine for security reasons. However, if you are working from a trusted device, you may want to stay logged-in for a longer time.
Local Authentication
To enable stayed signed-in for local authentications, you must adjust the default-authentication-login stage.
- Log into Authentik as admin and visit the
admin interface - Head over to
Flows and Stages>Stages - Edit the stage
default-authentication-login - Adjust the setting
Stay signed in offset. You may choose a value like 24h. - May enable
Network bindingandGeoIP bindingto secure such prolonged sessions even more. - Hit update or save.
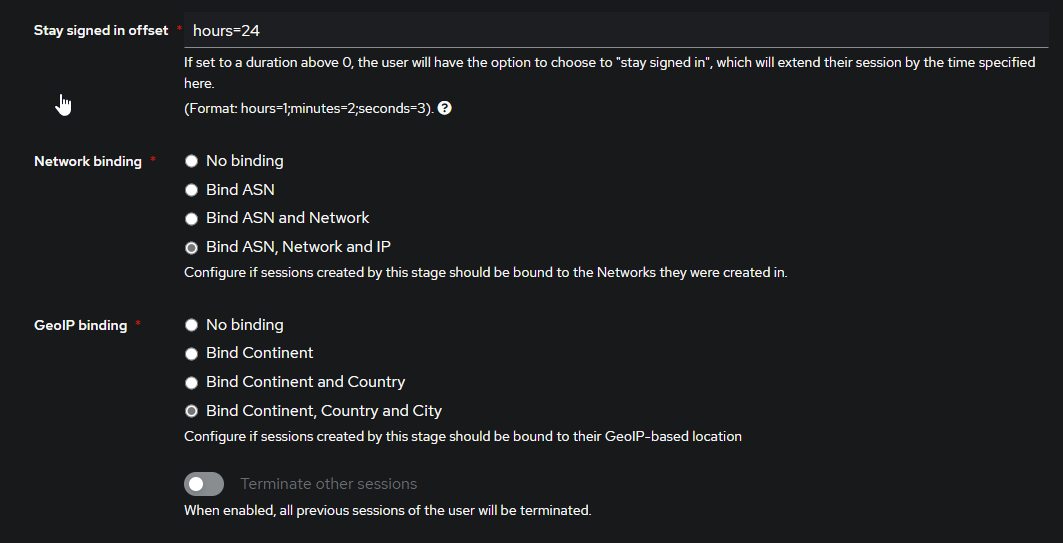
Users that successfully authenticate against Authentik will from now on receive a popup that actively asks whether the user wants to stay signed in for a longer period of time. The session may be bound to the network and geo IP, if enabled.
This protects the prolonged session from unauthorized use.
Source Authentication (Entra)
To enable stayed signed-in for source authentications (e.g. Entra AD), you must adjust the default-source-authentication-login stage.
Basically follow the same outlined steps above for the local authentication stage but make sure to configure the correct source stage.
Custom Branding
You can also rebrand Authentik with your company logos and custom wallpapers.
In order to change the Authentik logo and favicon:
- Log into Authentik as admin and visit the
admin interface - Browse to
System > TenantsorSystem > Brands - Select the default and the action
Edit - Set your preferred logos at
Branding settingsorLogo/Title/Faviconrespectively - Hit
Updatewhen finished
In order to change the background wallpaper for the login or consent screens:
- Log into Authentik as admin and visit the
admin interface - Browse to
Flows and Stages > Flows - Select
default-authentication-flowand the actionEdit - Upload your background image at
Appearance settings - Hit
Updatewhen finished
Repeat the same for the flows:
default-provider-authorization-explicit-consentdefault-provider-authorization-implicit-consentdefault-source-authenticationdefault-invalidation-flow
You can also enforce dark mode by adding the following YAML code to the global setting's attributes field at:
System > Brands > Authentik Default > Edit > Additional global settings > Attributes
settings:
  theme:
    base: dark
Summary
If you have followed this blog post, you will have successfully configured Authentik in conjunction with Traefik as reverse proxy and Azure AD as social login. Your Azure AD tenant users can now access proxy services by choosing Azure AD as SSO option at the Authentik login screen.
If Azure AD authentication succeeds, the Azure AD user will be onboarded and created as local user in Authentik. If access controls permit access to the requested proxy service, the user will be able to instantly gain access.
By choosing this setup, we successfully established a single authentication entry point for all our proxy services without the hassle of creating Azure AD users manually within Authentik. The social login integration will handle the authentication flow between Authentik and Microsoft Azure AD and onboard AD users accordingly.
You can now start grouping users and granting fine-grained access controls to all of your services. To add more proxy services into Authentik, here is a short summary of the required steps:
- Adjust the proxy service's Traefik labels to use the
authentik@dockermiddleware. - Log into Authentik as admin and create a new authentication provider at
Applications > Providers. Choose a fitting name depending on your proxied service. May read this blog's relevant section again. - Log into Authentik as admin and create a new application at
Applications > Applications. Choose a fitting name depending on your proxied service and select the previously created authentication provider. Also visit thePolicy / Group / User Bindingsarea and configure access controls, if necessary. - Test accessing your proxy service.
Just create an SAML/OAuth/OIDC provider + reflect the IDs, secrets and relevant URL endpoints at your application, for which you want to introduce SSO. May read this wiki for my selfhosted VoucherVault application to get an idea on how it works.
Enjoy!


Discussion