


In this blog post we will configure Authelia as OIDC provider and use it to enable Single Sign On (SSO) in Immich.
Works again for Immich v1.113.0 and Authelia v4.38.9!
Configuring Authelia
Authelia's configuration is defined in a configuration.yml file. Within this file, we can define the necessary OIDC configuration settings such as a provider and a client.
Visiting Authelia's public OIDC documentation, we can obtain an example configuration. Within this example configuration, there are multiple parameters that either require a secret value or a certificate.
Those must be securely generated prior adjusting the configuration. Therefore, let's generate those things!
Creating an RSA Certificate
Authelia requires you to define a certificate (private key) via the key directive and a certificate chain (public key) via the certificate_chain directive.
You can generate both via the following command:
docker run --rm authelia/authelia sh -c "authelia crypto certificate rsa generate --common-name authelia.example.com && cat public.crt && cat private.pem"Creating an RSA Certificate
Creating a Client Secret
Authelia requires you to define a secure client secret.
You can generate one via the following command:
docker run authelia/authelia:latest authelia crypto hash generate pbkdf2 --variant sha512 --random --random.length 72 --random.charset rfc3986Creating a Client Secret
$pbkdf2 password hash for later use.Creating an OIDC Provider and Client
Once the RSA certificate and client secret are created securely, we can start adjusting Authelia's configuration file. We will add an Identity Provider and client by inserting our self-generated secrets and certificate information.
Put the following at the end of your Authelia configuration:
identity_providers:
  oidc:
    hmac_secret: 'my-secure-hmac-secret-key-to-change'
    jwks:
      - key_id: 'authelia'
        algorithm: 'RS256'
        use: 'sig'
        certificate_chain: |
          -----BEGIN CERTIFICATE-----
          <PASTE-HERE-YOUR-PUBLIC-KEY-DATA>
          -----END CERTIFICATE-----
        key: |
          -----BEGIN PRIVATE KEY-----
          <PASTE-HERE-YOUR-PRIVATE-KEY-DATA>
          -----END PRIVATE KEY-----
    enable_client_debug_messages: false
    minimum_parameter_entropy: 8
    enforce_pkce: 'public_clients_only'
    enable_pkce_plain_challenge: false
    enable_jwt_access_token_stateless_introspection: false
    discovery_signed_response_alg: 'none'
    discovery_signed_response_key_id: ''
    require_pushed_authorization_requests: false
    lifespans:
      access_token: '1h'
      authorize_code: '1m'
      id_token: '1h'
      refresh_token: '90m'
    cors:
      endpoints:
        - 'authorization'
        - 'token'
        - 'revocation'
        - 'introspection'
      allowed_origins:
        - 'https://immich.example.com'
      allowed_origins_from_client_redirect_uris: false
    clients:
      - client_id: immich
        client_name: Immich OIDC
        client_secret: '$pbkdf2-<PASSWORD-HASH-DATA>'
        public: false
        authorization_policy: one_factor
        consent_mode: pre-configured
        token_endpoint_auth_method: "client_secret_basic"
        pre_configured_consent_duration: 1w
        scopes:
          - openid
          - groups
          - email
          - profile
        redirect_uris:
          - https://authelia.example.com/
          - https://authelia.example.com/oauth2/callback
          - https://immich.example.com/oauth2/callback
          - https://immich.example.com/auth/login
          - https://immich.example.com/user-settings
          - https://immich.example.com
          - app.immich:/ # required for immich < v1.113.0
          - app.immich:///oauth-callback # required since immich v1.113.0
          - https://immich.example.com/api/oauth/mobile-redirect
        grant_types:
          - refresh_token
          - authorization_code
        response_types:
          - code
        response_modes:
          - form_post
          - query
- fragmentcertificate_chain. The private key must be defined in key. Replace all entries with
example.com to your FQDN domains.Ensure to properly adjust the following key parameters to your environment:
- hmac_secret
- certificate_chain
- key
- allowed_origins
- client_secret
- Please define the
$pbkdf2password hash and not the cleartext password
- Please define the
- redirect_uris
After adjusting the Authelia configuration, please restart Authelia to reflect the new configuration. Actively inspect container logs for potential issues.
Configuring Immich
The configuration of Immich can be adjusted by logging into the web application as admin. Then browse the administration and settings area.
Setting up OAuth
Visit your Immich web instance and login as admin. Then browse the URL /admin/system-settings. You'll find a setting named OAuth Authentication.
Adjust the key parameters as follows:
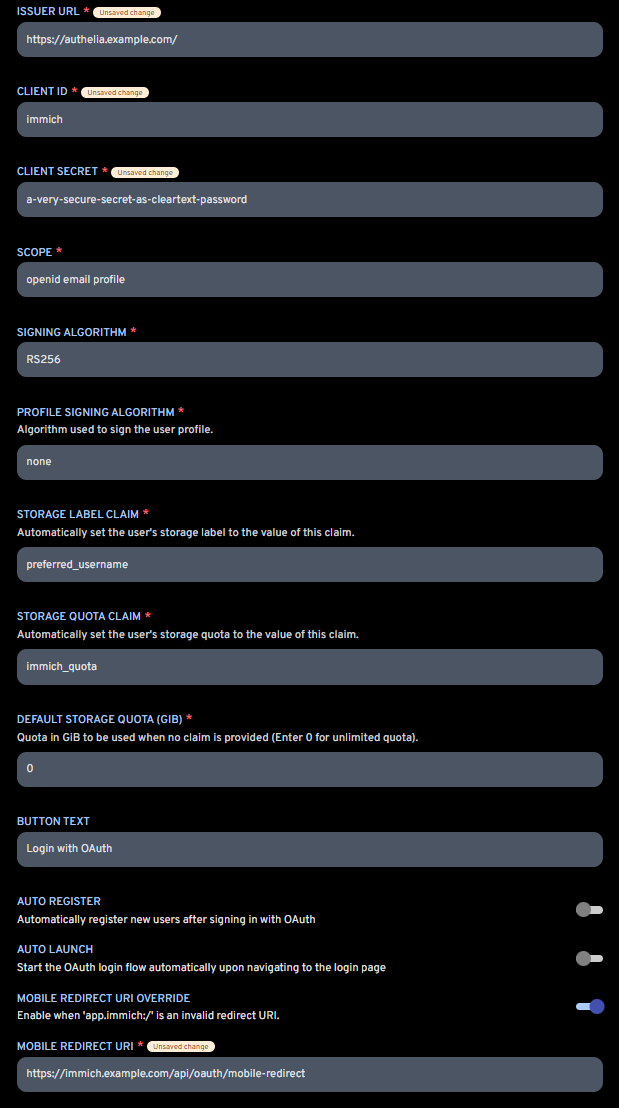
Here, a short explanation of the key settings:
- ISSUER URL: This is the FQDN of your Authelia instance
- CLIENT ID: This is the client name defined in Authelia's configuration.yml
- CLIENT SECRET: This is the client secret as cleartext password. Defined in Authelia's configuration.yml as
$pbkdf2password hash. - SCOPE: Can be left unchanged
- SIGNING ALGORITHM: The signing algorithm to be used. Either RSA256 or HS256. For Authelia, please choose RS256.
- STORAGE LABEL CLAIN: Can be left unchanged
- STORAGE QUOTA CLAIM: The quota limit
- BUTTON TEXT: Your prefered button text shown at the login page
- AUTO REGISTER: Your prefered choice, whether Authelia users are automatically registered/created within Immich if not yet existing. I recommend setting this to false. Create the users manually!
- AUTO LAUNCH: Whether the OAuth/OIDC authentication flow should be started automatically. If enabled, there won't be an option to use the local authentication flow with username and password anymore.
- MOBILE REDIRECT URI OVERRIDE: Must be enabled to support proper redirections from Authelia browser login back to the Immich mobile app.
- MOBILE REDIRECT URI: This is a specific URL provided by Immich, which will open the Immich mobile app if opened. Basically a custom scheme or deep link; see here. It consists of your Immich FQDN and the path
/api/oauth/mobile-redirect.
Afterwards, you can hit the save button and test the newly configured OIDC SSO.
Both the web application as well as mobile application of Immich will show a new button to login via OAuth/OIDC. Just hit the button, authenticate against Authelia and you will be redirected to Immich as authenticated user.
Enjoy!


Discussion