


Nginx Proxy Manager (NPM) gained popularity as reverse proxy amongst selfhosters and homelabbers due to its simplicity for managing SSL certificates and proxy hosts via a web interface.
It also supports a simplistic feature for proxy hosts called block common exploits that will block query parameters containing well-known payloads for exploiting vulnerabilities such as SQL injections (SQLi), Cross-Site Scripting (XSS), Remote and Local File Inclusion (RFI/LFI) as well as other hacking techniques.
Combined with the advanced Web Application Firewall (WAF) and Denial-of-Service (DoS) protection by Cloudflare, many attack vectors can be blocked straight away. Nonetheless, we can improve such a setup even more by implementing Fail2ban as additional Intrusion Detection (IDS) and Prevention System (IPS). Since all proxy host log files of NPM are structured in a normalized format, Fail2ban can easily be used to monitor those logs for malicious activities such as forceful browsing or brute-forcing.
This also works when not using Cloudflare at all. So keep reading.
Prerequisites
For this blog post, we will focus on implementing Fail2ban in conjunction with NPM as reverse proxy behind Cloudflare. I will not go into detail on how to run NPM, configure port forwardings on your router or define the necessary DNS entries on Cloudflare to get you started. I assume that these things are already running and working for you.
This blog post will only focus on installing and configuring a dockerized Failban container to work with your NPM reverse proxy logs. Additionally, we will configure optional Telegram notifications on actual IP bans and unbans.
If you are not using Cloudflare, don't worry. You can follow this blog post and neglect the relevant things for Cloudflare just fine. Your main focus will then be on banning threat actors using iptables only. Note that many modern Linux distributions nowadays are shipped with nftables instead of iptables. As we rely on iptables and specifically on the string matching extension, not supported by nftables, you'll have to ensure that iptables is installed on your server and that your kernel supports the string matching feature.
real_ip_header CF-Connecting-IP;This ensures that the logs of NPM contain the correct IP address of your site visitors. Cloudflare specifies the real visitor's IP address in a custom HTTP header called
CF-Connecting-IP.Fun fact: NPM propagates the file
/etc/nginx/conf.d/include/ip_ranges.conf automatically during run with IP addresses of popular CDN networks such as Cloudflare. This happens intransparently but ensures that only trustworthy IPs can set the X-Real-IP header that is processed by NPM to get the real IP address of site visitors.Detection Capabilities
Our goal will be to identify and block threat actors that actively conduct forceful browsing and brute-forcing attacks on our web services. Forceful browsing is the act of enumerating a web service for sensitive files, interesting directories and potentially vulnerable endpoints in an automated manner. Moreover, some threat actors may also try brute-forcing login areas or Basic Authentication prompts.
Since all these potential hacking attempts will generate log entries with 401, 403, 404 HTTP errors in a very short time period, we can easily identify such attacks and ban the threat actor's IP address via Fail2ban locally and globally on Cloudflare. Fail2ban will monitor all proxy host logs of our Nginx Proxy Manager reverse proxy. Therefore, once a misbehaving threat actor is detected and banned by Fail2ban, the attacker won't be able to access any of our other web services subsequently. This applies to all configured proxy hosts in NPM. Basically a universal ban as soon as one hacking attempt is detected on one of our HTTP web services.
Running Fail2ban with Docker Compose
Fail2ban can be run and installed on bare metal, but there also exists a containerized version. For this blog post, we will focus on using a Docker container provided by crazymax.
You can use the following docker-compose file to spawn a dockerized Fail2ban container. Please adjust your volume mappings and environment variables if needed.
/data/logs of your NPM reverse proxy into the Fail2ban docker container at /var/log/npm. Otherwise, Fail2ban is not able to inspect your NPM logs!version: "3"
services:
fail2ban:
container_name: fail2ban
hostname: fail2ban
cap_add:
- NET_ADMIN
- NET_RAW
environment:
- TZ=Europe/Berlin
- F2B_DB_PURGE_AGE=14d
image: crazymax/fail2ban:latest
network_mode: host
restart: unless-stopped
volumes:
- <PATH-ON-YOUR-SERVER-FOR-PERSISTED-F2B-DATA>:/data
- <PATH-ON-YOUR-SERVER-FOR-PERSISTED-NPM-DATA>/data/logs:/var/log/npmdocker-compose.yml
Afterwards, start the Docker container with the following command:
sudo docker compose up -dstarting the docker container
Configuring Fail2ban
Upon starting our Fail2ban Docker container, we will notice four new folders at the persisted data storage we defined in the above docker-compose.yml file:
- action.d
- db
- filter.d
- jail.d
These folders are necessary and used to define our actual Fail2ban configuration in order to detect malicious behavior in log files as well as ban the IP address of misbehaving threat actors. Note that the db folder can be ignored for now since it only holds the sqlite3 database for Fail2ban.
Put the following configuration file called jail.local inside the jail.d directory. This is our main configuration file for Fail2ban. It defines various settings for our jails such as which log files to monitor and when as well as how long a threat actor should be banned. Adjust to your needs and liking. Consult the Fail2ban documentation for more details regarding configuration options and syntax.
action-ban-cloudflare reference from the action = directive. Also remove whitelisting of Cloudflare IP addresses at ignoreip.[DEFAULT]
# "bantime.increment" allows to use database for searching of previously banned ip's to increase a
# default ban time using special formula, default it is banTime * 1, 2, 4, 8, 16, 32...
bantime.increment = true
# "bantime.rndtime" is the max number of seconds using for mixing with random time
# to prevent "clever" botnets calculate exact time IP can be unbanned again:
bantime.rndtime = 2048
# following example can be used for small initial ban time (bantime=60) - it grows more aggressive at begin,
# for bantime=60 the multipliers are minutes and equal: 1 min, 5 min, 30 min, 1 hour, 5 hour, 12 hour, 1 day, 2 day
bantime.multipliers = 1 5 30 60 300 720 1440 2880
[npm-general-forceful-browsing]
# bots that trigger too many 403 or 404
# logs are comming from reverse proxy "nginx proxy manager"
enabled = true
ignoreip = 173.245.48.0/20 103.21.244.0/22 103.22.200.0/22 103.31.4.0/22 141.101.64.0/18 108.162.192.0/18 190.93.240.0/20 188.114.96.0/20 197.234.240.0/22 198.41.128.0/17 162.158.0.0/15 104.16.0.0/12 172.64.0.0/13 131.0.72.0/22 2400:cb00::/32 2606:4700::/32 2803:f800::/32 2405:b500::/32 2405:8100::/32 2a06:98c0::/29 2c0f:f248::/32 127.0.0.0/8 10.0.0.0/8 172.16.0.0/12 192.168.0.0/16
action = action-ban-docker-forceful-browsing
action-ban-cloudflare
filter = npm-general-forceful-browsing
chain = DOCKER-USER
logpath = /var/log/npm/proxy-host-*_access.log
maxretry = 15
findtime = 60
bantime = 600/jail.d/jail.local
ignoreip parameter. This ensures that we are not banning ourselves or our CDN provider by accident.Remove the Cloudflare IP addresses if you do not plan on using Cloudflare as proxy. If Cloudflare is not in use, only define
ignoreip = 127.0.0.0/8 10.0.0.0/8 172.16.0.0/12 192.168.0.0/16.Put the following configuration file called npm-general-forceful-browsing.conf inside the filter.d directory. This configuration file is used to define which NPM log entries are relevant for Fail2ban to monitor and act on:
[INCLUDES]

[Definition]

failregex = ^.* (405|404|403|401|\-) (405|404|403|401) - .* \[Client <HOST>\] \[Length .*\] .* \[Sent-to <F-CONTAINER>.*</F-CONTAINER>\] <F-USERAGENT>".*"</F-USERAGENT> .*$

ignoreregex = ^.* (404|\-) (404) - .*".*(\.png|\.txt|\.jpg|\.ico|\.js|\.css|\.ttf|\.woff|\.woff2)(/)*?" \[Client <HOST>\] \[Length .*\] ".*" .*$
/filter.d/npm-general-forceful-browsing.conf
failregex parameter specifies a typical log entry format of failed HTTP requests. If such entries occur multiple times, it is usually an indicator of an ongoing forceful browsing or brute-forcing attack.The
ignoreregex parameter is used to ignore specific log entries, e.g. static or media files that cannot be found (404) on the server.By using fail2ban's failregex notiation
<F-*>...</F-*> we can even introduce custom variables. This allows us to retrieve e.g. the container name the HTTP request was sent to or to obtain the threat actor's user agent string. These variables may later be used when sending Telegram notifications or email alerts.Finally, put the following two configuration files inside the action.d directory.
The first configuration file is used to ban threat actors on Cloudflare itself using the Cloudflare API. This is recommended if you are using Cloudflare as CDN provider with the orange cloud symbol enabled. If not, just neglect this action.d script at all and remove the action-ban-cloudflare action reference in the jail.local configuration file above.
If you will use Cloudflare as proxy, please adjust the below configuration file and define your Cloudflare credentials at the variables cftoken and cfuser. Use your account's email address and your Global API Key available at https://dash.cloudflare.com/profile/api-tokens.
#
# Author: Mike Rushton
#
# IMPORTANT
#
# Please set jail.local's permission to 640 because it contains your CF API key.
#
# This action depends on curl (and optionally jq).
# Referenced from http://www.normyee.net/blog/2012/02/02/adding-cloudflare-support-to-fail2ban by NORM YEE
#
# To get your CloudFlare API Key: https://www.cloudflare.com/a/account/my-account
#
# CloudFlare API error codes: https://www.cloudflare.com/docs/host-api.html#s4.2
[Definition]
# Option: actionstart
# Notes.: command executed on demand at the first ban (or at the start of Fail2Ban if actionstart_on_demand is set to false).
# Values: CMD
#
#actionstart = bash /data/action.d/telegram_notif.sh -a start
# Option: actionstop
# Notes.: command executed at the stop of jail (or at the end of Fail2Ban)
# Values: CMD
#
#actionstop = bash /data/action.d/telegram_notif.sh -a stop
# Option: actioncheck
# Notes.: command executed once before each actionban command
# Values: CMD
#
actioncheck =
# Option: actionban
# Notes.: command executed when banning an IP. Take care that the
# command is executed with Fail2Ban user rights.
# Tags: <ip> IP address
# <failures> number of failures
# <time> unix timestamp of the ban time
# Values: CMD
#
# API v1
#actionban = curl -s -o /dev/null https://www.cloudflare.com/api_json.html -d 'a=ban' -d 'tkn=<cftoken>' -d 'email=<cfuser>' -d 'key=<ip>'
# API v4
actionban = curl -s -o /dev/null -X POST <_cf_api_prms> \
-d '{"mode":"block","configuration":{"target":"<cftarget>","value":"<ip>"},"notes":"Fail2Ban <name>"}' \
<_cf_api_url>
#bash /data/action.d/telegram_notif.sh -b <ip> -r "above reasons on Cloudflare - <name>"
# Option: actionunban
# Notes.: command executed when unbanning an IP. Take care that the
# command is executed with Fail2Ban user rights.
# Tags: <ip> IP address
# <failures> number of failures
# <time> unix timestamp of the ban time
# Values: CMD
#
# API v4
actionunban = id=$(curl -s -X GET <_cf_api_prms> \
"<_cf_api_url>?mode=block&configuration_target=<cftarget>&configuration_value=<ip>&page=1&per_page=1¬es=Fail2Ban%%20<name>" \
| { jq -r '.result[0].id' 2>/dev/null || tr -d '\n' | sed -nE 's/^.*"result"\s*:\s*\[\s*\{\s*"id"\s*:\s*"([^"]+)".*$/\1/p'; })
if [ -z "$id" ]; then echo "<name>: id for <ip> cannot be found"; exit 0; fi;
curl -s -o /dev/null -X DELETE <_cf_api_prms> "<_cf_api_url>/$id"
#bash /data/action.d/telegram_notif.sh -u <ip> -r "above reasons on Cloudflare - <name>"
_cf_api_url = https://api.cloudflare.com/client/v4/user/firewall/access_rules/rules
_cf_api_prms = -H 'X-Auth-Email: <cfuser>' -H 'X-Auth-Key: <cftoken>' -H 'Content-Type: application/json'
[Init]
cftoken = <CF-API-TOKEN>
cfuser = <CF-USER-EMAIL>
cftarget = ip
[Init?family=inet6]
cftarget = ip6 /action.d/action-ban-cloudflare.conf
Additionally, use the following configuration file to ban the threat actor's IP address via iptables on your server directly. This is optional when using Cloudflare as proxy with the orange cloud symbol enabled, but mandatory if you are not using Cloudflare at all.
action-ban-docker-forceful-browsing.conf, you have to ensure that iptables version >= 1.3.5 is installed on your system as well as that your kernel supports string matching. May read here.Note: Newer OS versions seem to use nftables only. Since nftables do not support string matching, your IP bans via fail2ban are not effective. Install and configure legacy iptables if you want to use this feature. Otherwise, you have to use Cloudflare and its API for banning.
You can list kernel modules with the command
ls /lib/modules/`uname -r`/kernel/net/netfilter/ and search for the required xt_string.ko kernel module. If you do not get a hit, your kernel seems not yet to support iptables' string matching extension.Note that we have to use the DOCKER-USER chain, since we are using Docker containers only. In detail, we will utilize the iptable's netfilter extension to ban the real IP address of a threat actor in the X-Forwarded-For header. Iptables can only see the source IP address of packets, namely the IP of your proxy, but not the real visitor's IP address commonly defined in HTTP headers like X-Real-IP or X-Forwarded-For etc. So use both, the DOCKER-USER and INPUT chain to be safe.

[Definition]

actionban = iptables -I DOCKER-USER -m string --algo bm --string 'X-Forwarded-For: <ip>' -j DROP
            iptables -A INPUT -s <ip> -j DROP

actionunban = iptables -D DOCKER-USER -m string --algo bm --string 'X-Forwarded-For: <ip>' -j DROP
              iptables -D INPUT -s <ip> -j DROP
/action.d/action-ban-docker-forceful-browsing.conf
If all configuration files are set up, please restart the Fail2ban Docker container to reflect all changes. For example via the following bash command:
sudo docker compose up --force-recreateRestarting the Fail2ban container
Configuring Telegram Notifications
Note that you can specify multiple actionban and actionunban actions. Currently, we only ban a misbehaving IP address of a threat actor via iptables and optionally via the Cloudflare API. However, we can also implement additional Telegram notifications when actual IP bans or unbans occur.
For this, append an additional line of code at the actionban and actionunban definitions, which calls a shell script that sends Telegram notifications. As an example, a proper configuration should then look like this:
[Definition]

actionstart = bash /data/action.d/telegram_notif.sh -a start
actionstop = bash /data/action.d/telegram_notif.sh -a stop

actionban = iptables -I DOCKER-USER -m string --algo bm --string 'X-Forwarded-For: <ip>' -j DROP
            iptables -A INPUT -s <ip> -j DROP
			bash /data/action.d/telegram_notif.sh -b <ip> -r "forceful browsing on <F-CONTAINER> (<name>)"

actionunban = iptables -D DOCKER-USER -m string --algo bm --string 'X-Forwarded-For: <ip>' -j DROP
              iptables -D INPUT -s <ip> -j DROP
			  bash /data/action.d/telegram_notif.sh -u <ip>
Implementing Telegram Notifications in action.d scripts
The corresponding bash script to send notifications via your Telegram bot can be obtained via the following file download. Place the script within the action.d directory and define your Telegram API token and chat ID inside the script.
Testing our Setup
Finally, we should test our Fail2ban setup for proper configuration and that it really works. Head over to your mobile phone, disconnect from your local Wi-Fi network and start using a mobile LTE connection. This ensures that your soon to be made requests are not originating from a whitelisted IP address within the ignoreip parameter of the jail.local Fail2ban configuration file. Furthermore, we want to ensure that you do not lock yourself out with your real WAN IP address.
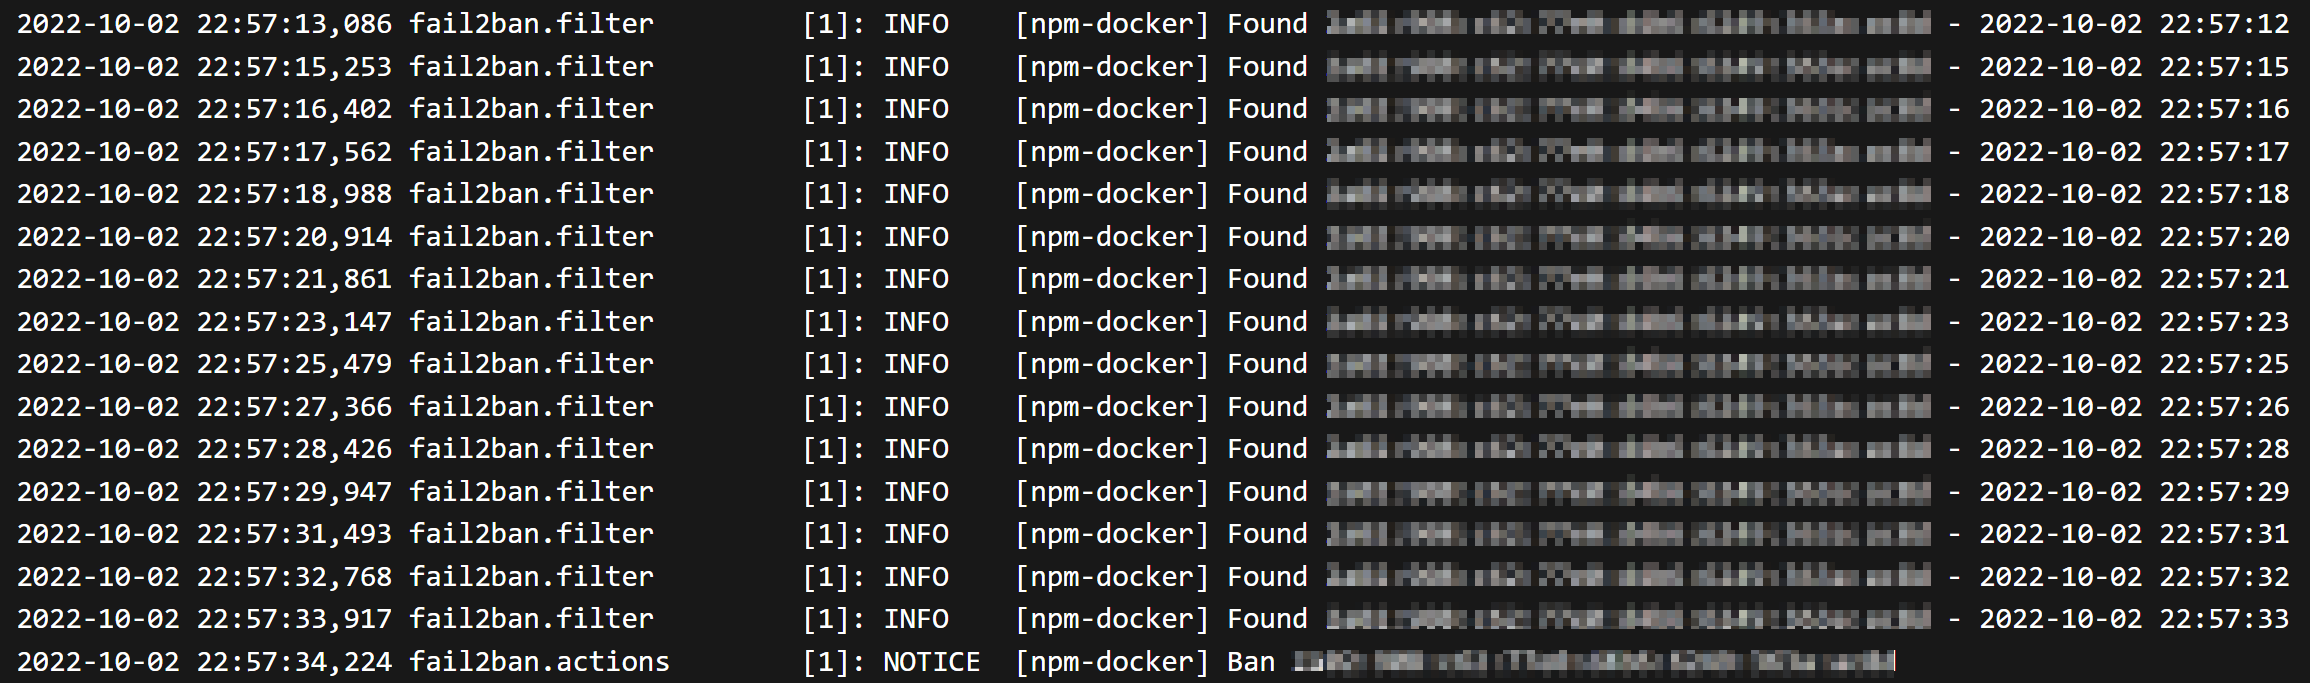
Then proceed by accessing a publicly exposed service via your mobile web browser. Start manipulating the browser URL and request a non-existent directory or file to trigger a 404 Not Found HTTP error. Proceed with these requests (at least 15 times within 1 minute since this is the current threshold defined in Fail2ban) until you notice a ban of your IP address.
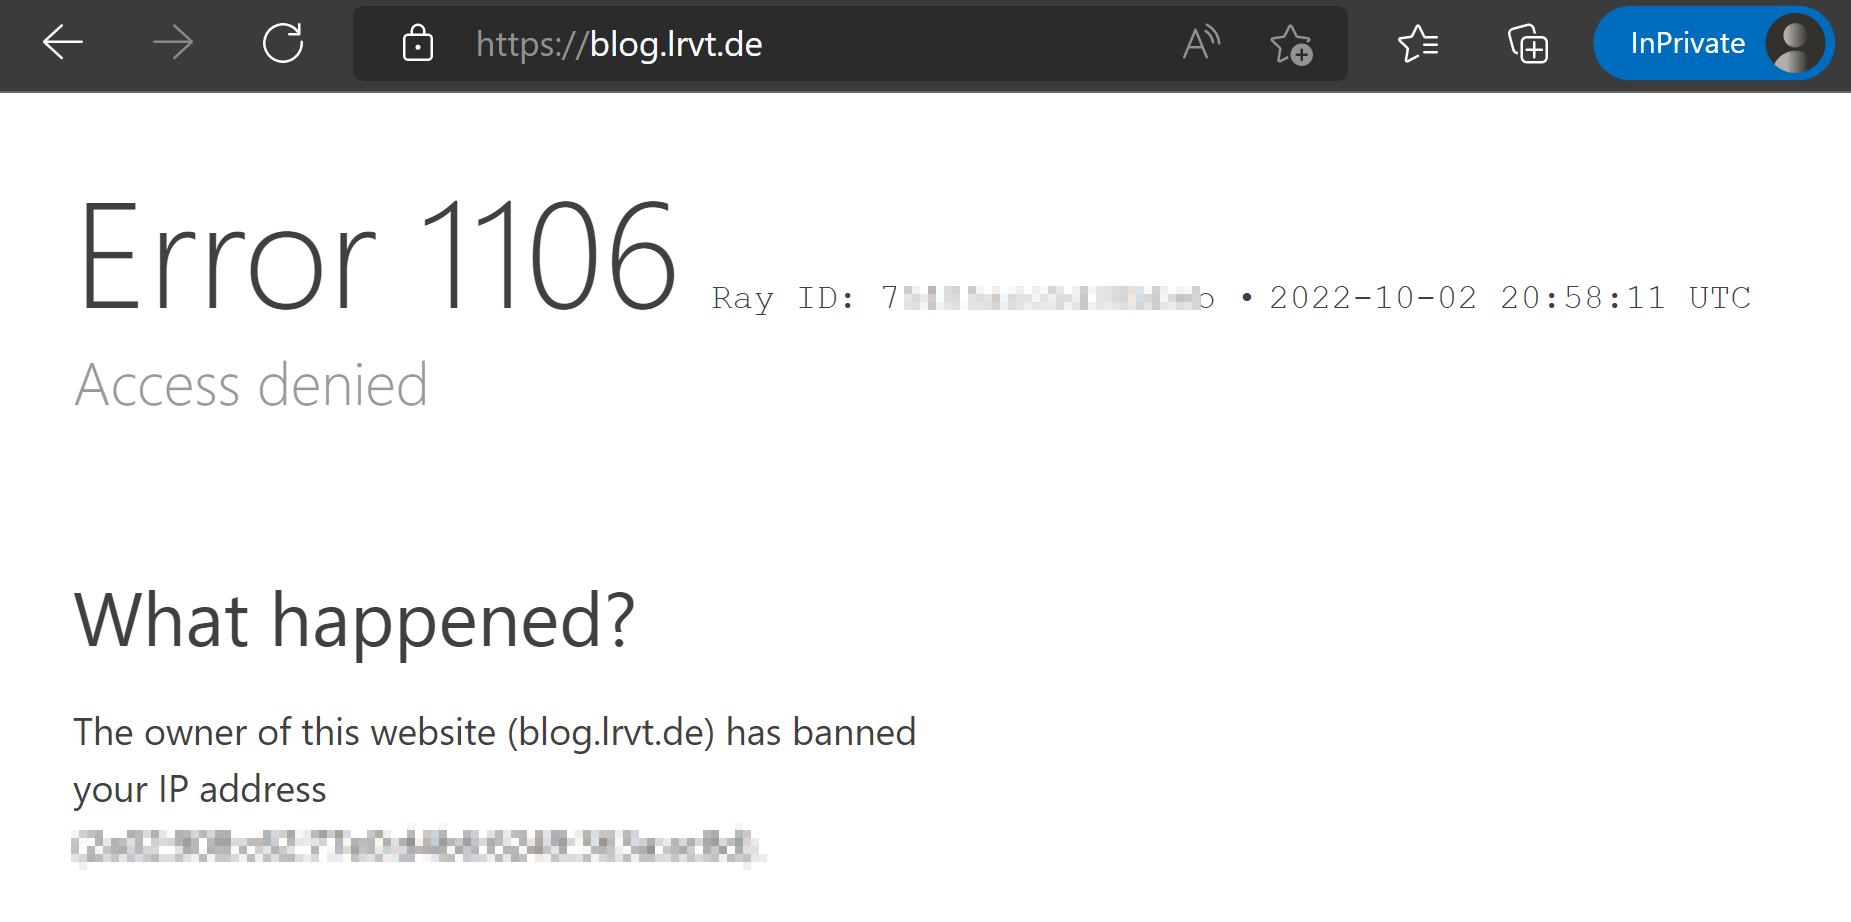
You should not be able to access any web service proxied by NPM anymore. Your browser should also display an error page by Cloudflare (if Cloudflare as proxy is in use) notifying you that your IP address was blocked. This applies to all proxy hosts of your NPM instance. You won't be able to access any HTTP web service for 10 minutes, until you will be automatically unbanned by Fail2ban again.
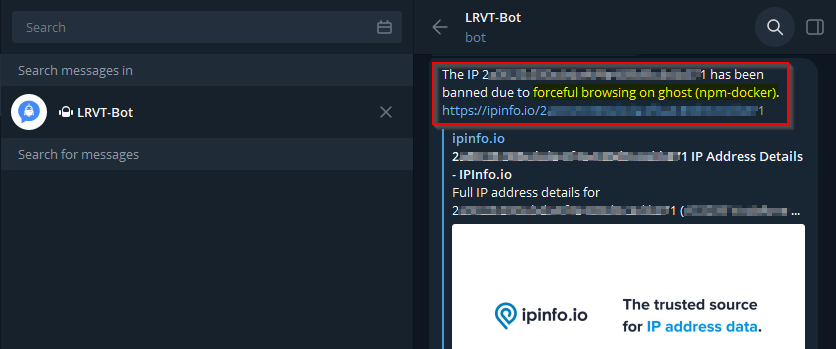
You may also consult the Fail2ban Docker logs for more details. You should see log entries notifying you about an IP address (your LTE IP) behaving maliciously. You may also login at Cloudflare if used and inspect the WAF or firewall rules to confirm an actual IP ban on the Cloudflare network for your managed domain.
To unban yourself, either wait 10 minutes or use the following bash command inside the Fail2ban docker container:
fail2ban-client set npm-general-forceful-browsing unbanip <YOUR-IP>Unbanning an IP address in Fail2ban Docker container
To test your Fail2ban filters, you can execute the following commands inside the Fail2ban Docker container:
# display matched log entries against /filter.d/npm-general-forceful-browsing.conf
fail2ban-regex /var/log/npm/proxy-host-1_access.log /etc/fail2ban/filter.d/npm-general-forceful-browsing.conf --print-all-matched

# display missed log entries against /filter.d/npm-general-forceful-browsing.conf
fail2ban-regex /var/log/npm/proxy-host-1_access.log /etc/fail2ban/filter.d/npm-general-forceful-browsing.conf --print-all-missed

# display ignored log entries against /filter.d/npm-general-forceful-browsing.conf
fail2ban-regex /var/log/npm/proxy-host-1_access.log /etc/fail2ban/filter.d/npm-general-forceful-browsing.conf --print-all-ignored
Test Fail2ban filter against NPM logs
Troubleshooting
Fail2ban reports IP bans but you can still access your services?
Check those steps:
- Have you installed legacy iptables over nftables? This is mandatory if you do not use CloudFlare API for banning. Only iptables supports string matching, to parse the threat actor's IP address via X-Forwarded-For HTTP header. Modern distros use nftables nowadays.
- Have you checked whether your kernel supports string matching? If not, head above and re-read the blog. Watch out for warning and danger callouts!
- Do you see the correct IP address logged in your access logs of NPM? It must be the IP address of the attacker, not the one of your NPM proxy or a CloudFlare IP.


Discussion