


Introduction
Log data is great. It is typically one of the first things you are going to inspect if something bricks or is not working as intended. Your customers cannot log into your webshop? You have trouble starting a network service and it does not come up? You are worried that automated bots from the Internet are compromising your server? Then head over to your logs and take a closer look what's really going on.
However, analyzing log data is time-consuming and not really fun. Furthermore, you are often flooded with data and cannot conveniently filter for the things you are really interested in. Therefore, we need tools to support us!
Sure, we all know the Linux command grep to rummage through strings or text files. We also have regular expressions to filter for interesing stuff. But financially strong companies have SOC analysts that monitor and analyze logs using very expensive tools for visualization and filtering. The question is, are there any free alternatives for smaller companies, selfhosters and others? Sure, the open-source community has your back!
In todays blog post we will focus on a tool called Grafana.
What You Will End up With
Following this blog post you will end up with three Docker containers. You'll spawn a Promtail docker container for fetching your log data and sending them to your second Docker container Loki. Loki will act as a data source for your final Docker container Grafana, used to visualize your log data in a very cool table format.
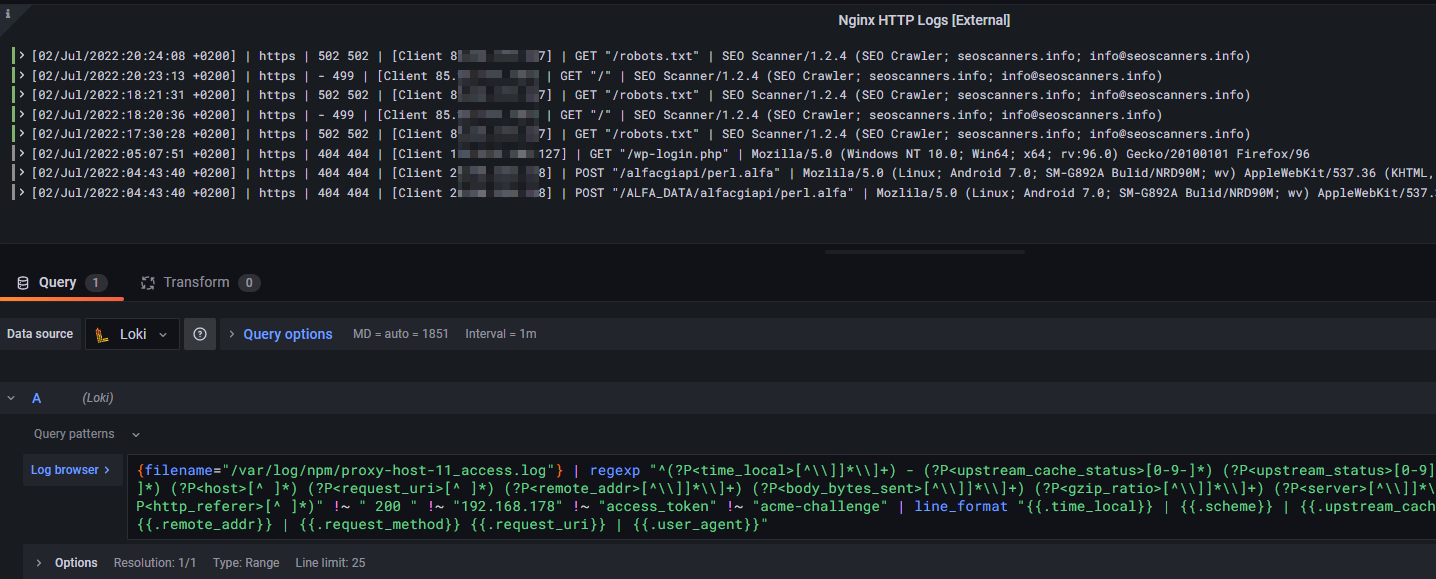
Finally, you will end up having a Grafana docker instance to visualize your logs as follows:
In order to proceed with this blog post I'll assume two things. First of all you are aware what Docker is and how to read and configure a docker-compose.yml configuration file. Additionally, I'll take for granted that you have some kind of log data, for example of your reverse proxy, your nginx web server or the basic auth logs of a regular Linux system.
Note that we will focus on visualizing and labeling HTTP log data from a reverse proxy only as an example. It is also possible to fetch the stdin and stdout logs of your Docker containers, e.g. via Loki's Docker log driver. If you just want to visualize those container logs, see the linked YouTube video below by Techno Tim.
Creating Our Docker Containers
If you nodded through these assumptions, let's start building our docker-compose.yml file.
Docker Compose
A Docker compose file defines all necessary information to spawn our three Docker containers with persistent data storage. Note that we'll use bind volumes to persist our container data. I personally store all my Docker volume data at the path /mnt/docker-volumes/<docker-container-name> of my Linux server. Please adjust the configuration to your needs and infrastructure setup.
Especially watch out for:
- volume mappings; ensure mapping your log data into Promtail
- uid and gid mappings
- Grafana's server URL as env variable with your server's IP or your subdomain
services:

  loki:
      image: grafana/loki:2.9.11
      hostname: loki
      container_name: loki
      volumes:
      # - /mnt/docker-volumes/Loki/data:/tmp/loki # optional loki storage
      - /mnt/docker-volumes/Loki:/etc/loki
      ports:
       - "127.0.0.1:3100:3100"
      restart: unless-stopped
      user: 1000:1000
      command: -config.file=/etc/loki/loki-config.yml

  promtail:
    image: grafana/promtail:latest
    container_name: promtail
    depends_on:
      - loki
    hostname: promtail
    volumes:
      - /var/log:/var/log
      - /mnt/docker-volumes/Promtail:/etc/promtail
      - /mnt/docker-volumes/Nginx-Proxy-Manager/data/logs:/var/log/npm
    restart: unless-stopped
    command: -config.file=/etc/promtail/promtail-config.yml

  grafana:
    image: grafana/grafana:latest
    container_name: grafana
    hostname: grafana
    user: 1000:1000
    ports:
       - "3000:3000"
    depends_on:
      - loki
      - promtail
    restart: unless-stopped
    environment:
      - GF_SERVER_ROOT_URL=http://subdomain.yourdomain.tld
    volumes:
      - /mnt/docker-volumes/Grafana:/var/lib/grafana
docker-compose.yml
Let's go over some important lines of code to understand what's happening.
- The Loki container configuration is straight-forward. We are using the latest v2.9 docker image
grafana/lokiand mapping the network port3100of the docker container to our Linux server at127.0.0.1:3100. This might be optional, but let's move on. Besides specifying the useruidandgidas well as thecontainer_nameandhostname, nothing really fancy. - The Promtail container configuration is also straight-forward. We are using the latest docker image
grafana/promtailand defining again our container name and hostname etc. However, we also have to take care about mapping our log data into the container itself. Otherwise, how will our Docker container be able to access the logs and parse them? In detail, I mapped/var/logof my Linux server into the Promtail container as well as the logs of my reverse proxyNginx Proxy Manager. Its logs are located at/mnt/docker-volumes/Nginx-Proxy-Manager/data/logson my Linux server and mapped into the Promtail container at the path/var/log/npmfor later use. - Finally, we define our Grafana docker container. Again, nothing special at all. We give it a container name, a hostname, specifying the dependent containers and mounting the container data persistently at
/mnt/docker-volumes/Grafana. Feel free to define the domain name of your grafana instance via the environment variableGF_SERVER_ROOT_URL. However, I assume that's optional.
Configuring Promtail
In order for our Promtail container to access, read and parse our log data, we must specify where our log data is available and which of them should be parsed. The log data must be mounted inside the Promtail container, which we defined in the docker-compose.yml file.
Specifying which log file to parse is done through a promtail-config.yml configuration file, located at /mnt/docker-volumes/Promtail/promtail-config.yml. For my use case, I'll force Promtail to parse the following two logs:
- Auth logs: We've successfully bind mounted the logs of my Linux server at
/var/loginto the Promtail container. Therefore, let's use it! I want to parse the well-knownauth.loglog file that holds many interersting things such as SSH logins etc. - NPM logs: Additionally, I want to parse one specific log file of my reverse proxy called
proxy-host-1_access.logthat provides access to a simple Nginx web server.
Each logfile or group of logs will get its own job_name as well as a job label. Finally, we tell Promtail where our log file is located via the __path__ parameter.
__path__: /var/log/npm/{proxy-host-1_access,proxy-host-2_access,default-host_access}.logThe configuration file should look like this:
server:
  http_listen_port: 9080
  grpc_listen_port: 0

positions:
  filename: /tmp/positions.yaml

clients:
  - url: http://loki:3100/loki/api/v1/push

# local machine logs
scrape_configs:
  - job_name: auth
    static_configs:
    - targets:
        - localhost
      labels:
        job: authlogs
        __path__: /var/log/auth.log

  - job_name: npm
    static_configs:
    - targets:
        - localhost
      labels:
        job: npmlogs
        __path__: /var/log/npm/proxy-host-1_access.log
        #__path__: /var/log/npm/proxy-host-*_access.log
promtail-config.yml
Configuring Loki
Finally, we must also define a configuration file for Loki. The file is called loki-config.yml and defined in the above docker-compose.yml (see volume mappings and the config parameter of the Loki service). In my case, it is located at /mnt/docker-volumes/Loki/loki-config.yml of my Linux server.
The config file should contain the following:
auth_enabled: false

analytics:
  reporting_enabled: false

server:
  http_listen_port: 3100
  grpc_listen_port: 9096

compactor:
  working_directory: /tmp/loki/compactor
  retention_enabled: true
  retention_delete_delay: 2h

common:
  path_prefix: /tmp/loki
  storage:
    filesystem:
      chunks_directory: /tmp/loki/chunks
      rules_directory: /tmp/loki/rules
  replication_factor: 1
  ring:
    instance_addr: 127.0.0.1
    kvstore:
      store: inmemory

limits_config:
   reject_old_samples: true
   reject_old_samples_max_age: 168h
   retention_period: 360h
   max_query_series: 100000
   max_query_parallelism: 2
   split_queries_by_interval: 0

schema_config:
  configs:
    - from: 2023-07-01
      store: tsdb
      object_store: filesystem
      schema: v13
      index:
        prefix: index_
        period: 24h

query_range:
  parallelise_shardable_queries: false

querier:
  max_concurrent: 2048

frontend:
  max_outstanding_per_tenant: 4096
  compress_responses: true

ruler:
  alertmanager_url: http://localhost:9093
loki-config.yml
Spawning Our Docker Containers
If you successfully adjusted the above docker-compose.yml file to your needs and ensured that a correct Promtail and Loki configuration exists, we will now be able to proceed booting up our Docker containers.
A single Linux command from the directory your docker-compose.yml is located and your containers should start to see daylight:
sudo docker-compose up -dIf everything went well, you should now be able to log into your Grafana instance at http://<your-servers-ip-address>:3000 via a web browser. If you are not greeted by Grafana, please inspect your Docker logs to identify the misconfiguration. Sometimes it takes a while until all containers are up and running. Depending on your server's hardware, give it a few minutes to come up.
admin. Visualizing Logs Inside Grafana
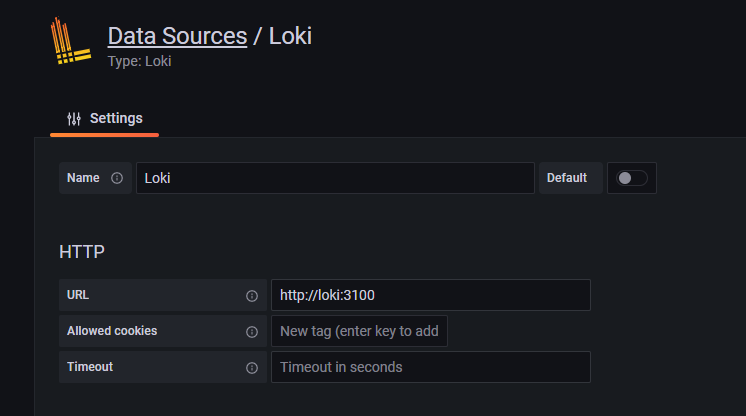
Upon logging into your fresh Grafana instance via a web browser, we must specify our Loki container as data source.
Head over to the URL /datasources and specify Loki as data source. We can use the container's name without specifying an IP address:
Creating a new dashboard
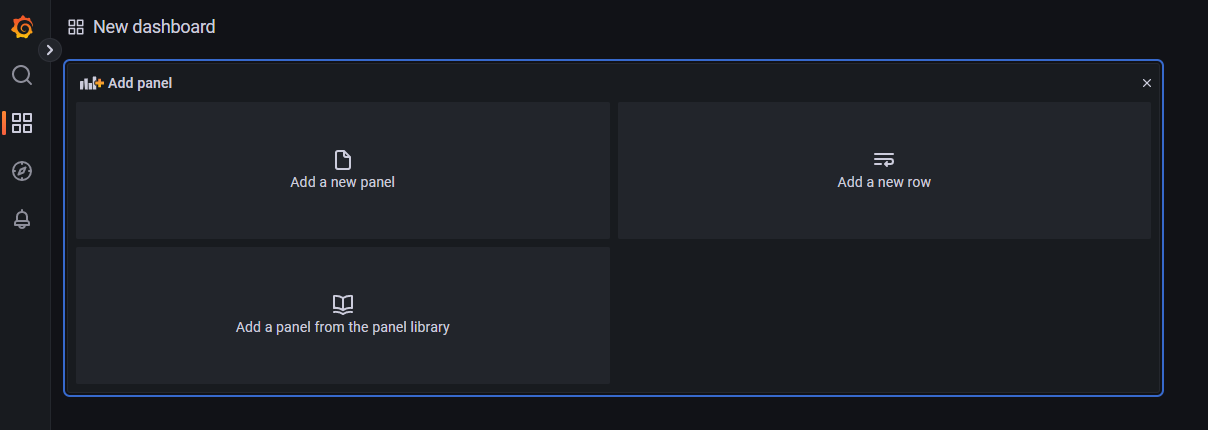
Now we must create a Grafana dashboard to display our log data. Head over to the URL /dashboards and create a new one. You will be greeted by a new page where you can start adding your first panel. Please click on Add a new panel.
In the top right corner we have to select the visualization type Logs, since we are going to display log data.
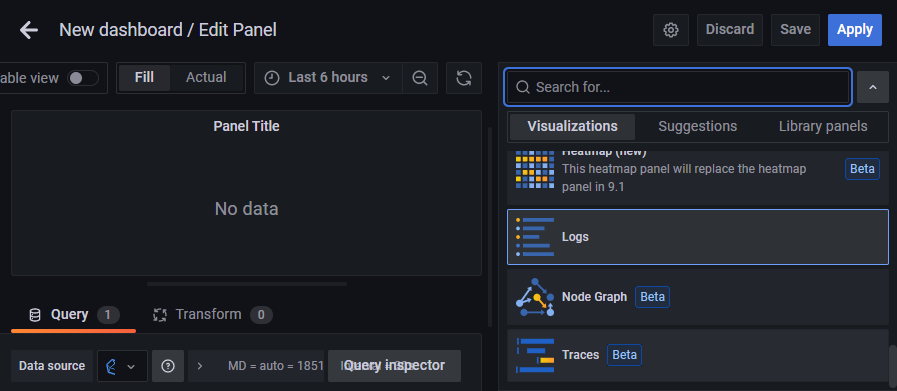
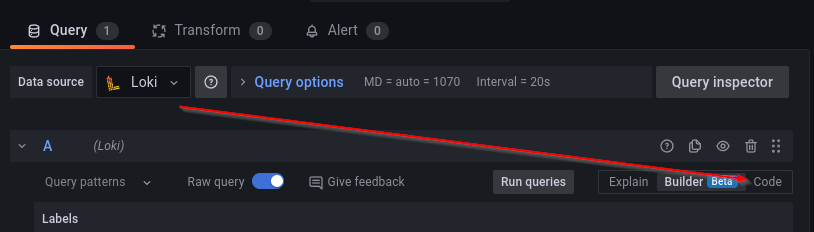
After that we'll hit the code button to switch from Builder mode and be able to insert a raw query string. Inside the query input mask we are now able to define a Grafana Loki LogQL query. Please ensure that Loki is selected as data source in the top left corner.
Defining our query string
For this blog post I will focus on a special query string for my reverse proxy Nginx Proxy Manager. This reverse proxy uses a custom log format, which we have to adhere to in order to visualize log data correctly.
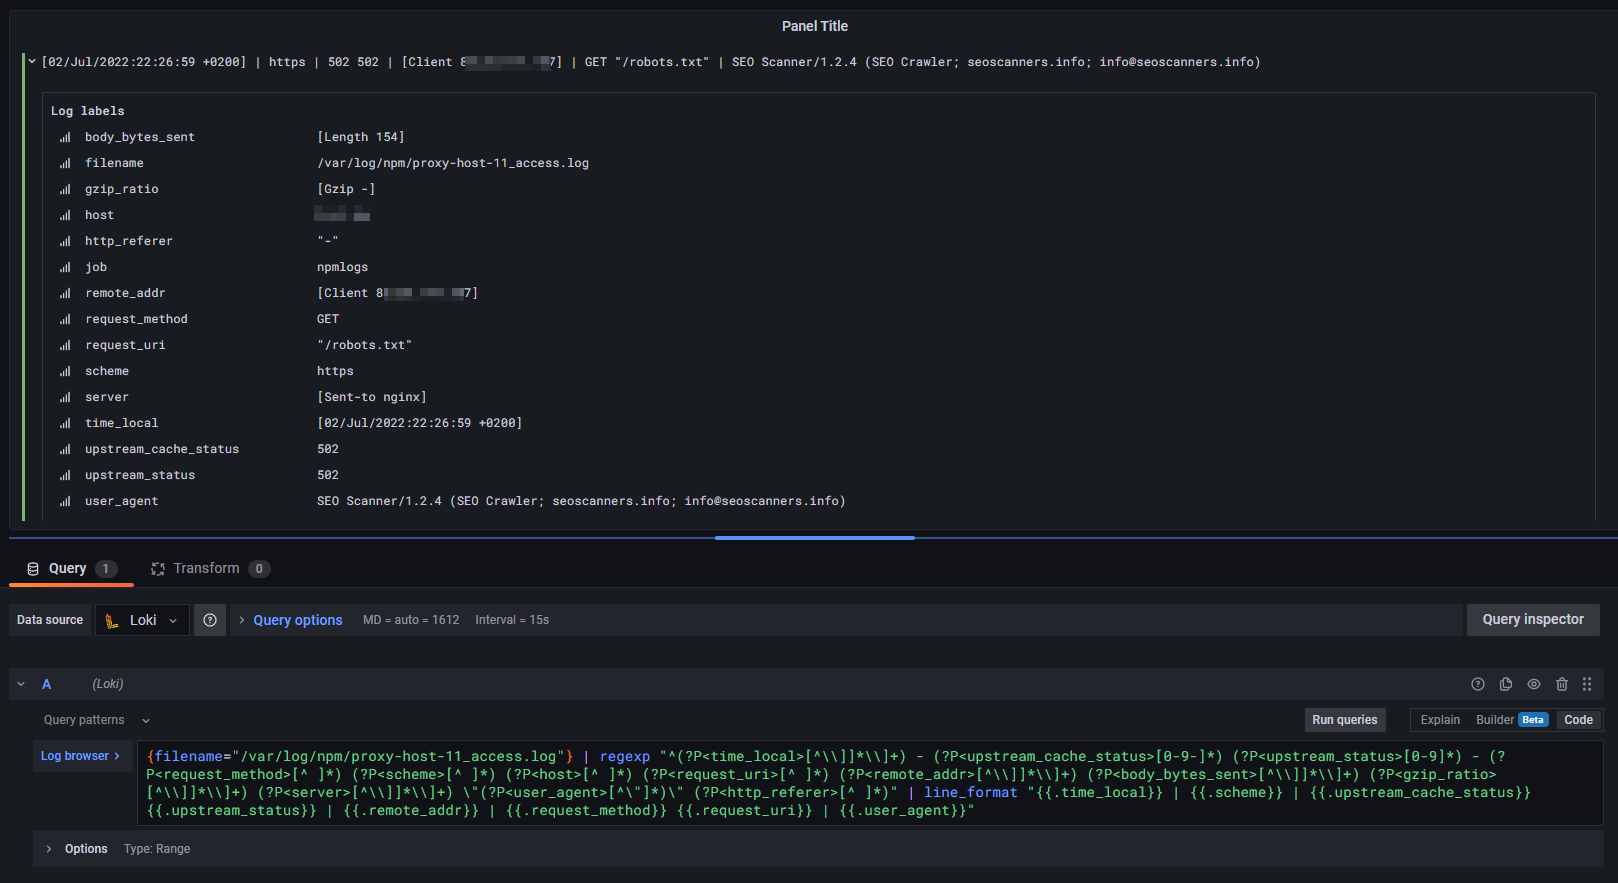
Specify the following query string into the Log browser input mask to parse our NPM log file /var/log/npm/proxy-host-1_access.log. It is based on regular expressions and I am by far not experienced enough to say it's 100% correct. However, it works for my use case and the NPM reverse proxy!
{filename="/var/log/npm/proxy-host-1_access.log"} | regexp "^(?P<time_local>[^\\]]*\\]+) - (?P<upstream_cache_status>[0-9-]*) (?P<upstream_status>[0-9]*) - (?P<request_method>[^ ]*) (?P<scheme>[^ ]*) (?P<host>[^ ]*) (?P<request_uri>[^ ]*) (?P<remote_addr>[^\\]]*\\]+) (?P<body_bytes_sent>[^\\]]*\\]+) (?P<gzip_ratio>[^\\]]*\\]+) (?P<server>[^\\]]*\\]+) \"(?P<user_agent>[^\"]*)\" (?P<http_referer>[^ ]*)" | line_format "{{.time_local}} | {{.scheme}} | {{.upstream_cache_status}} {{.upstream_status}} | {{.remote_addr}} | {{.request_method}} {{.request_uri}} | {{.user_agent}}"LogQL query string in Grafana with regexp
promtail-config.yml configuration file of the Promtail Docker container. You can also uncomment the line in the previously outlined Promtail configuration line to pass all NPM logs to Loki.Note that Loki also offers a Docker log driver, which you can setup in /etc/docker/daemon.json to automatically fetch Docker container logs.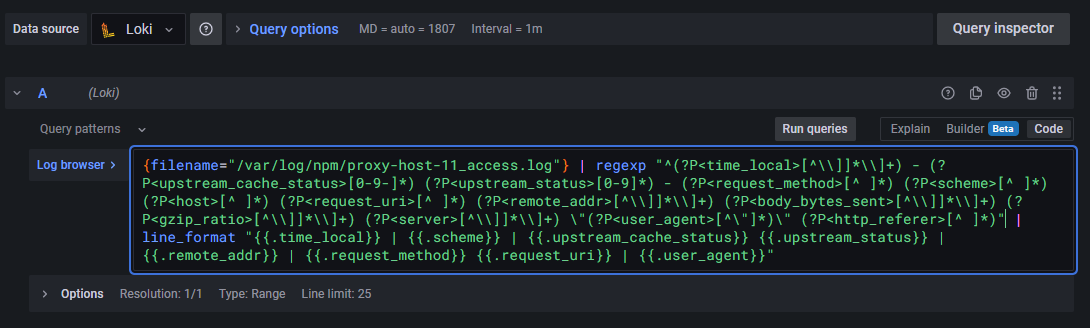
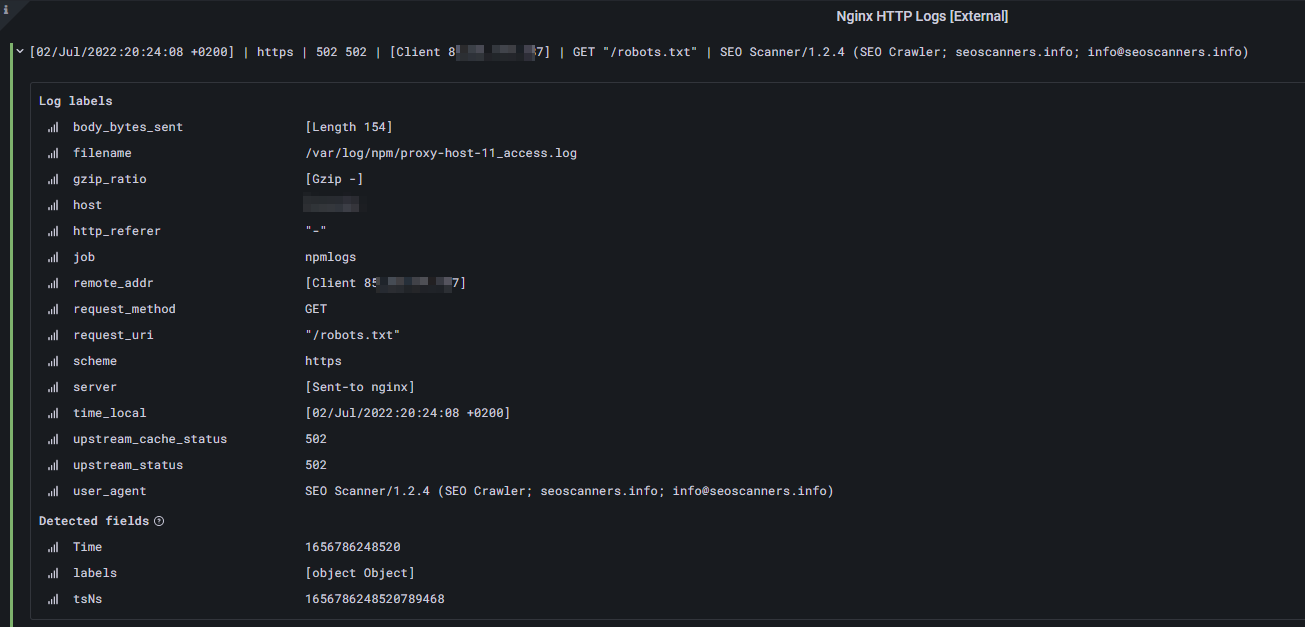
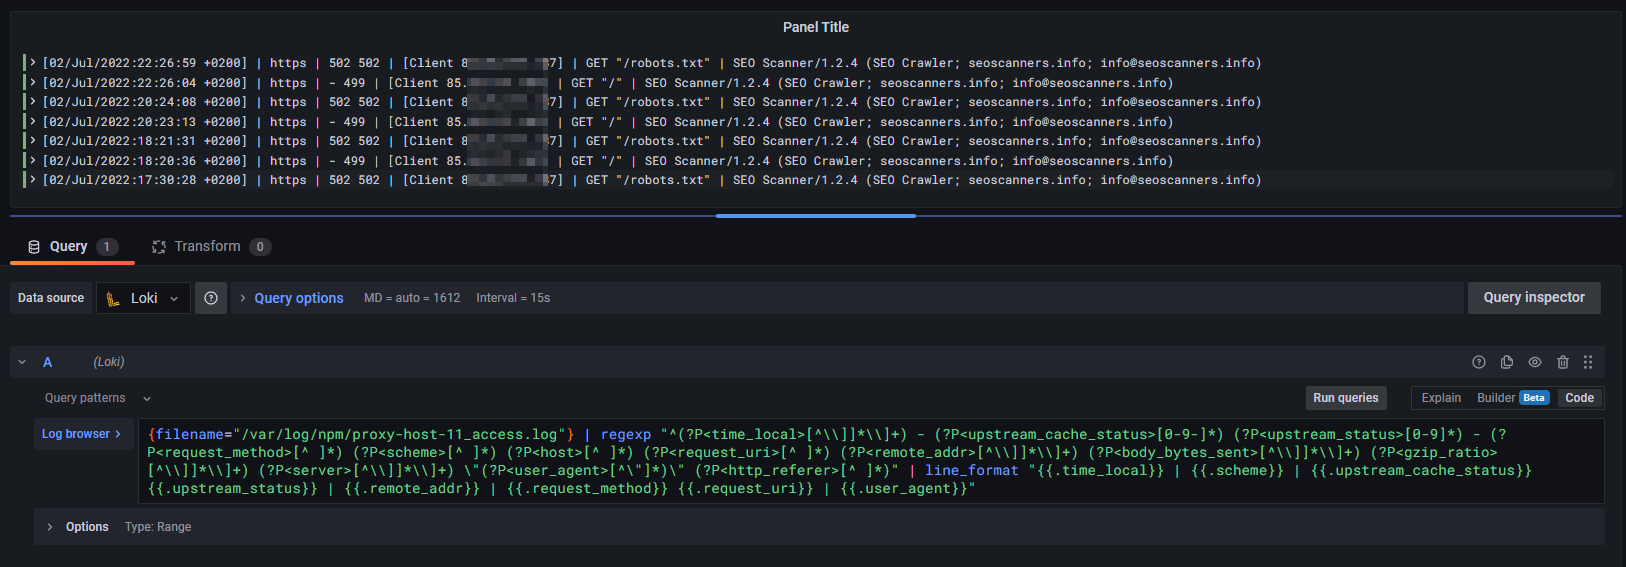
After pasting our query string, we will be greeted by our first log lines, which are correctly parsed and visualized. Furthermore, due to our advanced regexp filter, each data field of a log line is available as log label. Awesome!
If you uncommented the wildcard line within the Promtail configuration file to pass all NPM logs to Loki, you can use the following LogQL regexp query to visualize all NPM proxy host access logs within Grafana:
{job="npmlogs"} | regexp "^(?P<time_local>[^\\]]*\\]+) - (?P<upstream_cache_status>[0-9-]*) (?P<upstream_status>[0-9]*) - (?P<request_method>[^ ]*) (?P<scheme>[^ ]*) (?P<host>[^ ]*) (?P<request_uri>[^ ]*) (?P<remote_addr>[^\\]]*\\]+) (?P<body_bytes_sent>[^\\]]*\\]+) (?P<gzip_ratio>[^\\]]*\\]+) (?P<server>[^\\]]*\\]+) \"(?P<user_agent>[^\"]*)\" (?P<http_referer>[^ ]*)" !~ "192.168." !~ "- 403" !~ "200 200" !~ "301 301" !~ "304 304" !~ "- 499" !~ "204 204" !~ "apple-touch-icon" | line_format " {{.time_local}} | {{.server}} | {{.scheme}} | {{.upstream_cache_status}} {{.upstream_status}} | {{.remote_addr}} | {{.request_method}} {{.request_uri}} | {{.user_agent}} | {{.filename}}"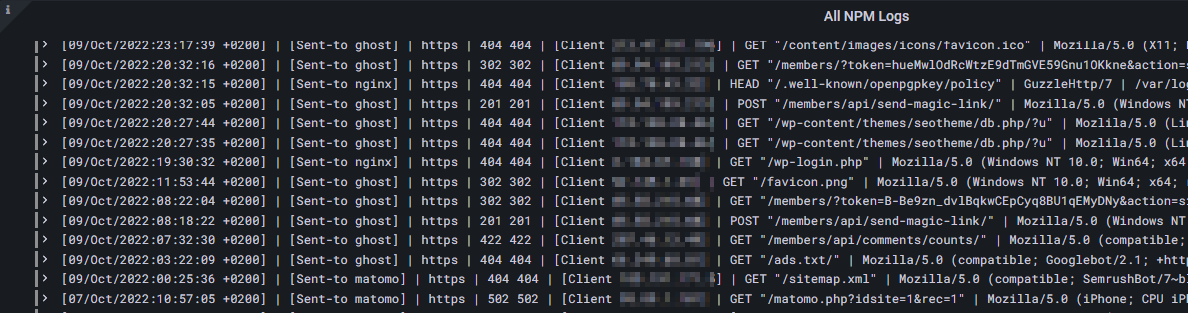
If you want to display other log data such as auth.logs or regular Apache/Nginx logs, feel free to browse the Internet for the correct LogQL regexp pattern. Just as an example, to display successful SSH logins you may use the following query string by utilizing simple filters only:
{filename="/var/log/auth.log"} |= "sshd" |= "session opened"LogQL query string for SSH logins in auth.log

Conclusion
Parsing and visualizing log data with a Docker stack consisting of Grafana, Loki and Promtail is very handy. The log data is clearly visualized and we can use even more advanced Grafana Loki queries to filter for what we are really interested in. For example authentication failures, hacking attempts by automated Internet bots and many more things.
If you want to learn more about Loki filters and overall Grafana's LogQL query language, please inspect the corresponding documentation. It's quite easy to understand and very helpful when parsing logs.
Finally, I can recommend a great YouTube video that helped me out a lot and got things started. Many thanks to Techno Tim for publishing such great content for free!
YouTube video about Grafana Loki by Techno Tim


Discussion