


Operating an IT infrastructure requires a lot of work, such as regular patch and release management, as well as the general hardening of all IT assets to protect them against malicious hacking attempts. An often preached recommendation in order to improve security is to decrease the overall attack surface.
Reducing the attack surface contains a facet of many things. For this blog post however, we will focus on identifying unnecessary network services in an IT infrastructure with the tool Nmap by visualizing the scan results as fancy HTML report.
The goal is to empower sysadmins and IT-savvy staff to scan their networks independently to find unneeded, outdated and vulnerable network services.
Identifying Network Services
There are many publicly known tools available to identify open TCP and UDP ports of IT systems or network ranges. For this blog post we will rely on the most popular port scanning tool Nmap that provides moderate speed and very reliable scan results.
A non-exhaustive list of well-known port scanners:
- Nmap - the potentially most popular port scanning tool with moderate speed but very reliable results
- Masscan - also a very known port scanning tool with focus on speed. It promises to the scan the whole IPv4 Internet within 10 minutes.
- RustScan - a relative modern port scanning tool build with the Go programming language. It focuses on speed and a fast identification of open ports. Can be used in conjunction with the regular Nmap port scanning tool for advanced scans such as service or script scans.
- Unicornscan - very old but popular UDP port scanning tool. Mainly used to identify UDP ports.
- DivideAndScan - a very handy wrapper script around many port scanning tools to improve speed and reliable results
The Nmap Port Scanning Tool
Installation
Nmap is usually present in many default repositories. Therefore, an installation should be easily possible by executing the following command on your Linux based machine:
sudo apt install nmapAlternatively, Nmap can also be used on Microsoft Windows. Binary downloads can be found here.
Nmap CLI
The port scanning tool Nmap provides many CLI command flags and parameters to tweak a scan. Getting used to all available features, its advantages and disadvantages can be really time consuming. Therefore, we will just provide command examples, which you can research in detail later on.
Generally, it is recommended to identify open ports first prior running advanced scans on target systems to enumerate specific software versions, banners, configuration settings and vulnerability susceptibility. This reduces the overall scan time, since Nmap must not go over all 65535 TCP ports and additionally conduct various scan modules on useless, potentially closed network services.
This means that we will first execute a basic Nmap scan to identify all open TCP network ports without additional scripts or modules. Later on we will use the identified range of open ports and conduct a more focused and advanced service and script scan of our target services. We will ignore UDP ports for now due to the common problematic of unreliable scanning results.
Scanning a Target
To identify open network services within the TCP port range 0-65535 execute the following Nmap command. Please define your target systems as single IP address (e.g. 10.10.10.10) or a network range (10.10.10.0-80 or 10.10.10.0/24). You may also use DNS hostnames like example.com, which will be resolved by Nmap to the correct IP address when a scan is started.
-iL <txt-file> to run your scan.sudo nmap -sS -Pn --open --min-hostgroup 256 --min-rate 5000 --max-retries 3 -oA nmap_fullrange_portscan -vvv -p- <IP-1> <IP-2> <IP-RANGE>During the scan you will see the Nmap results on stdout of your terminal. Upon finishing the scan, you will have multiple files holding your scan results such as .gnmap, .nmap and .xml.
For our second, more advanced Nmap scan we have to specify all previously identified open ports. Since it is often time consuming to list all open ports from an Nmap results file, I recommend using a bashrc helper script.
Paste the following snippet in your ~/.bashrc configuration file for persisted later use or alternatively just paste it in your active terminal window for temporary use:
function getports() {
        nmap_file=$1
        RED='\033[0;31m'
        NC='\033[0m' # No Color
        if [[ "$nmap_file" == *".nmap"* ]];then
                ports=$(cat $1 | grep " open " | grep -e tcp -e udp | cut -d"/" -f1 | sort | uniq | tr "\n" "," | sed 's/.$//')
                echo $ports && echo
        else
                echo -e "${RED}Only .NMAP format supported! Exiting..${NC}"
        fi
}If you used bashrc, then load the new configuration with the following command:
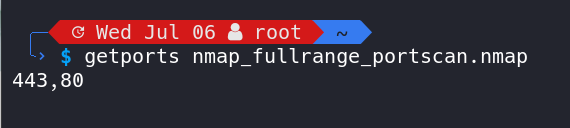
source ~/.bashrcAfterwards we are able to use the helper function getports() to retrieve all open ports of an Nmap .nmap output file. You can use the new function as follows:
getports nmap_fullrange_portscan.nmapThis will list all identified open ports within the nmap_fullrange_portscan.nmap results file of your initially executed basic Nmap scan.
The resulting port range can be used in the -p parameter of our second Nmap advanced scan:
sudo nmap -sS -sV --script=default,version,vuln,ssl-enum-ciphers,ssh-auth-methods,ssh2-enum-algos -Pn --open --min-hostgroup 256 --min-rate 5000 --max-retries 3 --script-timeout 300 -d --stylesheet https://raw.githubusercontent.com/Haxxnet/nmap-bootstrap-xsl/main/nmap-bootstrap.xsl -oA nmap_advanced_portscan -vvv -p <PORTRANGE-GETPORTS> <IP-1> <IP-2> <IP-RANGE>Nmap HTML Report
The newly created output file nmap_advanced_portscan.xml holds our final port scan results. It can already be opened with a browser of your choice and will display the results as HTML report since we ran our Nmap scan with the --stylesheet CLI flag.
However, I recommend converting the XML file into a standalone HTML report with the following command to ensure support by all type of web browsers:
# install xsltproc
sudo apt install -y xsltproc

# convert nmap xml file into html
xsltproc -o report.html <STYLESHEET-FILE>.xsl <NMAP-RESULT-FILE>.xmlYou can find my Nmap Boostrap XSL here on GitHub:
 Haxxnet
--stylesheet CLI command we can style the scanning results to be visible as HTML report. Alternatively, you can convert an Nmap
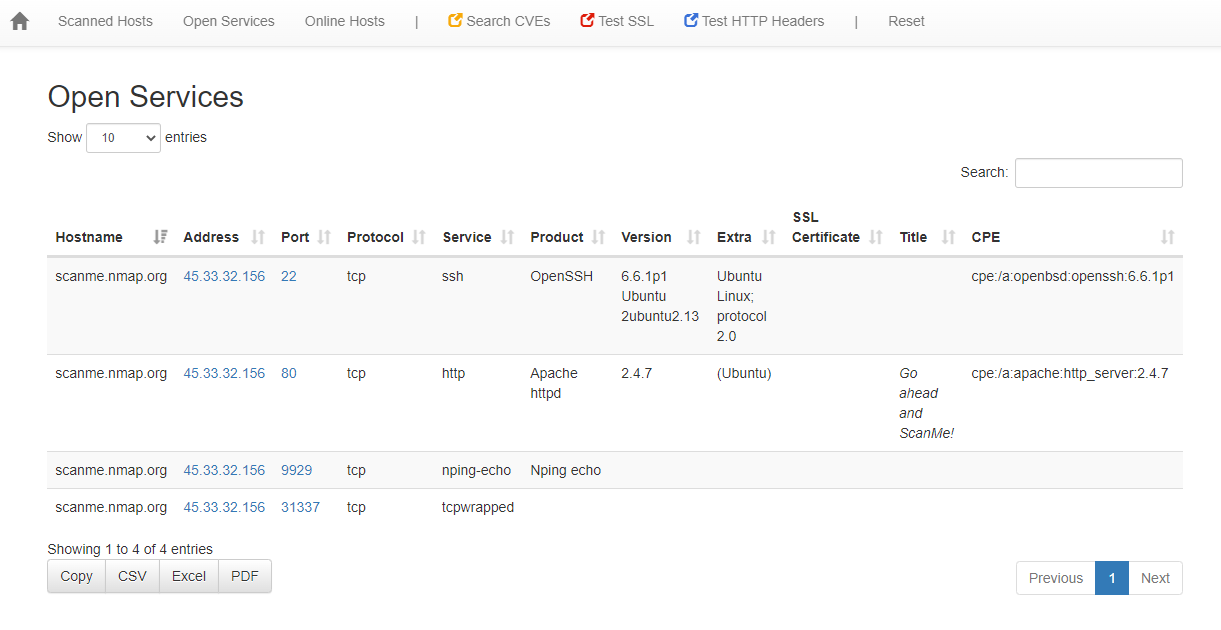
.xml file by specifying a stylesheet retroactively using xsltproc.Upon opening our XML or HTML result file within a browser, we are greeted by a beautiful HTML report that visualizes our scanning results in a clear manner. We have the ability to filter, search and sort data as well as can download our port scan results as CSV, Excel or PDF file. This provides advanced visibility to detect anomalies.
Conclusion
Identifying open ports with Nmap is now considered easy. Furthermore, by visualizing the scan results as HTML report, we obtain a handier way of examining data and can identify anomalies such as unnecessary ports or firewall misconfigurations more easily.
Generally, it is recommended to offer necessary network services only. Services that are not needed for the business purpose should be closed or made inaccessible by firewall rules.
Also watch out for service banners and headers disclosing your detailed software products and versions in use. Ensure that those software versions are up-to-date with the latest security patches.
Additionally, disable the disclosure of detailed version information in HTTP headers like Server and X-Powered-By. Consult the corresponding documentation of your web server. This is an optional hardening measure.
 Aaron Kili
 Aaron Kili


Discussion