


Traefik gained popularity as reverse proxy amongst selfhosters, homelabbers and enterprise organizations. It's unique feature of auto-detecting containerized services and the ability to automatically expose them is apparently in hot demand. Especially for power users of Kubernetes, Docker Swarm and AWS ECS.
Combined with the Infrastructure as Code approach, Traefik does not need a database and can be configured by configuration files or labels only. This syncs perfectly with containerized services and DevOPS (e.g. CI/CD).
Since the access logs of Traefik are structured in a normalized format, CrowdSec can easily be used to analyze those logs for malicious activities. Moreover, one can utilize CrowdSec's Cyber Threat Intelligence (CTI) as well as shared incident data by the community to protect online web services in great detail.
In this blog post, I'll guide you through implementing CrowdSec for Traefik.
Prerequisites
For this blog post, we will focus on implementing CrowdSec in conjunction with Traefik as reverse proxy behind CloudFlare (CF).
I will not go into detail on how to run and configure Traefik, set up port forwardings on your router or define the necessary DNS entries on CloudFlare to get you started. I assume that these things are already running and working for you.
Moreover, I want to state that both software solutions are run as Docker containers via Docker + Docker Compose. No baremetal.
If you do not have a Traefik container yet, may check out my GitHub repo with various examples:
 Haxxnet
Introduction to CrowdSec
Let's start with the official description by CrowdSec:
CrowdSec is a free, modern & collaborative behavior detection engine, coupled with a global IP reputation network.
It stacks on fail2ban's philosophy but is IPV6 compatible and 60x faster (Go vs Python), it uses Grok patterns to parse logs and YAML scenarios to identify behaviors.
CrowdSec is engineered for modern Cloud / Containers / VM-based infrastructures (by decoupling detection and remediation). Once detected you can remedy threats with various bouncers (firewall block, nginx http 403, Captchas, etc.) while the aggressive IP can be sent to CrowdSec for curation before being shared among all users to further improve everyone's security.
crowdsecuritySo besides my other blog posts about implementing Fail2ban for Traefik and Nginx Proxy Manager (NPM), we will now implement the modern CrowdSec approach.
The reasons for CrowdSec over Fail2ban are quite self-explanatory:
- CrowdSec runs 60x faster than Fail2ban
- CrowdSec supports IPv4 and IPv6 in full. Furthermore, better support for IP banning since we do not have to rely on Fail2ban's iptable string matching filter or third-party scripts for CloudFlare API banning. Bouncers will do the job for us.
- CrowdSec provides numerous pre-defined detection scenarios organized into collections that support a variety of applications (e.g., Traefik, Vaultwarden, Guacamole and many more). This contrasts with Fail2ban’s more manual setup and lacks the extensive, community-driven library of detection scenarios available in CrowdSec.
- CrowdSec's collaborative approach of sharing insights about incidents on other CrowdSec-protected IT infrastructures helps to identify new threats globally and enrich CrowdSec's Cyber Threat Intelligence (CTI) database. This way, CrowdSec goes beyond basic IP banning by incorporating CTI. This intelligence empowers preemptive blocking, stopping known malicious actors before they even reach our IT infrastructure services. Also provides additional information about CVE vulnerabilities, MITRE ATT&CK TTPs, known Advanced Persistent Threat (APT) actors as well as malicious IP addresses or ranges.
Detection Capabilities
CrowdSec leverages a three-tiered detection approach to secure systems against both known and emerging threats:
- Local Decision Making: CrowdSec’s local decision-making capability enables it to detect and respond to attacks in real-time as they occur. When suspicious activity — such as brute-forcing or forceful HTTP probing — matches one of CrowdSec’s predefined detection scenarios, it triggers a local decision. This action, like blocking or throttling an IP, directly addresses attacks detected within the system. Local decisions ensure that any new or previously unknown attackers are promptly blocked before they can escalate their activity. This is typically done by parsing log files. Finally, the decision's metadata such as the threat actor's IP address is shared with the CrowdSec community via CrowdSec's Cyber Threat Intelligence (CTI).
- Remote Decision Making: The remote decision-making feature is powered by CrowdSec’s global community and CTI. When a threat actor is identified by any CrowdSec instance worldwide, that information is shared with CrowdSec’s Cyber Threat Intelligence (CTI) database. Such known malicious IPs are then flagged for preemptive blocking on all other CrowdSec protected systems through remote decisions. This proactive layer allows CrowdSec to block incoming threats based on collective knowledge, stopping known bad actors before they even access your services. This is implemented by using a CrowdSec bouncer (e.g. for a Traefik reverse proxy).
- AppSec (WAF): CrowdSec can be configured to act as a WAF middleware. In this case, each HTTP request is relayed to CrowdSec's AppSec endpoint on TCP/7422, which will analyze the request for malicious patterns. Those patterns may be payloads for exploiting SQL injections, XSS or command injections. If wanted, one can make use of the infamous OWASP Core-Rule-Set (CRS) that is mostly known by the open-source WAF ModSecurity and used by many other WAF vendors too.
- This AppSec feature will not be configured, enabled nor discussed in this blog post. Configuring a WAF requires some time and often a specific configuration per proxied application.
For local decision-making, CrowdSec supports various Scenarios out-of-the-box. These are typically bundled in so-called Collections. By following this guide, you will end up implementing over 100 scenarios for local decision-making. Against those, your HTTP services behind Traefik will be protected from.

We will add the following collections:
- Collections for Traefik and HTTP (mandatory)
- Collections for Linux logs (recommended)
- Collections for AppSec/WAF (optional)
Running CrowdSec
CrowdSec can be run and installed on bare metal but there also exists a containerized version. For this blog post, we will focus on using the official Docker container provided by CrowdSec.
Docker Compose
To spawn up CrowdSec, you can use the following Docker Compose:
services:

  crowdsec:
    image: crowdsecurity/crowdsec:v1.6.8
    container_name: crowdsec
    restart: unless-stopped
    ports:
      - 127.0.0.1:9876:8080 # port mapping for local firewall bouncers
    expose:
      - 8080 # http api for bouncers
      - 6060 # metrics endpoint for prometheus
      - 7422 # appsec waf endpoint
    volumes:
      # crowdsec container data
      - ${DOCKER_VOLUME_STORAGE:-/mnt/docker-volumes}/crowdsec/data:/var/lib/crowdsec/data
      - ${DOCKER_VOLUME_STORAGE:-/mnt/docker-volumes}/crowdsec/etc:/etc/crowdsec
      # log bind mounts into crowdsec
      - /var/log/auth.log:/var/log/auth.log:ro
      - /var/log/syslog:/var/log/syslog:ro
      - ${DOCKER_VOLUME_STORAGE:-/mnt/docker-volumes}/traefik/logs:/var/log/traefik:ro
    environment:
      - GID=1000
      - COLLECTIONS=crowdsecurity/traefik crowdsecurity/http-cve crowdsecurity/base-http-scenarios crowdsecurity/sshd crowdsecurity/linux crowdsecurity/appsec-generic-rules crowdsecurity/appsec-virtual-patching crowdsecurity/appsec-crs
      #- CUSTOM_HOSTNAME=my-crowdsec-host123
    networks:
      - proxy

networks:
  proxy:
    external: true
compose.yml for CrowdSec
/mnt/docker-volumes/<stack-name>.This way, my Traefik container logs are also stored on the NFS share. You have to bind mount the log folder of Traefik into the CrowdSec container. Otherwise, CrowdSec is not able to parse and analyze them.
proxy.You can spawn it up via:
docker compose up -dSpawning up the Docker stack
Enroll Security Engine
After spawning up the CrowdSec container, we have to enroll it to our CrowdSec cloud account as security engine. To do so, visit the CrowdSec homepage below and register your account.
CrowdSec will advise you to enroll the engine by executing a CSCLI command.
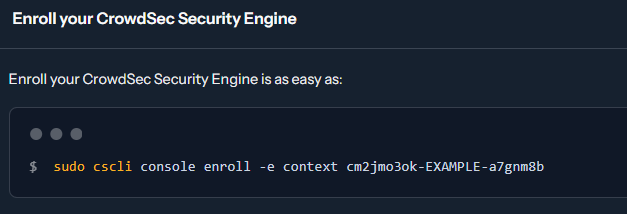
Since we are running CrowdSec as Docker container, we cannot use the bash command given. Instead, we will exec into the running CrowdSec container and issue the command from within as follows:
# enroll security engine by execing into the crowdsec container
docker exec crowdsec cscli console enroll -e context <YOUR-CODE>
Enrolling a security engine for CrowdSec
The container will respond with the following stdout message:

Creating a Bouncer API Token
After approving our security engine, we have to create a Traefik bouncer for our CrowdSec container. The bouncer requires an API token, which will be created in the process.
To add a bouncer, run the following command:
docker exec crowdsec cscli bouncers add traefik-bouncerAdding a bouncer in CrowdSec
The command will return the following stdout message:

Please make note of this API token, as we have to define it later on within a Traefik middleware configuration.
Configure Log Parsing
Finally, we have to advice the CrowdSec container to parse our local Linux and Traefik logs. To do so, we must adjust a CrowdSec configuration file, which is written by the container to our defined bind mount volume.
The configuration file is located at:
sudo nano /mnt/docker-volumes/crowdsec/etc/acquis.yamlOpen this configuration file as sudo and ensure that it reflects this content:
filenames:
 - /var/log/auth.log
 - /var/log/syslog
labels:
  type: syslog
---
poll_without_inotify: false
filenames:
  - /var/log/traefik/*.log
labels:
  type: traefik
---
listen_addr: 0.0.0.0:7422
appsec_config: crowdsecurity/appsec-default
name: myAppSecComponent
source: appsec
labels:
  type: appsec
/etc/acquis.yaml
If your log files are stored onto an NFS share, you may want to use
poll_without_inotify: true for each log source as outlined by CrowdSec here.Configure Notifications
If you want to configure CrowdSec notifications (e.g. Telegram or E-Mails), may have a look at the following official documentation. This step is considered optional. You may do it now, later or never.

You basically have to adjust two CrowdSec config files, which are written onto disk at the defined bind mount volume path.
In detail:
# enable notifications
sudo nano /mnt/docker-volumes/crowdsec/etc/profiles.yaml

# configure notification settings
sudo nano /mnt/docker-volumes/crowdsec/etc/notifications/http.yaml
sudo nano /mnt/docker-volumes/crowdsec/etc/notifications/email.yaml
Enabling notifications in CrowdSec
You can test configured notifications via:
# list notifications
docker exec crowdsec cscli notifications list

# test a notification channel
docker exec crowdsec cscli notifications test http_default
docker exec crowdsec cscli notifications test email_default
Testing configured notifications in CrowdSec
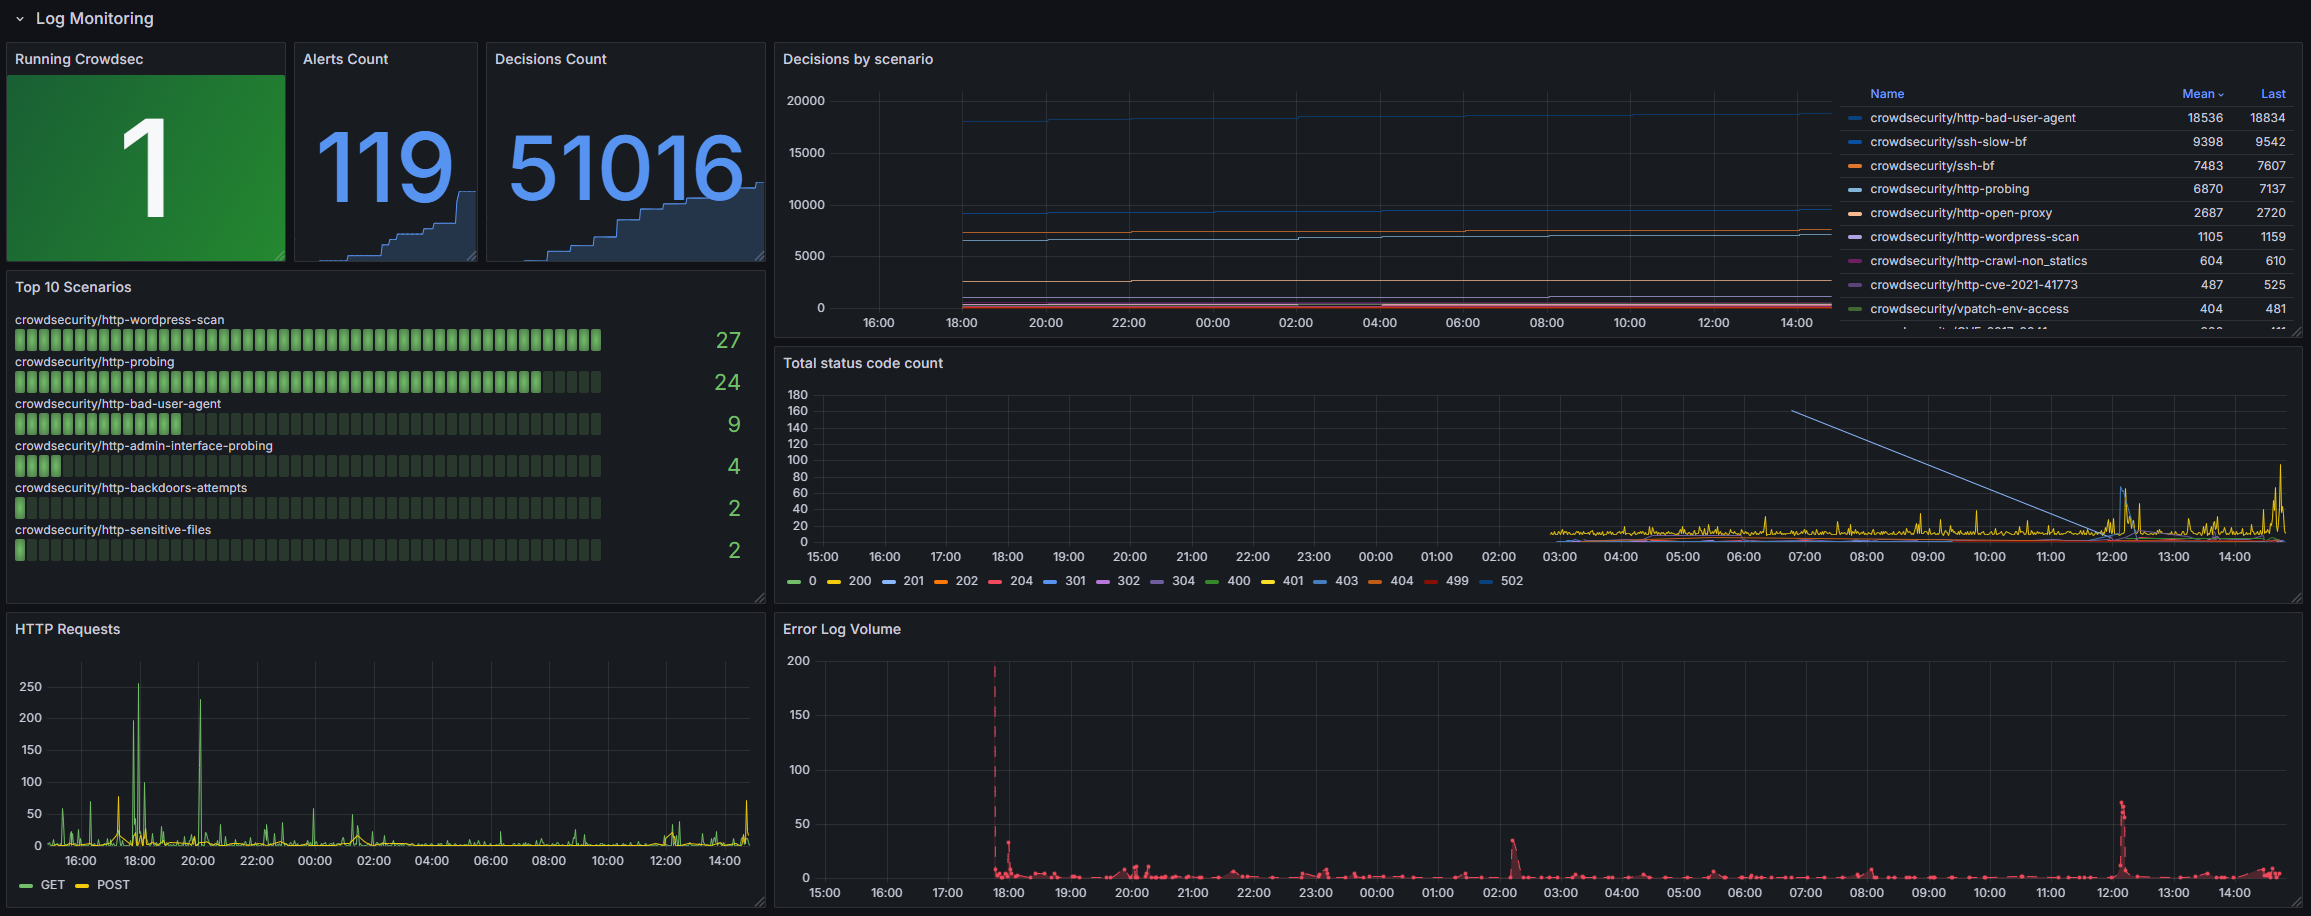
Visualizations
This section is totally optional.
I just want to let you know about some cool features to visualize CrowdSec statistics.
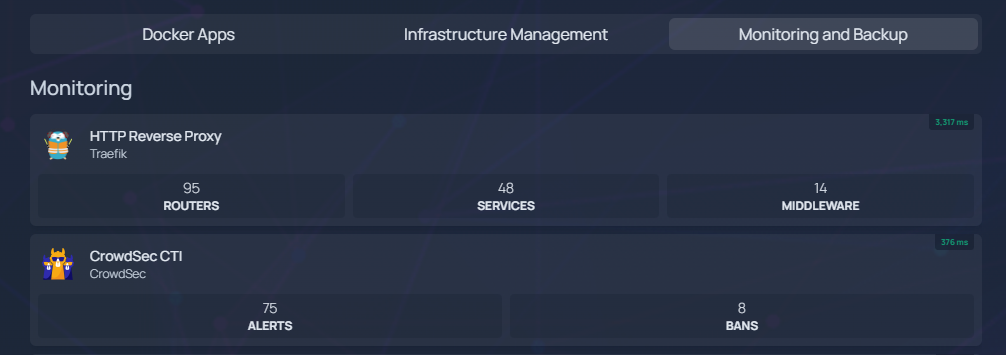
Homepage Widget
The popular Homepage dashboard supports a CrowdSec widget.
Grafana Dashboard
The CrowdSec container exposes a metrics endpoint on TCP/6060 for Prometheus.
This means that you can spawn up a stack consisting of Grafana and Prometheus to visualize CrowdSec statistics. Moreover, CrowdSec provides multiple Grafana dashboard examples here.
A Traefik + CrowdSec dashboard in Grafana may look like this:
Configuring Traefik
After spawning up the CrowdSec Docker container, enrolling our security engine, creating a bouncer API token and enabling log parsing, we have to enroll the CrowdSec bouncer to Traefik and define an actual middleware.
Adding a CrowdSec bouncer to Traefik can be done via various ways. In the older days, many people used Traefik's forward-auth middleware to implement this. Nowadays, we will make use of a dedicated bouncer plugin for Traefik.
But first things first ...
Enabling Traefik Logs
In order for CrowdSec to protect our web services, we have to enable access logs in Traefik. Those are not enabled per default.
To do so, open your static configuration file of Traefik, typically named traefik.yaml and paste the following directive somewhere at the top:
accessLog:
  filePath: "/logs/traefik.log"
  format: json
  filters:
    statusCodes:
      - "200-299" # log successful http requests
      - "400-599" # log failed http requests
  # collect logs as in-memory buffer before writing into log file
  bufferingSize: 0
  fields:
    headers:
      defaultMode: drop # drop all headers per default
      names:
          User-Agent: keep # log user agent strings
Snippet of traefik.yaml (static) to enable logging
In my case, I am logging both successful (200-299) and unsuccessful (400-599) HTTP requests. Those are directly written into a JSON logfile and not buffered. This ensures that CrowdSec can act upon the logs instantly with no time delay.
Moreover, I include the user-agent string in the logs. This helps CrowdSec to identify bad bots and block threat actors using known hacking tooling (nmap, gobuster, sqlmap etc.).
The Traefik Docker Compose file will bind mount the logs as follows, if you don't have implemented this yet:
    volumes:
      - /var/run/docker.sock:/var/run/docker.sock:ro # ro = read-only access to the docker.sock
      - ${DOCKER_VOLUME_STORAGE:-/mnt/docker-volumes}/traefik:/etc/traefik/ # put the provided traefik.yml and fileConfig.yml files at this location
      - ${DOCKER_VOLUME_STORAGE:-/mnt/docker-volumes}/traefik/logs:/logs # here are the logs stored
Snippet of Traefik's Docker Compose
# place this example code at /etc/logrotate.d/traefik on your docker host server
# please adjust the custom file path below, where your traefik logs are stored
# please adjust the below traefik container name to send the USR1 signal for log rotation

compress
/mnt/docker-volumes/traefik/logs/*.log {
  size 20M
  daily
  rotate 14
  missingok
  notifempty postrotate
  docker kill --signal="USR1" traefik # adjust this line to your traefik container name
  endscript
}
Implementation of logrotate for Traefik logs
CloudFlare as Trusted IP
If your Traefik reverse proxy runs behind the CloudFlare CDN network, you have to define CloudFlare within Traefik as trusted IP. This is necessary, as requests are basically proxied by two reverse proxies to the underlying HTTP service - namely CloudFlare and our Traefik instance. Due to this, the real visitor's IP address is hidden and Traefik only sees requests originating from the CloudFlare network.
Therefore, the Traefik logs would only contain CloudFlare IP addresses, which do not help CrowdSec to analyze and ban the real threat actor in front of CloudFlare.
To fix this and obtain the real IP address of users, we define all IPv4 and IPv6 addresses of the CloudFlare CDN network as trusted IPs. This way, Traefik will trust such IP addresses and parse the custom CloudFlare request headers (X-Forwarded-For), which contain the real IP address of a user.
To do so, there exist various methods. One can use a Traefik plugin like cloudflarewarp to parse CloudFlare's CF-Connecting-IP header or manually define the CloudFlare IPs as trusted at Traefik's entrypoint definitions. For this blog post, we'll do the latter in order to stay independent from third-party plugins.
Open your static configuration file of Traefik, typically named traefik.yaml and define all CloudFlare IPv4 and IPv6 addresses as trusted IPs for your entrypoints. Should look something like this:
entryPoints:
  http:
    address: :80
    forwardedHeaders:
      trustedIPs: &trustedIps
        # Start of Cloudlare's public IP list
        - 103.21.244.0/22
        - 103.22.200.0/22
        - 103.31.4.0/22
        - 104.16.0.0/13
        - 104.24.0.0/14
        - 108.162.192.0/18
        - 131.0.72.0/22
        - 141.101.64.0/18
        - 162.158.0.0/15
        - 172.64.0.0/13
        - 173.245.48.0/20
        - 188.114.96.0/20
        - 190.93.240.0/20
        - 197.234.240.0/22
        - 198.41.128.0/17
        - 2400:cb00::/32
        - 2606:4700::/32
        - 2803:f800::/32
        - 2405:b500::/32
        - 2405:8100::/32
        - 2a06:98c0::/29
        - 2c0f:f248::/32
        # End of Cloudlare's public IP list
    http:
      redirections:
        entryPoint:
          to: https
          scheme: https

  # HTTPS endpoint, with domain wildcard
  https:
    address: :443
    forwardedHeaders:
      # Reuse the list of Cloudflare's public IPs from above
      trustedIPs: *trustedIps
    http:
      tls:
       .....
       .....
Snippet from traefik.yaml (static) Traefik config
&trustedIps we can store the trustedIPs definition into a variable and later reuse it via *trustedIps at the https entrypoint without the need to write out all CloudFlare IPs another time.Afterwards, restart your Traefik container and ensure that you see the real IP address of website visitors in your Traefik logs within the JSON key ClientHost. The logs should not contain CloudFlare IP addresses anymore (except in the JSON key ClientAddr). Otherwise, please re-check your configuration.

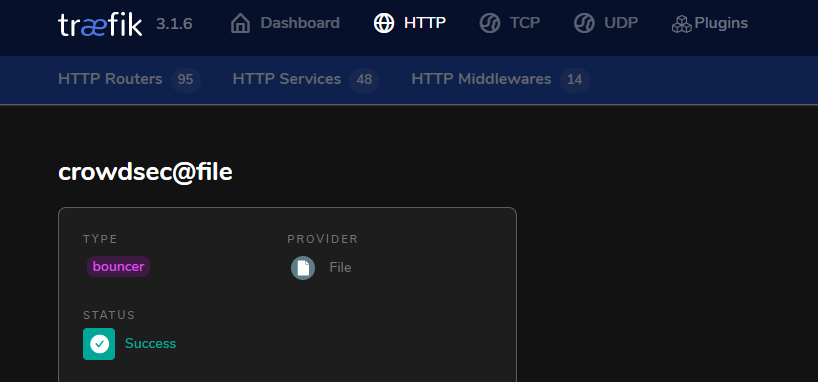
CrowdSec Bouncer Plugin
Open your static configuration file of Traefik, typically named traefik.yaml and add the following plugin definitions to it:
# crowdsec bouncer
experimental:
  plugins:
    bouncer:
      moduleName: github.com/maxlerebourg/crowdsec-bouncer-traefik-plugin
      version: v1.4.4
Snippet of traefik.yaml (static) to enable bouncer plugin
This advices Traefik to use the bouncer plugin developed by maxlerebourg in the latest version v1.4.2.
maxlerebourgAfterwards, you have to restart the Traefik instance to reflect changes. I'll remind you later within this blog post again 😘
CrowdSec Bouncer Middleware
After enabling the CrowdSec bouncer plugin in Traefik's static configuration file, we have to define an actual middleware for later use.
The middleware will be defined in Traefik's dynamic configuration file and outline all configuration needs for our CrowdSec implementation. To do so, open your dynamic configuration file of Traefik, typically named fileConfig.yaml and add the following middleware to the middleware directive:
  middlewares:

    crowdsec:
      plugin:
        bouncer:
          enabled: true
          defaultDecisionSeconds: 60
          crowdsecMode: live
          crowdsecAppsecEnabled: false # <--- here you can enable appsec waf
          crowdsecAppsecHost: crowdsec:7422
          crowdsecAppsecFailureBlock: true
          crowdsecAppsecUnreachableBlock: true
          crowdsecLapiKey: FIXME-LAPI-KEY # <--- replace this
          crowdsecLapiHost: crowdsec:8080
          crowdsecLapiScheme: http
          crowdsecLapiTLSInsecureVerify: false
          forwardedHeadersTrustedIPs:
            # private class ranges
            - 10.0.0.0/8
            - 172.16.0.0/12
            - 192.168.0.0/16
          clientTrustedIPs:
            # private class ranges
            - 10.0.0.0/8
            - 172.16.0.0/12
            - 192.168.0.0/16
Snippet of fileConfig.yaml (dynamic) to enable CrowdSec middleware
As can be seen, the middleware defines various configuration settings for the CrowdSec bouncer. If you want to read up on them, please refer to the official documentation.
crowdsecLapiKey.You may want to be more specific and add the exact /32 IP address of Traefik. However, whitelisting all private class ranges is a more convenient approach. Especially regarding dynamic Docker bridge network IPs that may change during container reboots.
clientTrustedIPs middleware configuration variable we can define trusted IPs or IP ranges we consider trustworthy. Those IP addresses or network ranges will not be blocked or banned by CrowdSec. Basically a whitelisting approach.In my case, I am trusting the local LAN network, which is reflected by whitelisting all private class ranges. You may want to restrict those to your actual LAN subnet range (CIDR) in use.
Protecting Traefik Web Services
Atfer configuring the CrowdSec bouncer and middleware within Traefik, it's time to protect our actual HTTP services proxied by Traefik.
To do so, one may protect individual web services only (via labels) or everything in total (via static entrypoint config). It's your choice!
Individually via Traefik Labels
In general, one can enable the newly added CrowdSec middleware individually per container service via Traefik labels. The implementation would look like the following, based on the popular whoami container:
  whoami:
    image: traefik/whoami
    container_name: whoami-crowdsec-test
    command:
       - --name=whoami
    networks:
      - proxy
    labels:
      - traefik.enable=true
      - traefik.docker.network=proxy
      - traefik.http.routers.whoami.rule=Host(`whoami.example.com`)
      - traefik.http.routers.whoami.service=whoami
      - traefik.http.services.whoami.loadbalancer.server.port=80
      - traefik.http.routers.whoami.middlewares=crowdsec@file

networks:
  proxy:
    external: true
Whoami Docker Compose with individually enabled CrowdSec middleware
traefik.http.routers.whoami.middlewares, which defines our newly added CrowdSec middleware in Traefik's dynamic configuration file - called crowdsec@file. The @file declaration defines that it is a file provider config, namely defined in the fileConfig.yaml dynamic config.Generally via Entrypoint Middleware
Alternatively, one can define a middleware directly at entrypoint level. This has the advantage that the middleware is active for all proxied container services that make use of this entrypoint. You basically enable CrowdSec protection for all your services.
To do so, open your static configuration file of Traefik, typically called traefik.yaml and add the CrowdSec middleware at the entrypoint level. In my case, I have two entrypoints in Traefik. One is called http and the other is called https.
Accordingly, I will add the CrowdSec middleware as default to the https entrypoint as follows:
# Traefik entrypoints (network ports) configuration
entryPoints:
  http:
    address: :80
    forwardedHeaders:
      trustedIPs: &trustedIps
        # Start of Cloudlare's public IP list
        - 103.21.244.0/22
        - 103.22.200.0/22
        - 103.31.4.0/22
        - 104.16.0.0/13
        - 104.24.0.0/14
        - 108.162.192.0/18
        - 131.0.72.0/22
        - 141.101.64.0/18
        - 162.158.0.0/15
        - 172.64.0.0/13
        - 173.245.48.0/20
        - 188.114.96.0/20
        - 190.93.240.0/20
        - 197.234.240.0/22
        - 198.41.128.0/17
        - 2400:cb00::/32
        - 2606:4700::/32
        - 2803:f800::/32
        - 2405:b500::/32
        - 2405:8100::/32
        - 2a06:98c0::/29
        - 2c0f:f248::/32
        # End of Cloudlare public IP list
    http:
      redirections:
        entryPoint:
          to: https
          scheme: https

  # HTTPS endpoint, with domain wildcard
  https:
    address: :443
    forwardedHeaders:
      # Reuse the list of Cloudflare's public IPs from above
      trustedIPs: *trustedIps
    # enable HTTP3 QUIC via UDP/443
    http3:
      advertisedPort: '443'
    http:
      tls:
        # Generate a wildcard domain certificate
        certResolver: myresolver
        domains:
          - main: example.com # change this to your proxy domain
            sans:
              - '*.example.com' # change this to your proxy domain
      middlewares:
        - security-headers@file # reference to a dynamic middleware for setting http security headers per default
        - rate-limit@file # reference to a dynamic middleware for enabling rate limiting per default
        - crowdsec@file # reference to a dynamic middleware for enabling crowdsec bouncer
Snippet of traefik.yaml (static) to enable CrowdSec middleware on entrypoint level
http entrypoint only redirects unencrypted HTTP traffic to the TLS encrypted https entrypoint. For the https entrypoint, I have enabled multiple default middlewares such as security headers, rate limiting as well as the newly added CrowdSec middleware.Moreover, I've defined the CloudFlare IPv4 and IPv6 addresses as trusted IPs directly on the entrypoints. This ensures that the Traefik logs obtain the correct IP address of site visitors, defined in CloudFlare's
CF_CONNECTING_IP HTTP header.Please adjust to your needs and setup.
Testing the Setup
First of all, ensure that you have properly defined the CrowdSec bouncer API token at the following location, replacing the placeholder FIXME-LAPI-KEY:
- Traefik's dynamic configuration file (fileConfig.yaml) within the
crowdsecmiddleware atcrowdsecLapiKey
Then, ensure that you have restarted the CrowdSec as well as Traefik Docker containers to reflect all changes. You may do so via the following commands:
# restart traefik
docker compose up -f <path-to-traefik-compose> -d --force-recreate

# restart crowdsec
docker compose up -f <path-to-crowdsec-compose> -d --force-recreate
Restarting Traefik and CrowdSec
You may want to check the following too:
- Inspect container logs and ensure that everything looks fine.
- Exec into the CrowdSec container and ensure you can read and access the bind mounted Traefik logs at
/var/logs/traefik/traefik.log. - Ensure that the CrowdSec container data is properly written onto disc at the defined bind mount volume path. Ensure that you have correctly added parsing of the Traefik logs at the
/crowdsec/etc/acquis.yamlconfig file.
If all checks went fine and CrowdSec as well as Traefik work as intended, you can start simulating an attack.
Attack Simulation
This attack will simulate forceful browsing to enumerate juicy directories and files on one of your proxied web services by Traefik. It should be detected by CrowdSec easily by the collections crowdsecurity/http-probing and crowdsecurity/http-bad-user-agent at least.
The attack can be executed under Linux (Kali preferable) via Gobuster. Afterwards, your IP address should be banned and you cannot access the service anymore. To execute the attack, you can use the following command:
gobuster dir -k -e -fr -w /usr/share/wordlists/dirbuster/directory-list-2.3-small.txt -u https://service.example.com/Gobuster Forceful Browsing Attack
Alternatively, you can manually ban and unban an IP address. Keep reading.
Manual IP Banning
To ban or unban an IP address manually in CrowdSec, you can use the following CSCLI commands via Docker exec:
# manually ban an ip address
docker exec crowdsec cscli decisions add --ip <IP>

# manually unban an ip address
docker exec crowdsec cscli decisions remove --ip <IP>
Manually banning and unbanning
Inspecting Results
Once an attack is detected by CrowdSec, it will be reflected in the container logs + metrics. The attacking IP address will be banned and not be able to access your web service(s) anymore. The attacker will obtain a 403 Forbidden error message.
The IP ban either comes from a local decision (unknown threat actor but attack scenario detected); or from a remote decision based on CrowdSec's Cyber Threat Intelligence (CTI). The default banning time is 4 hours.
Moreover, you can configure CrowdSec for exponential banning. May read this and see the profile format documentation here. You basically uncomment the
duration_expr key within the profiles.yaml configuration file of CrowdSec. Restart the container and that's it!You can inspect the container logs as follows:
# change directory where your crowdsec compose file resists
cd <path-to-crowdsec-compose-file>

# inspect logs
docker compose logs -f | grep -i "performed\|ban on Ip"
Inspecting CrowdSec container logs
A typical ban log entry (local decision) looks like this:
crowdsec  | time="2024-10-22T08:12:07Z" level=info msg="Ip 52.178.177.18 performed 'crowdsecurity/http-probing' (11 events over 508.624879ms) at 2024-10-22 08:12:07.778997344 +0000 UTC"
crowdsec  | time="2024-10-22T08:12:07Z" level=info msg="Ip 52.178.177.18 performed 'crowdsecurity/http-bad-user-agent' (11 events over 508.624879ms) at 2024-10-22 08:12:07.778997344 +0000 UTC"
crowdsec  | time="2024-10-22T02:54:50Z" level=info msg="(localhost/crowdsec) crowdsecurity/http-probing by ip 52.169.227.122 (IE/8075) : 4h ban on Ip 52.169.227.122"
crowdsec  | time="2024-10-22T02:54:50Z" level=info msg="(localhost/crowdsec) crowdsecurity/http-bad-user-agent by ip 52.169.227.122 (IE/8075) : 4h ban on Ip 52.169.227.122"
Example CrowdSec log during a ban
Finally, you can also inspect CrowdSec's metrics via Docker exec:
# inspect metrics
docker exec crowdsec cscli metrics
Inspect CrowdSec metrics
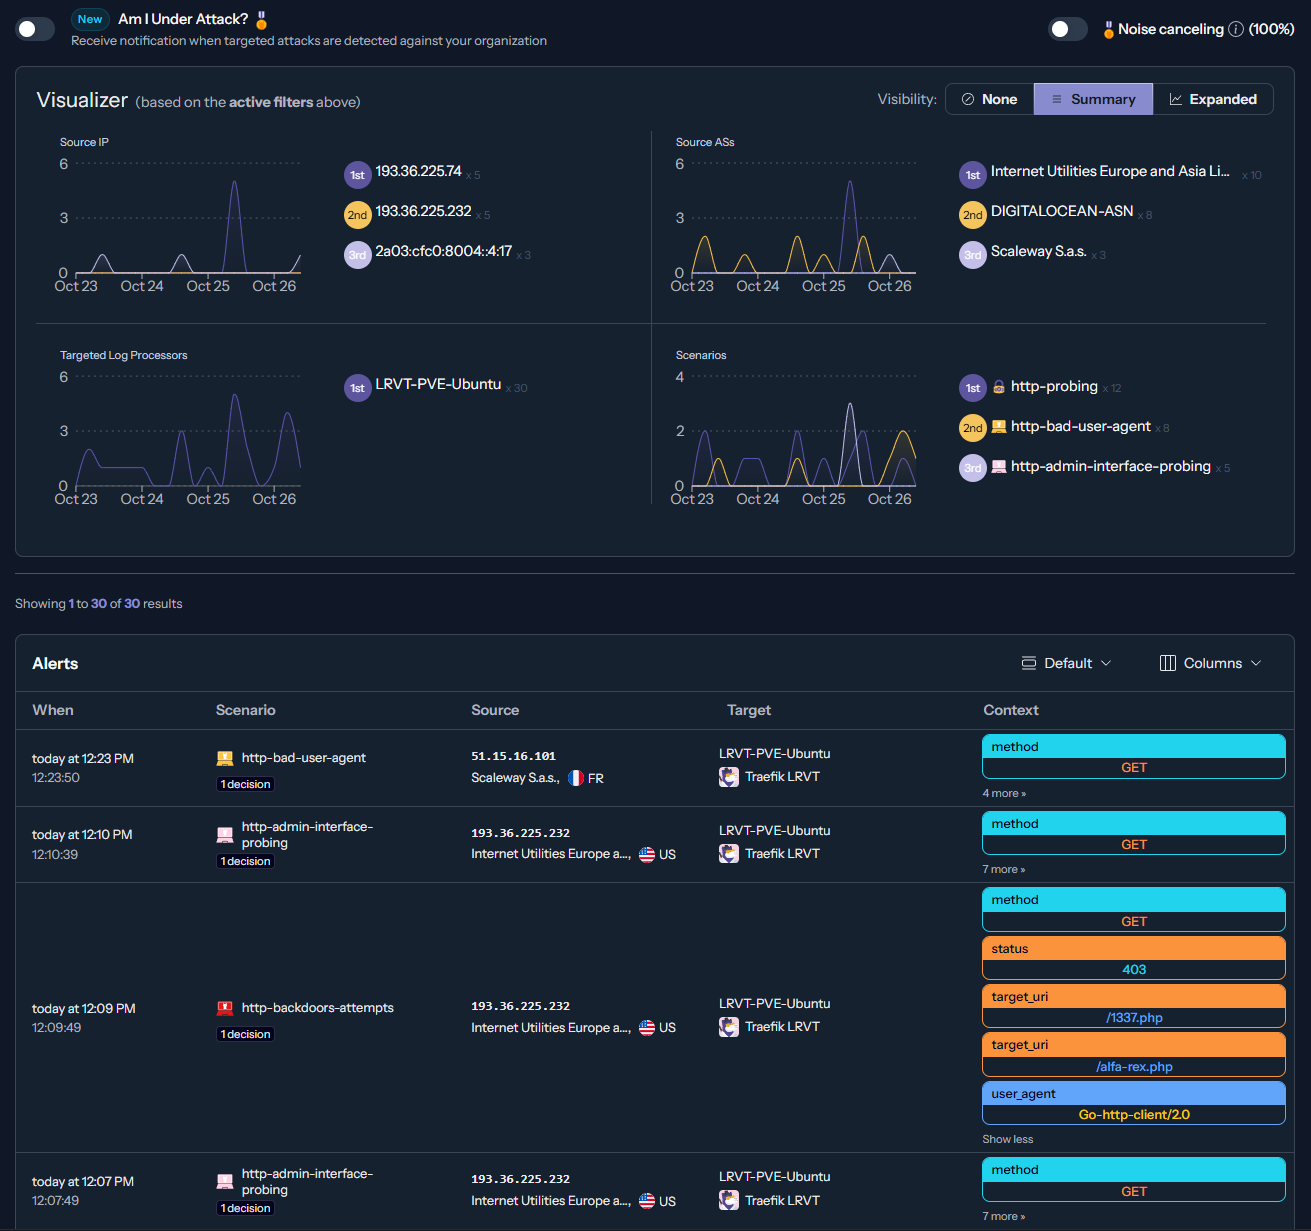
Later on, the attacks detected by local decision-making will also be visible on CrowdSec's web console under "Alerts". It will be shared with the CrowdSec community too. Moreover, if configured, you should also receive a notification about the IP ban (e.g. via Telegram or E-Mail).
CrowdSec's cloud security panel will list a lot of additional information about an IP ban, such as IP reputation, what the attacking IP is known for, MITRE ATT&CK TTPs, CVE references and many more stuff. Go check it out!
Final Words
By following this blog post you have successfully implemented CrowdSec for your Traefik reverse proxy. CrowdSec will now happily protect your web services via remote and local decision-making.
Before your web services can be accessed by someone, the CrowdSec bouncer within Traefik will audit the visitor's IP address against local and remote decisions. If everything is fine, access is granted. If not, the HTTP request is instantly blocked. Additionally, the CrowdSec container will parse your Traefik logs as well as your Linux auth.log as well as syslog files for suspicious patterns. If it finds some, the threat actor's IP address will be added to the decision database and finally banned too.
Limitations
Please note that the IP banning is currently limited to the Traefik bouncer. Therefore, only your exposed web services by Traefik are protected. In case CrowdSec detects a bruteforcing attack on SSH via your local auth.log file, the IP address will be banned but only checked by the Traefik bouncer. This way, the threat actor cannot access your web services anymore but would still be able to access your SSH network service.
To prevent this scenario, you likely want to install additional bouncers like a local firewall bouncer for iptables or nftables:
On Debian/Ubuntu systems, the installation is straight-forward:
# add crowdsec repositories to your apt sources
curl -s https://install.crowdsec.net | sudo sh

# install the firewall bouncer (nftables here)
sudo apt install crowdsec-firewall-bouncer-nftables

# create a new bouncer api key and make note of it
docker exec crowdsec bouncer add firewall-bouncer

# adjust firewall bouncer config
sudo nano /etc/crowdsec/bouncers/crowdsec-firewall-bouncer.yaml
# 1. add the bouncer api key to the firewall-bouncer config
# > api_key: <YOUR-API-KEY>
# 2. configure the api url to the mapped port of the crowdsec container
# > api_url: http://127.0.0.1:9876/

# restart the service
sudo service crowdsec-firewall-bouncer restart

# confirm new bouncer 'firewall-bouncer' is active
docker exec crowdsec cscli bouncer list
CrowdSec firewall bouncer installation
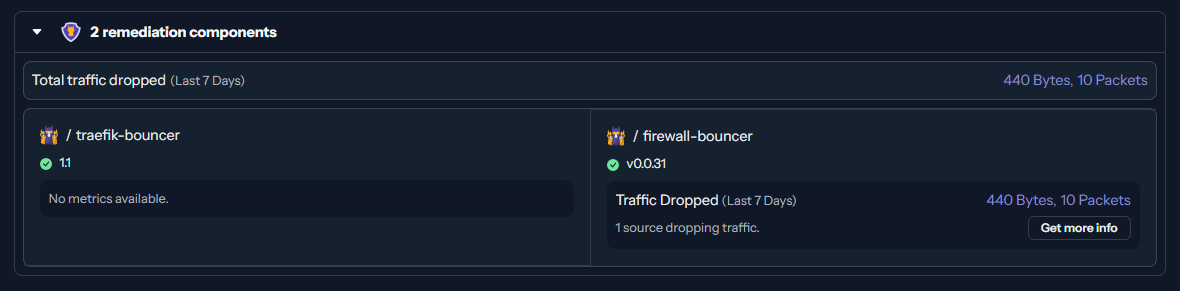
From now on, the firewall bouncer will regularly reach out to your CrowdSec Docker container and fetch new or deleted decisions. It will access the locally mapped HTTP API endpoint on TCP/9876 - as outlined in the Docker Compose file above. It will then ban or unban IP addresses accordingly via iptables or nftables, depending on which bouncer you have installed.
Your SSH and other network services are now also protected via general firewalling.

Want to build a Threat Intelligence (TI) dashboard with CrowdSec metrics now? May read this:


Discussion