


Vaultwarden is an alternative implementation of the Bitwarden server API written in Rust. It is compatible with the regular upstream Bitwarden clients such as the Desktop apps for Windows, MacOS and Linux as well as the Android and iOS mobile applications.
It is a more lightweight implementation of the official Bitwarden password manager solution and perfect for self-hosted deployments where running the official resource-heavy Bitwarden services might not be possible. It runs on Docker and supports various architectures such as ARM and AMD. This allows spawning your own password manager instance by e.g. using a small Raspberry Pi single-board computer.
 dani-garcia
What You Will End Up With
In this blog post we will focus on securing a Vaultwarden Docker instance with a dockerized Fail2ban IDS container. With this setup you will be able to detect and effectively block automated login attacks by malicious threat actors which try to gain unauthorized access. Furthermore, you will learn about implementing Telegram notifications about actual IP bans.
This can be an additional protection mechanism besides having multi factor authentication enabled as well as email notifications when a successful login occurs from an unknown device or new location.
Setup and Installation
In order to secure and harden a Vaultwarden docker instance, we first have to get an instance up and running. Furthermore, we are going to use an open-source tool called Fail2ban, also running as Docker container, in order to detect and prevent malicious hacking attempts on our password manager's login area based on log data.
Note that I will not explain how Docker works or how to adjust a Docker compose configuration file. Feel free to browse the web to keep on learning.
Spawning a Vaultwarden Docker Instance
You can use the following exemplary docker-compose.yml to spawn a Vaultwarden instance with persisted data. Please adjust the volume mappings as well as the SMTP settings to enable mail communication.
version: "3"

services:
  vaultwarden:
    container_name: vaultwarden
    hostname: vaultwarden
    expose:
      - 80
    dns:
      - 1.1.1.1
    environment:
      - globalSettings__mail__replyToEmail=<SMTP-REPLY-ACCOUNT>
      - globalSettings__mail__smtp__host=<SMTP-SERVER>
      - globalSettings__mail__smtp__username=<SMTP-ACCOUNT>
      - globalSettings__mail__smtp__password=<SMTP-PASSWORD>
      - globalSettings__mail__smtp__ssl=true
      - globalSettings__mail__smtp__port=587
      - globalSettings__disableUserRegistration=true
      - LOG_FILE=/data/logs/access.log
      - WEBSOCKET_ENABLED=true
      - ROCKET_ENV=prod
      - ROCKET_WORKERS=10
      - TZ=Europe/Berlin
      - LOG_LEVEL=error
      - EXTENDED_LOGGING=true
    image: vaultwarden/server:latest
    restart: unless-stopped
    volumes:
      - <PATH-ON-YOUR-SERVER-FOR-PERSISTED-DATA>:/data
      - <PATH-ON-YOUR-SERVER-TO-STORE-LOGDATA>:/data/logs
docker-compose.yml
Afterwards, start the Docker container with the following command:
docker compose up -dCF-Connecting-IP.If you are using Nginx Proxy Manager as reverse proxy, please add the following configuration to the advanced section of all your proxy hosts behind Cloudflare:
real_ip_header CF-Connecting-IP;Spawning a Fail2ban Docker Instance
You can use the following exemplary docker-compose.yml to spawn a Fail2ban instance with persisted data. We will use a Docker image provided by crazymax and utilize the host network of our server. Please adjust the volume mappings and environment variables to your needs.
version: "3"

services:
  fail2ban:
    container_name: fail2ban
    hostname: fail2ban
    cap_add:
      - NET_ADMIN
      - NET_RAW
    environment:
      - TZ=Europe/Berlin
      - F2B_DB_PURGE_AGE=14d
    image: crazymax/fail2ban:latest
    network_mode: host
    restart: unless-stopped
    volumes:
      - <PATH-ON-YOUR-SERVER-FOR-PERSISTED-DATA>:/data
      - <PATH-ON-YOUR-SERVER-WITH-VAULTWARDEN-LOGS>:/var/log
docker-compose.yml
Afterwards, start the Docker container with the following command:
docker compose up -dConfiguring Fail2ban
Upon starting our Fail2ban Docker container, we will notice four new folders at the persisted data storage we defined in the above docker-compose.yml file:
- action.d
- db
- filter.d
- jail.d
These folders are necessary and used to define our actual Fail2ban configuration in order to detect malicious behavior in log files as well as ban the IP address of misbehaving threat actors. Note that the db folder can be ignored for now since it only holds the sqlite3 database for Fail2ban.
Put the following configuration file called jail.local inside the jail.d directory. This is our main configuration file for Fail2ban. It defines various settings for our jails such as which log file to monitor and when as well as how long a threat actor should be banned. Adjust to your needs and liking. Consult the Fail2ban documentation for more details regarding configuration options and syntax.
[DEFAULT]
# "bantime.increment" allows to use database for searching of previously banned ip's to increase a
# default ban time using special formula, default it is banTime * 1, 2, 4, 8, 16, 32...
bantime.increment = true

# "bantime.rndtime" is the max number of seconds using for mixing with random time
# to prevent "clever" botnets calculate exact time IP can be unbanned again:
bantime.rndtime = 2048

# following example can be used for small initial ban time (bantime=60) - it grows more aggressive at begin,
# for bantime=60 the multipliers are minutes and equal: 5 min, 30 min, 1 hour, 5 hour, 12 hour, 1 day, 2 day
bantime.multipliers = 1 5 30 60 300 720 1440 2880

[vaultwarden_login_bruteforce]
enabled = true
ignoreip = 173.245.48.0/20 103.21.244.0/22 103.22.200.0/22 103.31.4.0/22 141.101.64.0/18 108.162.192.0/18 190.93.240.0/20 188.114.96.0/20 197.234.240.0/22 198.41.128.0/17 162.158.0.0/15 104.16.0.0/12 172.64.0.0/13 131.0.72.0/22 2400:cb00::/32 2606:4700::/32 2803:f800::/32 2405:b500::/32 2405:8100::/32 2a06:98c0::/29 2c0f:f248::/32 127.0.0.0/8 10.0.0.0/8 172.16.0.0/12 192.168.0.0/16
filter = vaultwarden_login_bruteforce
logpath = /var/log/<YOUR-MAPPED-VOLUME-PATH>/access.log
# this action bans every IP via DOCKER-USER chain. So the IP won't be able to access docker containers!
# Note: This only works for containers that don't use the dockernet MACVLAN interface
chain = DOCKER-USER
banaction = action-ban-docker-vaultwarden-bruteforce
			action-ban-cloudflare
# after three failed login attempts
maxretry = 3
# during a time span of 300 seconds
findtime = 300
# if detected, ban first occurence for 600s
bantime = 600
/jail.d/jail.local
ignoreip parameter. This ensures that we are not banning ourselves or our CDN provider by accident.Put the following configuration file called vaultwarden_login_bruteforce.conf inside the filter.d directory. This configuration file is used to define which Vaultwarden log entries are relevant for Fail2ban to monitor and act on:
[Definition]

failregex = ^.*Username or password is incorrect\. Try again\. IP: <ADDR>\. Username: <F-USER>.*</F-USER>\.$

ignoreregex =
/filter.d/vaultwarden_login_bruteforce.conf
failregex parameter specifies a typical log entry format of a failed Vaultwarden login attempt. If such entries occur multiple times, it is an indicator of an ongoing brute force attack to gain unauthorized access.Finally, put the following two configuration files inside the action.d directory.
The first configuration file is used to ban threat actors on Cloudflare itself using the Cloudflare API. This is only necessary if you are using Cloudflare as CDN provider with the orange cloud symbol enabled for your Vaultwarden DNS entry. If so, please adjust the below configuration file and define your Cloudflare API credentials at the last two configuration lines.
#
# Author: Mike Rushton
#
# IMPORTANT
#
# Please set jail.local's permission to 640 because it contains your CF API key.
#
# This action depends on curl (and optionally jq).
# Referenced from http://www.normyee.net/blog/2012/02/02/adding-cloudflare-support-to-fail2ban by NORM YEE
#
# To get your CloudFlare API Key: https://www.cloudflare.com/a/account/my-account
#
# CloudFlare API error codes: https://www.cloudflare.com/docs/host-api.html#s4.2
[Definition]
# Option: actionstart
# Notes.: command executed on demand at the first ban (or at the start of Fail2Ban if actionstart_on_demand is set to false).
# Values: CMD
#
#actionstart = bash /data/action.d/telegram_notif.sh -a start
# Option: actionstop
# Notes.: command executed at the stop of jail (or at the end of Fail2Ban)
# Values: CMD
#
#actionstop = bash /data/action.d/telegram_notif.sh -a stop
# Option: actioncheck
# Notes.: command executed once before each actionban command
# Values: CMD
#
actioncheck =
# Option: actionban
# Notes.: command executed when banning an IP. Take care that the
# command is executed with Fail2Ban user rights.
# Tags: <ip> IP address
# <failures> number of failures
# <time> unix timestamp of the ban time
# Values: CMD
#
# API v1
#actionban = curl -s -o /dev/null https://www.cloudflare.com/api_json.html -d 'a=ban' -d 'tkn=<cftoken>' -d 'email=<cfuser>' -d 'key=<ip>'
# API v4
actionban = curl -s -o /dev/null -X POST <_cf_api_prms> \
-d '{"mode":"block","configuration":{"target":"<cftarget>","value":"<ip>"},"notes":"Fail2Ban <name> [<bantime>s]"}' \
<_cf_api_url>
#bash /data/action.d/telegram_notif.sh -b <ip> -r "above reasons on Cloudflare - <name>"
# Option: actionunban
# Notes.: command executed when unbanning an IP. Take care that the
# command is executed with Fail2Ban user rights.
# Tags: <ip> IP address
# <failures> number of failures
# <time> unix timestamp of the ban time
# Values: CMD
#
# API v1
#actionunban = curl -s -o /dev/null https://www.cloudflare.com/api_json.html -d 'a=nul' -d 'tkn=<cftoken>' -d 'email=<cfuser>' -d 'key=<ip>'
# API v4
actionunban = id=$(curl -s -X GET <_cf_api_prms> \
"<_cf_api_url>?mode=block&configuration_target=<cftarget>&configuration_value=<ip>&page=1&per_page=1¬es=Fail2Ban%%20<name>" \
| { jq -r '.result[0].id' 2>/dev/null || tr -d '\n' | sed -nE 's/^.*"result"\s*:\s*\[\s*\{\s*"id"\s*:\s*"([^"]+)".*$/\1/p'; })
if [ -z "$id" ]; then echo "<name>: id for <ip> cannot be found"; exit 0; fi;
curl -s -o /dev/null -X DELETE <_cf_api_prms> "<_cf_api_url>/$id"
#bash /data/action.d/telegram_notif.sh -u <ip> -r "above reasons on Cloudflare - <name>"
_cf_api_url = https://api.cloudflare.com/client/v4/user/firewall/access_rules/rules
_cf_api_prms = -H 'X-Auth-Email: <cfuser>' -H 'X-Auth-Key: <cftoken>' -H 'Content-Type: application/json'
[Init]
cftoken = <CF-API-TOKEN>
cfuser = <CF-USER-EMAIL>
cftarget = ip
[Init?family=inet6]
cftarget = ip6 /action.d/action-ban-cloudflare.conf
Alternatively or additionally, use the following configuration file if you want to ban the threat actor's IP address via iptables on your server directly. Note that we have to use the DOCKER-USER chain, since we are using Docker containers only.
Furthermore, we will utilize the iptable's netfilter extension to ban the real IP address of a threat actor in the X-Forwarded-For header. This is necessary if you are running Vaultwarden behind one or multiple proxies such as Cloudflare > Reverse Proxy > Vaultwarden Docker instance. Iptables can only see the source IP address of packets, namely the IP of your proxy, but not the real visitor's IP address commonly defined in HTTP headers like X-Real-IP or X-Forwarded-For etc.

Note: Newer OS versions seem to use nftables only. Since nftables do not support string matching, your IP bans via fail2ban are not effective. Install and configure legacy iptables if you want to use this feature. Otherwise, you have to use Cloudflare and its API for banning.
You can list kernel modules with the command
ls /lib/modules/`uname -r`/kernel/net/netfilter/ and search for the required xt_string.ko kernel module. If you do not get a hit, your kernel seems not yet to support iptables' string matching extension.[Definition]
actionban = iptables -I DOCKER-USER -m string --algo bm --string 'X-Forwarded-For: <ip>' -j DROP
actionunban = iptables -D DOCKER-USER -m string --algo bm --string 'X-Forwarded-For: <ip>' -j DROP/action.d/action-ban-docker-vaultwarden-bruteforce.conf
If all configuration files are set up, please restart the Fail2ban Docker container to reflect all changes. For example via the following bash command:
sudo docker-compose up --force-recreateRestarting the Fail2ban container
Configuring Telegram Notifications
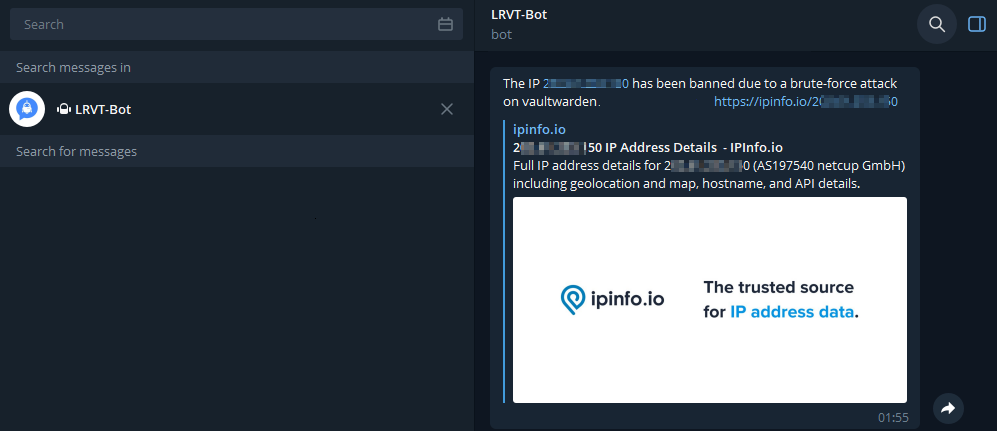
Note that you can specify multiple actionban and actionunban actions. Currently, we only ban a misbehaving IP address of a threat actor via iptables and the Cloudflare API. However, we can also implement additional Telegram notifications about actual IP bans.
For this, append an additional line of code at the actionban and actionunban definitions, which calls a shell script that sends Telegram notifications. As an example, a proper configuration should then look like this:
[Definition]

actionstart = bash /data/action.d/telegram_notif.sh -a start
actionstop = bash /data/action.d/telegram_notif.sh -a stop

actionban = iptables -I DOCKER-USER -m string --algo bm --string 'X-Forwarded-For: <ip>' -j DROP
			bash /data/action.d/telegram_notif.sh -b <ip> -r "a brute-force attack for '<F-USER>' on vaultwarden (<name>)"

actionunban = iptables -D DOCKER-USER -m string --algo bm --string 'X-Forwarded-For: <ip>' -j DROP
			  bash /data/action.d/telegram_notif.sh -u <ip>
Implementing Telegram Notifications in /action.d/action-ban-docker-vaultwarden-bruteforce.conf
The corresponding bash script to send notifications via your Telegram bot can be obtained via the following file download. Place the script within the action.d directory and define your Telegram API token and chat ID inside the script.
Testing our Setup
Finally, we should test our Fail2ban IDS setup for proper configuration and that it really works. Head over to your mobile phone, disconnect from your local Wi-Fi network and start using a mobile LTE connection. This ensures that your soon to be made malicious requests are not originating from a whitelisted IP address within the ignoreip parameter of the jail.local Fail2ban configuration file.
Then proceed accessing your Vaultwarden instance via your mobile web browser. Start inserting a valid Vaultwarden login username (important!) but an invalid user password and click login. Proceed with these invalid login attempts (at least 10 times since this is the current threshold defined in Fail2ban) until you notice a ban of your IP address. You should not be able to access the Vaultwarden web vault anymore from your mobile phone.
Also consult the Fail2ban Docker logs for more details. You should see a log entry notifying you about an IP address (your LTE IP) behaving maliciously. You can also login at Cloudflare and inspect the WAF or firewall rules to confirm an actual IP ban on Cloudflare CDN.

To unban yourself again, use the following bash command inside the Fail2ban docker container:
fail2ban-client set vaultwarden_login_bruteforce unbanip <YOUR-IP>Unbanning an IP address in Fail2ban Docker container
Additional Recommendations
Besides protecting the login area of Vaultwarden, I recommend further security improvements in general:
- Enable 2FA for all of your Vaultwarden accounts and backup your 2FA recovery codes.
- Enable emergency access for all of your Vaultwarden accounts.
- Whitelist Cloudflare IPv4 and IPv6 IP addresses on your reverse proxy only and deny any other requests not originating from Cloudflare CDN.
- Implement additional Fail2ban jails and filters to monitor for excessive HTTP requests resulting in 404/403 HTTP errors. Generally known as forceful browsing hacking attempts to identify interesting HTTP endpoints, directories and files.
- Regularly backup your Vaultwarden data. For example by ttionya/vaultwarden-backup or Bruceforce/vaultwarden-backup. Adhere to the popular 3-2-1 backup policy.


Discussion